Monday, February 28, 2022

HELLO LADYBUG GIFT TOTE with the LADYBUG BUILDER PUNCH - Stampin' Up!


Hi Friends!
My project today is a Gift Tote that measures   6 x 3 1/2  x  1 1/2".  I used  Hello Ladybug stamp set, the Ladybug Builder Punch, Abstract Beauty Designer Series Paper and the Beautiful Shapes dies.


I started with a piece of Real Red Cardstock sized  10 1/2  x  7 1/2".
I scored the  10 1/2"  side at:
1 1/2,  5,  6 1/2  and  10"/
I scored the  7 1/2" side at:
1 1/2  then
I scored only the small sections at:
4 1/2".
To cut and put the tote together you can watch my Video Tutorial Here.
Below is a picture of how your Cardstock should look after scoring and cutting.
Do not put the box together before cutting the handles.


I attached a piece of Abstract Beauty Designer Series Paper sized
6  x  2 3/4" to a piece of Basic Black Cardstock sized  6  x  3"  with Stampin' Seal.
I cut the handle in the Basic Black Cardstock and DSP using a die from the Beautiful Shapes dies.
Then I attached the DSP and Cardstock to the front of the tote with Stampin' Seal.
Then I placed the die over the holes in the DSP in order to cut the handles in the Real Red Cardstock.
I cut the back handle after I cut the front.


I cut two ladybugs from Basic Black and Real Red Cardstocks using the Ladybug Builder Punch.
I stamped the Dots on the wings with the image from Hello Ladybug stamp set and Tuxedo Black Ink.
I used the Real Red Cardstock label that I cut out when I cut the back handle for the sentiment.
I stamped the 2 sentiment, from Hello Ladybug stamp set, onto the label with Tuxedo Black Ink.


I cut 4 sets of wings from Granny Apple Green Cardstock to use as wings.
I cut one set of the leaves apart.
I placed the leaves on the front of the box the way I wanted them and then attached them with Liquid Glue.
I attached the sentiment and Ladybugs with Dimensionals.
For the final touch I added 3 Yellow Matte Decorative Dots.


Supplies:
Hello Ladybug stamp set
Ladybug Builder Punch
Abstract Beauty Designer Series Paper
Beautiful Shapes dies
Real Red Cardstock
Basic Black Cardstock
Granny Apple Green Cardstock
Tuxedo Black Ink
Real Red Faux Linen Ribbon
Matte Decorative Dots
Simply Scored
Take You Pick Tool
Stampin' Seal
Liquid Glue
Tear and Tape

Thank you for visiting my Blog today.  I hope you enjoyed my Ladybug Tote.
See you next time!

Love and Hugs,
Cathryn

Friday, February 25, 2022

DRIVING BY NESTING BOX with YOU'RE A PEACH - Stampin' Up!


Hi Friends!
My project today is a tall nesting box that measures
6 1/2  x  2 1/2  x  1 1/4".   I used Driving By stamp set, You're a Peach Designer Series Paper, Layering Circle dies and Pale Papaya 1/2" Woven Ribbon.  I put a pair of Children's Sunglasses inside the box.  It will also fit a Gift Card and/or some treats.


I started with a piece of Calypso Coral Cardstock
for the bottom of the box sized  8 x 6 3/4".
I scored the  8" side at:
1/2,  3,  4 1/4  and  6 3/4".
I scored the  6 3/4" side at:
1 1/4".
Below is a picture of how your Cardstock should look after scoring and cutting.


Next I made the top of the box with a piece of You're a Peach Designer Series Paper sized  8  x  5 3/4".
I scored the 8" side at:
1/2,  3,  4 1/4  and  6 3/4".
I scored the  5 3/4" side at:
1 1/4".
Below is a picture of how your DSP should look after scoring and cutting.
To see how I put the box together you can watch my Video Tutorial Here.


I stamped the sentiment, from Driving By stamp set, onto Basic White Cardstock with Tuxedo Black Ink.
I used a smooth circle from the Layering Circle dies to cut the sentiment out.  I made sure the sentiment was as low in the circle as it would fit.


I stamped the Car Image, from Driving By stamp set,  onto Basic White Cardstock with Tuxedo Black Ink.
I colored the car only with Stampin' Blends.
Light Pale Papaya for the trim.
Dark Pale Papaya for the body of the car,
Light Pool Party for the windows and headlight.
Light Smokey Slate for the hub caps.
Dark Smokey Slate for the tires.


I fussy cut the Car out by hand and attached it above the sentiment with Dimensionals.
I cut a scalloped circle from Calypso Coral Cardstock using the Layering Circle dies.
I attached the two circles together with Liquid glue.


I slid the box together and tied 1/2" Pale Papaya Woven Ribbon around the top of the box and tied a bow at the front.
I attached the circle to the front of the box with Dimensionals.
For the final touch I added 3 Pale Papaya Jewels around the car.


Supplies:
Driving By stamp set
You're a Peach Designer Series Paper
Layering Circle dies
Calypso Coral Cardstock
Basic White Cardstock
Tuxedo Black Ink
Light and Dark Pale Papaya Stampin' Blends
Light and Dark Smokey Slate Stampin' Blends
Light Pool Party Stampin' Blend
Pale Papaya 1/2" Woven Ribbon
2021-2023 In Color Jewels
Tear and Tape
Liquid Glue
Glue Dots
Dimensionals
Simply Scored
Take Your Pick Tool
Sunglasses from Target Dollar Spot

Thank you for visiting my Blog today!  I hope you enjoyed my box tutorial.
See you next time.

Love and Hugs,
Cathryn

Wednesday, February 23, 2022

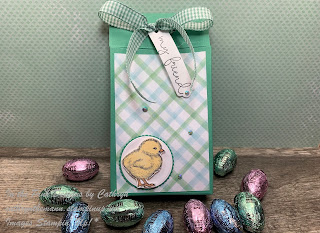
FOIL EASTER EGG TREAT HOLDER with EASTER FRIENDS - Stampin' Up!


Hi Friends!
My project today is a Treat Holder that holds Mini Foil Easter Egg Chocolates.  It measures  5  x  2 3/4  x  1".  I used Easter Friends stamp set, Abstract Beauty Designer Series Paper, Layering Circle dies and Seasonal Label dies.


I started with a piece of Just Jade Cardstock sized  8 x 6".
I scored the 8" side at:
1,  3 3/4,  4 3/4  and  7 1/2".
I scored the 6" side at:
1  and  5".
To cut and put the box together you can watch my Video Tutorial Here.
Below is a picture of how your Cardstock should look after scoring, cutting and rounding the corners of the tops with the Detail Trio Punch.


I attached pieces of Abstract Beauty Designer Series Paper to the box.
(2)  2 1/2  x  3 3/4" for the front and back.
I attached the DSP to the box with Liquid glue.


I stamped off the Chick image, from Easter Friends stamp set, onto scrap paper first.  Then I stamped it again onto Basic White Cardstock.
I colored the Chick with Stampin' Blends.
Light Pumpkin Pie for the Feet and Beak.
Light So Saffron for the Chick.
I fussy cut the Chick image out by hand.


I stamped the sentiment onto Basic White Cardstock with Tuxedo Black Ink.  I cut the sentiment out using the smallest label from Seasonal Labels dies.
I punched holes in both side of the top flaps of the box and put 10 Hershey's Foil Chocolate Eggs inside.
I punched a hole in the end of the Sentiment Label.
I ran Just Jade Gingham Ribbon, from the Flowers for Every Season Ribbon Combo Pack, through the holes and slid the tag on one side.  Then I tied the bow at the front.


I cut a smooth circle (about 1 3/8") from Basic White Cardstock and a scalloped circle from Just Jade Cardstock using the Layering Circle dies.
I attached them together with Liquid Glue.
I used a Mini Dimensional on the Chicks feet and a Dimensional on its body to attach the chick to the Basic White Circle.


I attached the Chick and circles to the bottom left side of the box with Liquid Glue.
For the final touch I added three 2021-2023 In Color Jewels to the box around the Chick and one at the end of the sentiment.


Supplies:
Easter Friends stamp set
Abstract Beauty Designer Series Paper
Layering Circle dies
Seasonal Label dies
Detail Trio Punch
Just Jade Cardstock
Basic White Cardstock
Flowers For Every Season Ribbon Combo Pack
2021-2023 In Color Jewels
Tuxedo Black Ink
Light So Saffron Stampin' Blend
Light Pumpkin Pie Stampin' Blend
Tear and Tape
Liquid Glue
Mini Dimensionals
Dimensionals
Simply Scored
Take Your Pick Tool
Small Hole Punch

Thank you for visiting my Blog today!  I hope you enjoyed my Treat Holder.
See you next time.

Love and Hugs,
Cathryn

Monday, February 21, 2022

LET'S SET SAIL NAUTICAL GIFT BOX with ABSTRACT BEAUTY - Stampin' Up!


Hi Friends!
My project today is a square box that measures  3 1/2  x  3 1/2  x  1 1/4".  I used the new Let's Set Sail stamp set and Sailboat Builder Punch along with Abstract Beauty Designer Series Paper.
I will put some Salt Water Taffy and a Gift Card inside for my recipient.


I started with a piece of Night of Navy Cardstock sized
10 3/4  x  7".
I scored the  10 3/4" side at:
1 1/4,  4 3/4,  6  and  9 1/2".
I scored the  7" side at:
1/2,  1 3/4,  5 1/4  and  6 1/2".
To cut and put the box together you can watch my Video Tutorial Here.
Below is a picture of how your Cardstock should look after scoring and cutting.


I attached Abstract Beauty Designer Series Paper to the box.
(1)  3 1/4  x  3 1/4"  for the top.
(4)  3 1/4  x  1"  for the outside front flap and sides.
I attached the DSP to the box with Liquid Glue.


I cut 2 of the largest Hexagons from the Beautiful Shapes dies.  One from the flip side of the same Piece of Abstract Beauty DSP that is on the box and one from Night of Navy Cardstock.
I stamped the bottom of the DSP Hexagon with the long stamp from Let's Set Sail stamp set using Balmy Blue Ink.
I stamped the Seagulls to the upper left corner with Tuxedo Black Ink.
I attached the DSP Hexagon to the Night of Navy Hexagon, slightly off to the left, with Liquid Glue.


I stamped the Sailboat using 3 stamps from Let's Set Sail stamp set.
I stamped the Boat and Mast with Night of Navy.
I stamped both Sails with Balmy Blue.
I cut the Sailboat pieces out using the Sailboat Builder Punch.
I attached the Mast and Boat to the Hexagons with Liquid Glue.
I attached the Sails with a Mini Dimensional in the middle and Liquid Glue on the top and bottom.


I attached the entire embellishment to the middle of the box top with Dimensionals.
I stamped the sentiment onto Basic White Cardstock with Tuxedo Black Ink.  I cut the bottom only of the sentiment out by hand and attached it to the bottom, just touching the bottom of the hexagons, with 3 Mini Dimensionals.
I punched 2 holes in the front flap and matching ones in the body of the box with a 1/8" hole punch.
I cut 2  12" pieces of Blue Twine, from Fan Bakers Twine, through the holes and tied a bow at the front.
For the final touch I added 3 Night of Navy Holiday Rhinestone Basic Jewels onto the box.


Supplies:
Let's Set Sail stamp set
Sailboat Builder Punch
Abstract Beauty 4 x 6 Designer Series Paper
Beautiful Shapes dies
Night of Navy Cardstock
Basic White Cardstock
Night of Navy Ink
Balmy Blue Ink
Tuxedo Black Ink
Fan Baker's Twine
Holiday Rhinestone Basic Jewels
Liquid Glue
Tear and Tape
Mini Dimensionals
Dimensionals
Simply Scored
Take Your Pick Tool

Thank you for visiting my Blog today.  I hope you enjoyed my project using the Let's Set Sail Bundle.
See you next time.

Love and Hugs,
Cathryn

Friday, February 18, 2022

SPRING MANiCURE GIFT BAG with EASTER FRIENDS - Stampin' Up!


Hi Friends!
My project today is a Spring Gift Bag that measures  3 1/4  x  6  x  1 1/2".  I made my own Designer Series Paper for this bag using the Happy Hedgehogs stamp set.  I also used Easter Friends stamp set, Tailor Made Tags dies, Dots Embossing Folder and Loose Flower Flourishes.


I started with a piece of Crumb Cake Cardstock sized
10  x  7 1/2".
I scored the 10" side at:
1/2,  3 3/4,  5 1/4  and  8 1/2".
I scored the  7 1/2" side at:
1 1/2.
Before folding and cutting the Cardstock I stamped the Tree image, from Happy Hedgehogs stamp set, onto the Crumb Cake Cardstock with Crumb Cake Ink.
To cut and put the box together you can watch my Video Tutorial Here.


I cut a large tag from Fresh Freesia Cardstock using the Tailored Made Tags dies.
I embossed the tag using the Dots Embossing Folder from the Dots and Checks Embossing Folders set.


I stamped the Bunny image, from Easter Friends stamp set, onto Crumb Cake Cardstock with Crumb Cake Ink.  I fussy cut the image out by hand.
I attached the Bunny to the tag with Dimensionals.


I cut two holes in the top of the bag with a hole punch.
I put Fine Art Ribbon and Fresh Freesia Open Weave Ribbon together, put it through the holes in the top and tied a bow at the front.


I tied two 12" pieces of Linen Thread to the tag and tied it around the bow.
I added 3 Pastel Pearls to the bottom left side of the bag.
For the final touch I added a Fresh Freesia Loose Flower Flourish to the top of the Bunny's ear with a Glue Dot.


Supplies:
Easter Friends stamp set
Happy Hedgehogs stamp set
Tailor Made Tags dies
Dots Embossing Folder
Crumb Cake Cardstock
Fresh Freesia Cardstock
Crumb Cake Ink
Fine Art Ribbon
Fresh Freesia Open Weave Ribbon
Linen Thread
Pastel Pearls
Loose Flower Flourishes
Tear and Tape
Liquid Glue
Glue Dots
Dimensionals
Simply Scored
Take Your Pick Tool
Hole Punch
Manicure Items

Thank you for visiting my Blog today!  I hope you enjoyed my Bunny Bag.
See you next time.

Love and Hugs,
Cathryn
Wednesday, February 16, 2022

EASTER FRIENDS LABEL TOPPED BOX with FLOWERING FIELDS - Stampin' Up!


Hi Friends!
My project today is an Easter Gift Box that measures
3 1/2  x  5 1/4  x  1".  I used Easter Friends stamp set, Seasonal Labels dies, Layering Circles dies, Rectangle Stitched dies, Flowering Fields Designer Series Paper and the Gingham Embossing Folder.


I started with a piece of Highland Heather Cardstock sized
9 1/2  x  6 1/4".
I scored the  9 1/2" side at:
1,  4 1/2,  5 1/2  and  9".
I scored the 6 1/4" side at:
1".


I cut out the largest label, from Seasonal Labels dies, from Highland Heather Cardstock.
I scored the 3" side at:
1 and 2".
I embossed the label using the Gingham Embossing Folder.
To cut and put the box together you can watch my Video Tutorial Here.


I attached 4 pieces of Flowering Fields Designer Series Paper to the box.
(2)  3 1/4  x  5"  for the front and the back.
(2)  3/4  x  5"  for the sides.
I attached the embossed label to the back of the box with Liquid Glue.


I cut a smooth circle from Basic White Cardstock using and a Scalloped circle from Highland Heather Cardstock using the Layering Circle dies.
I attached them together withLiquid Glue.
I stamped the Chick Image onto scrap paper first and then on to Basic White Cardstock with Tuxedo Black Ink.
I colored the image with Stampin' Blends.
Light Pumpkin Pie for the Beak and Feet.
Light So Saffron for the rest of the Chick.
I fussy cut the image out by hand.
I attached the image to the circles with Dimensionals.


I stamped the sentiment, from Easter Friends stamp set, onto Basic White Cardstock with Tuxedo Black Ink.
I cut the sentiment out using a Rectangle from the Rectangle Stitched dies.
I attached the sentiment at the bottom of the front of the box with Liquid Glue.
I attached the Duck and Circles above the sentiment with Dimensionals.


I attached two 3/8" Adhesive Velcro Dots to the inside of the label and the body of the box for a closure.


I ran 3/4" Frayed Edges Ribbon around the flap and tied a bow at the top.
For the final touch I added 3 Purple Pastel Pearls around the Duck.


Supplies:
Easter Friends stamp set
Seasonal Labels dies
Layering Circles dies
Rectangle Stitched dies
Flowering Fields Designer Series Paper
Gingham Embossing Folder
Highland Heather Cardstock
Basic White Cardstock
Tuxedo Black Ink
Pastel Pearls
3/4" Frayed Ribbon
Light So Saffron Stampin' Blend
Light Pumpkin Pie Stampin' Blend
Liquid Glue
Tear and Tape
Dimensionals
Simply Scored
Take Your Pick Tool
3/8" Adhesive Velcro Dots

Thank you for visiting my Blog today!  I hope you enjoyed my tutorial.
See you next time.

Love and Hugs,
Cathryn

Tuesday, February 15, 2022

SPRING FLIP TOP BOX with HAPPY HEDGEHOGS STAMP SET - Stampin' Up!


Hi Friends!
My project today is a flip top box that measures  5  x  2 1/4  x  1 1/2".  I used Happy Hedgehogs stamp set, Rectangle Stitched dies, Sunshine and Rainbows Designer Series Paper, 3/4" Frayed Ribbon and 2021-23 In Color Jewels.


I started with a piece of Balmy Blue Cardstock
sized  8  x 7 3/4".
I scored the 8" side at:
1/2,  2 3/4,  4 1/4  and  6 1/2".
I scored the  7 3/4" side at:
1 1/2,  5 1/4  and  6 1/2".
To cut and put the box together you can watch my Video Tutorial Here.
Below is a picot of what your Cardstock should look like after scoring and cutting.


I attached several pieces of Sunshine and Rainbows Designer Series Paper to the box.
(2)  2  x  3 1/2"  for the front and back.
(2)  3 1/2  x  1 1/4"  for the sides.
(2)  2 x 1"  for the front flap and back of the top.
I attached the DSP to the box with Liquid Glue.


I attached 3/8" Adhesive Velcro Dots under the flap and the inside top of the box for the closure.
I tied 3/4" Frayed Ribbon under the front flap and tied a bow at the outside.
I cut a Rectangle from Basic White Cardstock using the Rectangle Stitched dies.
I stamped the images, from Happy Hedgehogs stamp set, onto the Stitched Rectangle with Tuxedo Black Ink.


I colored the images with Stampin' Blends.
Light and Dark Balmy Blue for the Bird.
Light and Dark So Saffron for the Mushroom.
Light Old Olive for the Grass and Leaf.
Light Flirty Flamingo for the Flower.
Light Smokey Slate for the Bird's Beak.
For the final touch I added 2021-2023 In Color Jewels to the box.
1 Soft Succulent to the middle of the Flower.
3 Pale Papaya around the images.


Supplies:
Happy Hedgehogs stamp set
Rectangle Stitched dies
Sunshine and Rainbows Designer Series Paper
3/4" Frayed Ribbon
2021-2023 In Color Jewels
Balmy Blue Cardstock
Basic White Cardstock
Tuxedo Black Ink
Light and Dark Balmy Blue Stampin' Blends
Light and Dark So Saffron Stampin' Blends
Light Smokey Slate Stampin' Blend
Light Flirty Flamingo Stampin' Blend
Light Mossy Meadow Stampin' Blend
Tear and Tape
Liquid Glue
Dimensionals
Simply Scored
Take Your Pick Tool
3/8" Adhesive Velcro Dots

Thank you for visiting my Blog today!  I hope you enjoyed my Spring Gift Box.
See you next time.

Love and Hugs,
Cathryn