Wednesday, November 23, 2022

SWEET GINGERBREAD TRUFFLE PINK GIFT BOX with SNOWFLAKE SPECIALTY VELLUM - Stampin' Up!


Hi Friends!
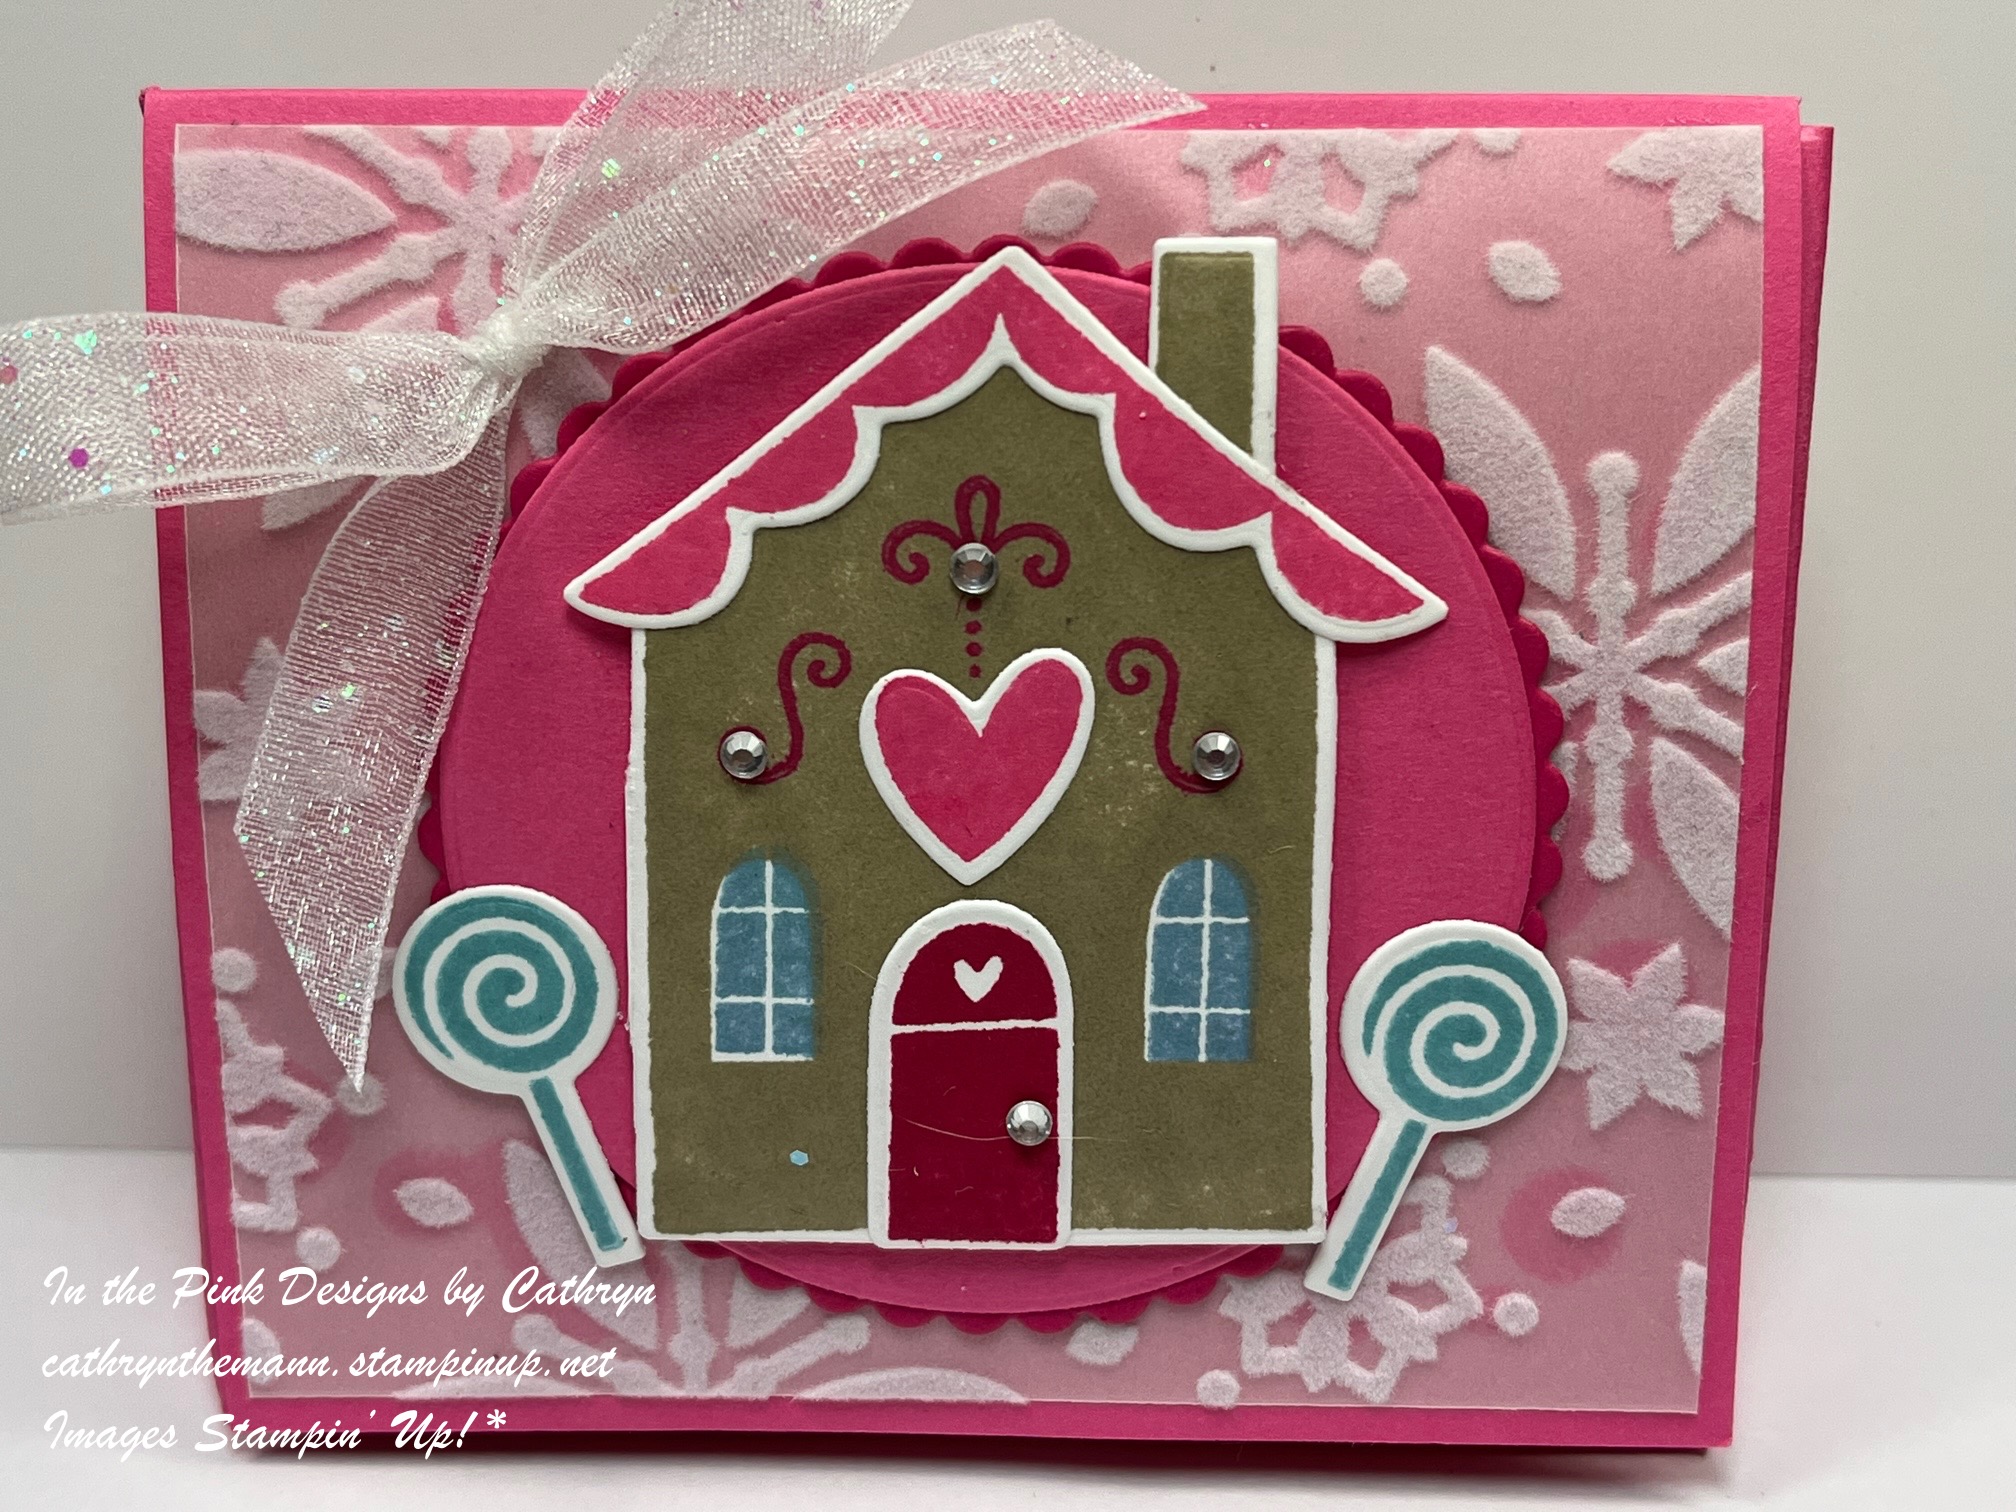
My project today is a triangle gift box that holds 4 Truffles.  It measures  4  x  3 1/2  x  1 1/4".  I used Sweet Gingerbread stamp set, Gingerbread House dies, Layering Circle dies, Snowflake Specialty Vellum and Celebrate Everything Host Designer Series Paper.


I started with a piece of Polished Pink Cardstock sized
11  x  8 1/4".
I scored the  11" side at:
1/2,  4 1/2,  5 3/4  and  9 3/4".
I scored the  8 1/4" side at:
1 1/4  and  4 3/4".
To cut and put the box together you can watch my Video Tutorial Here.
Below is a picture of what your Cardstock should look like after scoring and cutting.


I attached 2 pieces of Snowflake Specialty Vellum to the box.
(2)  3 3/4  x  3 1/4"
I attached the Vellum to the front and back of the box by putting Liquid Glue onto the back where the images will cover the Glue.
I attached 2 pieces of Celebrate Everything Host Designer Series Paper to the inside of the box.
(2)  3 3/4  x  3 1/4".
I attached the DSP to the box with Liquid Glue.


I stamped the pieces of the Gingerbread House onto Basic White Cardstock using the Sweet Gingerbread stamp set.
House  -  Crumb Cake Ink
Windows and Lollipops  -  Balmy Blue Ink
Scroll Work and Door  -  Melon Mambo Ink
Roof and Heart  -  Polished Pink Ink
I cut the pieces out using the Gingerbread House dies.


I cut 2 circles out using the Layering Circle dies.
A Polished Pink Cardstock Circle sized  2 5/8".
A Melon Mambo Cardstock Scalloped Circle sized  2 3/4".
I attached them together with Liquid Glue.
I attached the Gingerbread House pieces together with Liquid Glue and attached it to the circles with Dimensionals.


I attached the entire piece to the front of the box with Dimensionals.
I attached the Lollipops to the sides of the house with Liquid Glue.
I added 5/8" Adhesive Velcro Dots to the inside flaps for the closure.


I cut the Chimney Smoke from Basic White Cardstock using the Gingerbread House dies.
I stamped the sentiment to the middle of the die cut with Balmy Blue Ink.
I attached the Chimney Smoke to the inside of the box with Liquid Glue.


I tied a bow with Glittered Organdy Ribbon and attached it to the upper right side of the box with 2 Glue Dots and Liquid Glue.
For the final touch I added Rhinestone Basic Jewels to the Scroll Work and for a Door Knob.


Supplies:
Sweet Gingerbread stamp set
Gingerbread House dies
Layering Circle dies
Snowflake Specialty Vellum
Celebrate Everything Host Designer Series Paper
Polished Pink Cardstock
Basic White Cardstock
Crumb Cake Ink
Melon Mambo Ink
Balmy Blue Ink
Polished Pink Ink
Glittered Organdy Ribbon
Rhinestone Basic Jewels
Tear and Tape
Liquid Glue
Dimensionals
Glue Dots
5/8" Adhesive Velcro Dots

Thank you for visiting my Blog today.  I hope you enjoyed my Pink Gingerbread House.
See you next time!

Love and Hugs,
Cathryn

Tuesday, November 22, 2022

MINI POCKET ENVELOPE GIFT BOX with DECORATED HAPPINESS - Stampin' Up!


Hi Friends!
My project today is a Gift Box that I made to fit 3 of the Mini Pocket Envelopes.  I put a Gift Card in one, and a Ghirardelli Square in the other 2.  It measures  2 1/2  x  4 1/4  x  1".  I used the Mini Pocket Envelope dies, Decorated with Happiness stamp set, Decorated Pine dies, Santa Express Designer Series Paper and Real Red and White Glimmer Paper.


I started with a piece of Poppy Parade Cardstock sized
7 1/2  x  6 3/4".
I scored the  7 1/2" side at:
2 1/2,  3 1/2,  6  and  7".
I scored the  6 3/4" side at:
1,  5 1/4  and  6 1/4".
To cut and put the box together you can watch my Video Tutorial Here.
Below is a picture of how your Cardstock should look after scoring, cutting and rounding the corners of the top flap.


I attached 6 pieces of Santa Express Designer Series Paper to the box.
(2)  2 1/4  x  4"  front and back.
(2)  3/4  x  4"  long sides.
(2)  2 1/4  x  1/4"  short sides.
I attached the DSP to the box with Liquid Glue.


I cut 2 branches from Garden Green Cardstock using the Decorated Pines dies.
I cut the bottom off one and cut two sprigs from the other.
I put the full one on the top left of the box and the two loose springs on the bottom right with Liquid Glue.


I cut a Rectangle (1 1/2  x  1 7/8") from Basic White Cardstock using the Mini Pocket Envelope dies.
I stamped the sentiment, from Decorated with Happiness stamp set, onto the rectangle with Shaded Spruce Ink.
I cut another rectangle from Real Red Glimmer Paper sized  1 3/4  x  2 1/8".
I attached the two rectangles together with Liquid Glue.
I attached the whole piece to the middle of the box, over the greens, with Dimensionals.


I tied a bow with Real Red 3/8" ribbon and attached it to the upper right side of the box with Glue Dots and Liquid Glue.
I cut an Ornament from White Glimmer Paper using the Decorated Pine dies.
I tied Silver Trim through the hole in the top of the ornament and tied a bow.
I attached the Ornament to the middle of the bow and side of the sentiment with Liquid Glue.


I added an Iridescent Rhinestone Basic Jewel to the top and the two bottom sprigs.
I cut 3 Mini Pocket Envelopes from different sheets of Santa Express Designer Series Paper, folded them and put them together with Liquid Glue.
I put a Gift Card in one and a Ghirardelli Chocolate Square in the other two.
I put them all in the box together.


Supplies:
Mini Pocket Envelope dies
Decorated with Happiness stamp set
Decorated Pine dies
Santa Express Designer Series Paper
Real Red & White Glimmer Paper
Poppy Parade Cardstock
Basic White Cardstock
Shaded Spruce Ink
Real Red & Garden Green 3/8" Ribbon Combo Pack
Simply Elegant Trim
Iridescent Rhinestone Basic Jewels
Tear and Tape
Liquid Glue
Dimensionals
Glue Dots
Simply Scored
Take Your Pick Tool
Corner Rounder
Small Circle Punch

Thank you for visiting my Blog today.  I hope you enjoyed my Mini Envelope Gift Box.
See you next time!

Love and Hugs,
Cathryn

Friday, November 18, 2022

WREATH CHOCOLATE SANTA TREAT BOX with SANTA'S TRAIN DIES - Stampin' Up!


Hi Friends!
My project today is a Treat Box that holds a Chocolate Santa inside.  It measures  4 3/4  x  2 1/4  x  1/2".  I used Santa's Delivery stamp set, Santa's Train dies, Santa Express Designer Series Paper, Sweetest Christmas Designer Series Paper, Stylish Shapes dies and Rectangle Stitched dies.


I started with a piece of Poppy Parade Cardstock sized
6  x  5 1/4".
I scored the  6" side at:
1/2,  2 3/4,  3 1/4  and  5 1/2".
I scored the  5 1/4" side at:
1/2  and  4 1/2".
To cut and put the box together you can watch my Video Tutorial Here.
Below is a picture of how your Cardstock should look after scoring and cutting.


I attached 2 pieces of Sweetest Christmas Designer Series Paper to the box.
(2)  2 1/8  x  3 7/8".
I attached the DSP to the box with Liquid Glue.
I punched 2 holes in the top of the box with a 1/8" hole punch.
I ran Glittered Organdy Ribbon Through the holes and tied a bow at the front of the box.


I cut a piece of Santa Express Designer Series Paper to  3 1/8  x  1 3/4" using the Rectangle Stitched dies.
I cut 2 wreath pieces using the Santa's Train dies.
1 from Shaded Spruce Cardstock and 1 from Garden Green Cardstock.
I attached the wreath pieces together using Liquid Glue and my Silicone Mat.


I stamped the sentiment, from Santa's Delivery stamp set, onto Basic White Cardstock.
I cut the sentiment out with a label die from the Stylish Shapes dies.
I cut the label down to  1 1/2" from the bottom.  I flagged the ends of the top and attached it to the bottom of the Wreath.
I attached the Wreath and banner to the middle of the Stitched Rectangle with Liquid Glue.


I attached the Stitched Rectangle to the box with Dimensionals.
I tied 2 pieces of Linen Thread into a small bow and attached it to the bottom of the wreath with Liquid Glue.
I added 5 Real Red Rhinestone Basic Jewels to the Wreath and for the final touch I added 3 Iridescent Rhinestone Basic Jewels above the Stitched Rectangle.


Supplies:
Santa's Train dies
Santa's Delivery stamp set
Santa Express Designer Series Paper
Sweetest Christmas Designer Series Paper
Stylish Shapes dies
Rectangle Stitched dies
Poppy Parade Cardstock
Shaded Spruce Cardstock
Garden Green Cardstock
Basic White Cardstock
Real Red Ink
Glittered Organdy Ribbon
Linen Thread
Red Rhinestone Basic Jewels
Iridescent Rhinestone Basic Jewels
Silicone Mat
Simply Scored
Take Your Pick Tool
1/8" Hole Punch

Thank you for visiting my Blog today.  I hope you enjoyed my Wreath Treat Box.
See you next time!

Love and Hugs,
Cathryn

Wednesday, November 16, 2022

RIBBON SLIDER HERSHEY BAR BOX with SANTA'S DELIVERY - Stampin' Up!


Hi Friends!
My project today is a Ribbon Slider Box for a Hershey Bar.  I used Santa's Delivery stamp set, Santa's Train dies and Santa Express Designer Series paper.


I started with a piece of Real Red Cardstock sized
7  x  6 1/2".
I scored the  7" side at:
1/2".
I scored the  6 1/2" side at:
1/2,  3,  3 1/2  and  6".
To cut and put the box together you can watch my Video Tutorial Here.
Below is a picture of how your Cardstock should look after scoring and cutting.


I attached 2 pieces of Santa Express Designer Series Paper to the box.
(2)  6 3/8  x  2 3/8".
I attached the DSP to the front and back of the box with Liquid Glue.
I punch a hole in the edge of each side of the box, about 1/4" from the edge, with a 1/4" hole punch.
I ran Real Red Ribbon through both holes, then slid my Hershey Bar into the box on top of the ribbon.
I tied a knot in the ribbon and tied a bow.


I stamped the images, Santa's Delivery stamp set, onto Basic White Cardstock with Tuxedo Black Ink.
I colored the images with Stampin' Blends.
Top of Train Cars and Flag  -  Dark Cherry Cobbler
Bottom of Train Cars  -  Light and Dark Granny Apple Green
Bottom of Santa's Hat, Eyebrows, Mustache and Beard  -  Light Smokey Slate and a Color Lifter to blend.
Top of Santa's Hat, side Presents and Middle Present's Bow, Candy Canes  -  Dark Real Red
Tree and Middle Present  -  Dark Shaded Spruce
Wheels and Straps on Tree  -  Dark Smokey Slate
Tree Trunk  -  Dark Soft Suede
Star and Penguins Beak  -  Daffodil Delight
Outside of Penguin  -  Light Basic Black
Penguins Flippers  -  Dark Pumpkin Pie
I cut the images out using the Santa's Train Dies.
I cut the Train Tracks from Smokey Slate Cardstock.


I cut 2 rectangles out using the Deckled Rectangle dies.
Smallest Rectangle  -  Basic White Cardstock
Next Smallest Rectangle  -  Real Red Cardstock
I stamped the sentiment onto the Basic White Cardstock with Real Red Ink.
I attached the Rectangles together with Liquid Glue and attached them to the back of the box.
I attached the Penguin to the left side of the Rectangles.


I added Matte Black Dots to the middle of the tires, some Wink of Stella to the Tree and Presents and for the final touch I added Rhinestone Basic Jewels to the Presents and Candy Canes.


Supplies:
Santa's Delivery stamp set
Santa's Train dies
Santa Express Designer Series Paper
Real Red Cardstock
Basic White Cardstock
Smokey Slate Cardstock
Tuxedo Black Ink
Real Red Ink
Stampin' Blends
Real Red & Garden Green 3/8" Ribbon Combo Pack
Rhinestone Basic Jewels
Matte Black Dots
Wink of Stella
Dimensionals
Mini Dimensionals
Liquid Glue
Tear and Tape
1/4" Hole Punch

Thank you for visiting my Blog today.  I hope you enjoyed my Ribbon Slider Box.
See you next time!

Love and Hugs,
Cathryn

Tuesday, November 15, 2022

ALL BUNDLED UP RACCOON DOVE CHOCOLATE BOX with DECKLED RECTANGLE DIES - Stampin' Up!


Hi Friends!
My project today is a Treat Box that holds 6 Dove Chocolates.  It measures  3 3/4  x  2 1/2  x  1/2".  I used All Bundled Up stamp set,  Basic Borders dies, Deckled Rectangle dies, Sweetest Christmas Designer Series Paper and Snowflake Specialty Vellum.


I started with a piece of Real Red Cardstock sized
6 1/2  x  6".
I scored the 6 1/2" side at:
1/2,  3,  3 1/2  and  6".
I scored the  6" side at:
1/2,  4 1/4  and  4 3/4".
To cut and put the box together you can watch my Video Tutorial Here.
Below is a picture of how your Cardstock should look after scoring, cutting and cutting the edge of the back flap with the Basic Borders dies.


I cut 2 Rectangles from Sweetest Christmas Designer Series Paper using the Deckled Rectangle dies.
They measure approximately  2 1/8  x  3 1/2".
I attached them to the front and back of the box with Liquid Glue.
I attached Adhesive Backed Velcro Dots to the back flap and body of the box for a closure.
I wound Glittered Organdy Ribbon around the short side of the box and tied a bow on the left side.


I stamped the Raccoon, from All Bundled Up stamp set, onto Basic White Cardstock with Tuxedo Black Ink.
I colored the image with Stampin' Blends.
Light and Dark Smokey Slate  -  Raccoon.
Light Petal Pink  -  Inside Ears
Light and Dark Real Red  -  Hat and Scarf
I fussy cut the image out by hand.


I cut a rectangle from Snowflake Specialty Vellum using the Deckled Rectangle dies.  It measures  1 3/4  x  3 1/8".
I attached the Raccoon onto the Vellum with Dimensionals.
I put Dimensionals on the back of the Vellum where the Raccoon was on the front (in order to hide them) and attached the entire piece to the front of the box.


I stamped the sentiment onto Basic White Cardstock with Real Red Ink.
I cut the sentiment in half at the word "lot".
I attached the beginning of the sentiment to the upper left side of the Vellum and the end to the lower right side with Mini Dimensionals and Liquid Glue.


I attached 3 Adhesive Backed Stars to the upper right of the Vellum.
I added a Red Rhinestone Basic Jewel to the middle of each star.
For the final touch I added Wink of Stella Glitter to the Scarf and Hat.


Supplies:
All Bundled Up stamp set
Basic Borders dies
Deckled Rectangle dies
Sweetest Christmas Designer Series Paper
Snowflake Specialty Vellum
Real Red Cardstock
Basic White Cardstock
Real Red Ink
Tuxedo Black Ink
Stampin' Blends
Glittered Organdy Ribbon
Adhesive Backed Stars
REd Rhinestone Basic Jewels
Dimensionals
Mini Dimensionals
Tear and Tape
Liquid Glue
Wink of Stella
Simply Scored
Take Your Pick Tool

Thank you for visiting my Blog today.  I hope you liked my Dove Chocolate Box.
See you next time!

Love and Hugs,
Cathryn

Friday, November 11, 2022

CHRISTMAS GNOME CHOCOLATE PRETZEL GIFT BOX with the GNOME DIES - Stampin' Up!


Hi Friends!
My project today is a Christmas Gnome Gift Box that holds a Chocolate Covered Pretzel that I purchased from Target.  It measures  5 x 3 x 1".  I used the Gnome dies, Dots & Spots die, Sweet Gingerbread stamp set and Gingerbread House dies.


I started with a piece of Real Red Cardstock sized
8 1/2  x  6".
I scored the  8 1/2" side at:
1/2,  3 1/2,  4 1/2  and  7 1/2".
I scored the  6" side at:
1  and  5 1/4".
To cut and put the box together you can watch my Video Tutorial Here.
Below is a picture of how your Cardstock should look after scoring, cutting and rounding the corners of the top flaps.


I die cut a piece of Crumb Cake Cardstock using the Dots & Spots Die.
After die cutting I cut the Cardstock down to 2 1/2  x  3 3/4".
I attached the Die Cut to the front of the box with Mini Dimensionals.


I die cut the Gnome out using the Gnomes dies.
Hat  -  Sweetest Christmas Designer Series Paper
Beard  -  Basic White Cardstock
Legs  -  Basic Black Cardstock
Nose  -  Petal Pink Cardstock
I put the Gnome together using my Silicone Mat and Liquid Glue.
I attached the Gnome to the Crumb Cake die cut with Mini Dimensionals and Dimensionals.


I cut 2 large boughs and 1 small one out of Garden Green Cardstock using the Decorated Pink dies.
I cut the pieces of the greens apart, stuck them in behind the Gnomes and attached them with Liquid Glue.
I stamped the small wreath, from Sweet Gingerbread stamp set, onto Basic White Cardstock using Garden Green Ink.
I cut the Wreath out using the Gingerbread House dies and attached it to the lower right side of the Gnomes Beard with Liquid Glue.


I punched 2 holes in the top flaps with a 1/8" hole punch.
I ran Garden Green Ribbon through the holes and tied a bow at the front.
I brushed some Wink of Stella onto the Pine Needles.
I added a Large Adhesive Backed Star to the Gnome's Hat, 3 Red Rhinestone Basic Jewels to the Wreath and 5 Iridescent Rhinestone Basic Jewels to the Pine Boughs.


Supplies:
Gnome dies
Dots & Spots dies
Sweet Gingerbread stamp set
Gingerbread House dies
Decorated Pine dies
Sweetest Pines Designer Series Paper
Real Red Cardstock
Crumb Cake Cardstock
Basic White Cardstock
Petal Pink Cardstock
Basic Black Cardstock
Garden Green Ink
Real Red & Garden Green Ribbon Combo Pack
Adhesive Backed Stars
Iridescent Rhinestone Basic Jewels
Red Rhinestone Basic Jewels
Tear and Tape
Liquid Glue
Dimensionals
Mini Dimensionals
Silicone Mat
Simply Scored
Take Your Pick Tool
Small Hole Punch

Thank you for visiting my Blog today.  I hope you liked my Chocolate Covered Pretzel Gift Box.
See you next time!

Love and Hugs,
Cathryn