Monday, August 31, 2020

Gather Together Borders Bakery Box - Stampin' Up!

Hi Friends!
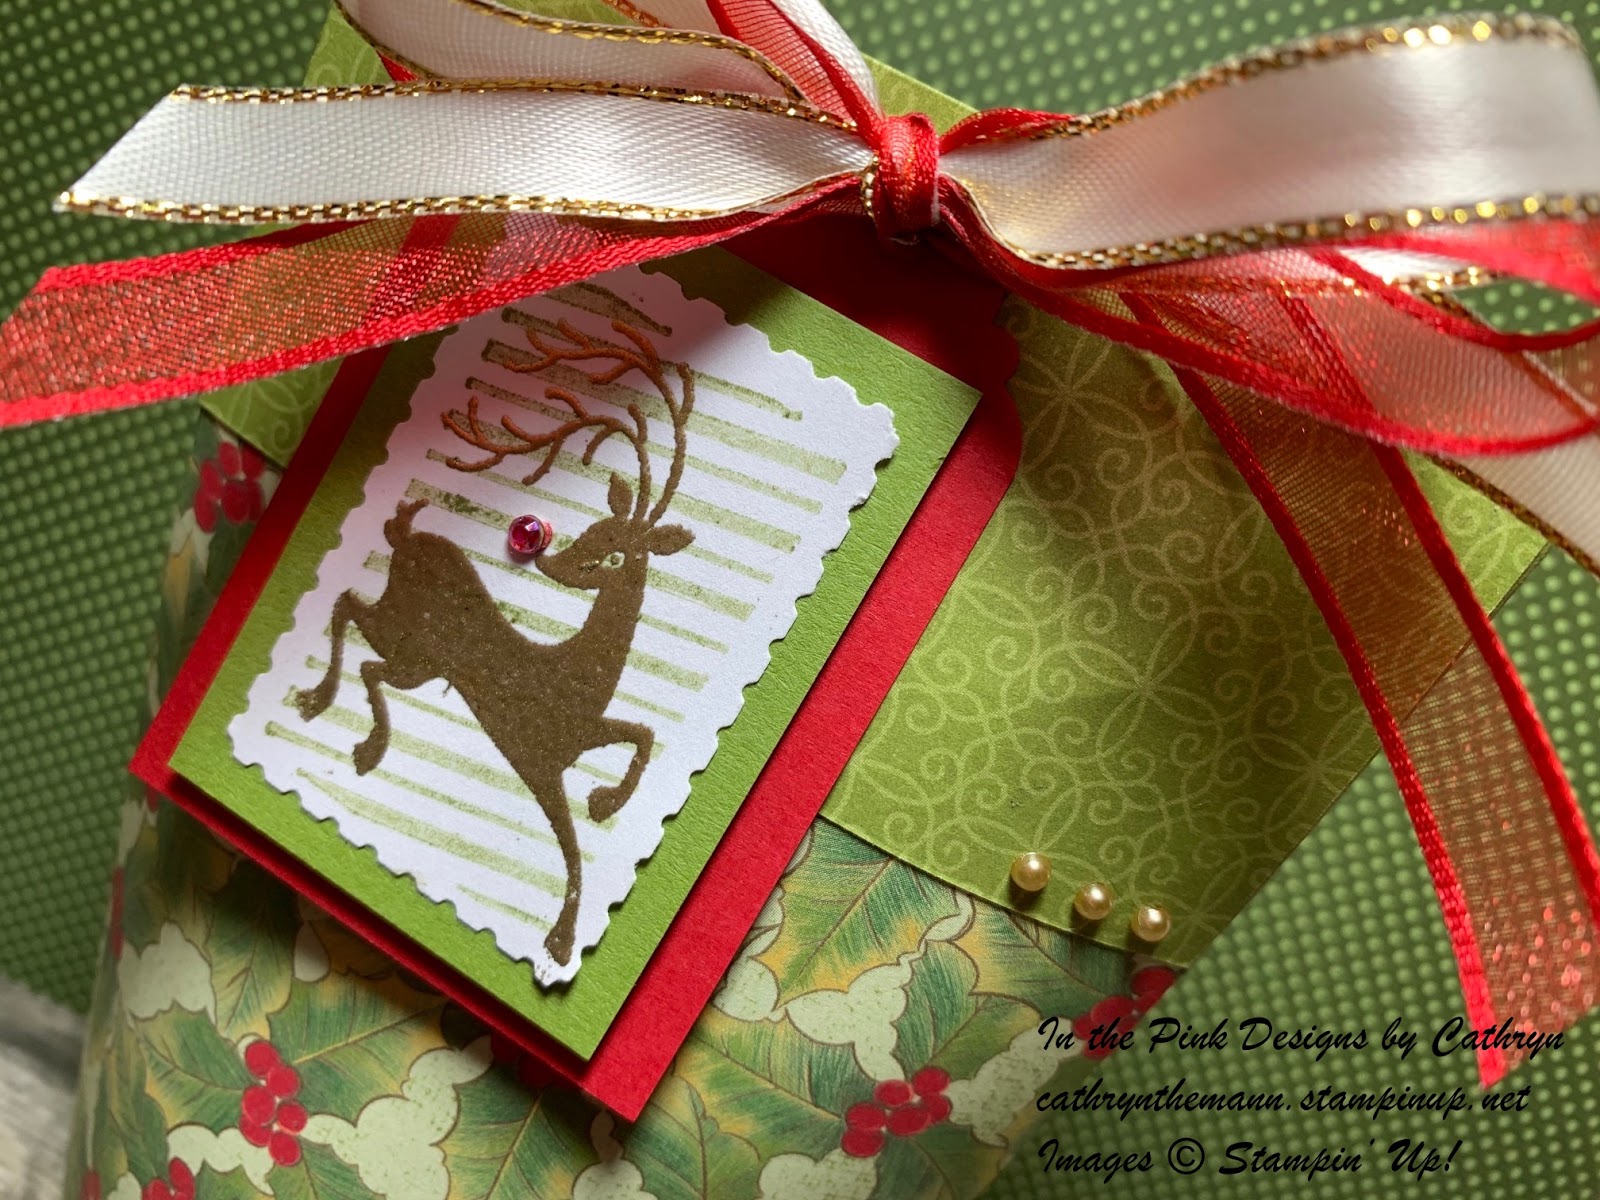
My project today is a  2 1/4  x  2 1/4"  Bakery Box that is 1" high.  I used Boundless Borders stamp set, Gather Together stamp set, North Pole Wonder dies and Gilded Autumn Specialty paper.  This box can hold 1 or 2 Reese's Peanut Butter Cups or 3 Ghirardelli Squares.


I started with a piece of Very Vanilla sized  7 1/2  x  4 1/4".
I scored the 7 1/2" side at:
1,  3 1/4,  4 1/4,  6 1/2"
I scored the 4 1/4" side at:
1 and 3 1/4"

To cut and put this box together please see my video tutorial here.


After I cut the tabs of the box I embossed the side using Boundless Borders stamp set, Versamark Ink and Gold Stampin' Emboss Powder.
I cut a piece of Early Expresso Cardstock and Gold Foil Specialty paper with a die from the North Pole Wonder dies and Embossed the sentiment from Gather Together stamp set.  I attached the gold foil piece on the back of the Sentiment piece a little lower.


I added a  2 1/8 x  2 1/8" piece of Early Espresso on to of the box and layered a piece of Specialty Designer Series Paper sized  1 7/8  x  1 7/8" on top of it.
I cleared the hole at the top of the label, ran some gold cord from Wonder of the Season Ribbon Combo Pack and tied a bow.


I ran the same cord around the box twice and tied a knot.  I put Dimenstionals on the back of label and attached it to the top of the box.


Supplies:
Borders Abound stamp set
Gather Together stamp set
North Pole Wonder dies
Gilded Autumn Specialty Designer Series Paper
Very Vanilla Cardstock
Early Espresso Cardstock
Gold Foil Paper
Versamark Ink
Gold Stampin' Embossing Powder
Wonder of the Season Ribbon Combo Pack
Tear and Tape
Stampin' Seal Adhesive
Liquid Glue
Heat Tool
Dimensionals

I hope you enjoyed my tutorial today.
See you next time!

Friday, August 28, 2020

Halloween Treat box with Little Treats stamp set - Stampin' Up!

Hi Friends!
My project today is another Halloween Treat.  This time I made a box with the Little Treat Boxes die set, Little Treats stamp set and Peed-A-Hoot die set.

You can see my Video Tutorial here.
Please Subscribe!


I started with a piece of the Brights 6x6 Designer Series Paper.  I used the Treat Box dies to cut the box out of the purple polka dot  paper, the Spider out of Basic Black Cardstock and the Scallop Circle out of Pumpkin Pie Cardstock.
I cut the Spider Web out of Basic Black Cardstock with the Peek-A-Hoot die set.


I stamped the Sentiment, also from Little Treat stamp set, with Tuxedo Black Ink.
I glued the box together with liquid adhesive and tied it with a ribbon from my stash plus Black and White twine from the Playful Pets Trim Combo Pack.


I attached the Spider Web with 1 Dimensional at the bottom of the web.  I put Liquid Glue at the top-back of the Pumpkin Pie Scallop Circle and a Dimensional on the bottom, then attached it on top of the spider web.
I also used liquid glue to attach the spider to the bottom.


For the final touch I added some Rhinestones (these are from the Noble Peacock Gems but you can color clear Rhinestones with a Highland Heather Stampin' Blend) to the bottom of the circle and some Wink of Stella to the Spider Web.


Supplies:
Little Treat stamp set
Little Treat Boxes dies
Peek-A-Hoot dies
Brights 6x6 Designer Series Paper
Pumpkin Pie Cardstock
Basic Black Cardstock
Liquid Glue
Wink of Stella
Playful Pets Trim Combo Pack
Rhinestone Basic Gems

Wednesday, August 26, 2020

Celebration Labels Halloween Treat Bags - Stampin' Up!

Hi Friends!
My project today is a Halloween Treat Bag using the Celebration Tidings stamp set, Celebration Labels dies and Brights 6x6 Designer Series Paper.

Please Subscribe!


I used the 2nd and 3rd Largest label dies from the Celebration Label die set.  I cut a piece of Melon Mambo paper from the Brights 6x6 DSP with the larger die and a piece of Whisper White Cardstock with the smaller die.


I folded the Melon Mambo label exactly in half in order to match the label ends together.
I cut the Whisper White label in half and used only 1 side per treat bag.


I did all my stamping on the Whisper White Label.
I stamped the pumpkins and Happy Haunting sentiment, from Celebration Tidings stamp set, towards the top of the label with Tuxedo Black Ink.
I stamped the spider with Tuxedo Black Ink also, then cut it out with the matching die from Celebration Label die set.

I colored the pumpkins with the Dark Pumpkin Pie Stampin' Blend and the leaves with light and dark Mossy Meadow Stampin' Blends
I added Wink of Stella glitter to the pumpkins and spider piece.
I added the spider to the bottom of the label with a Dimensional.


I filled a cellophane bag with 3 mini candy bars and some filler grass, leaving a about an inch of room at the top.
I put the Melon Mambo label over the bag and stapled it on with the ends of the staples facing forward.
I attached the stamped Whisper White piece on the front of the bag with Dimensionals.
I tied a bow with some black ribbon (from my stash, I didn't have the beautiful glitter ribbon yet) and attached it with a glue dot.
I colored some Rhinestones with the Pumpkin Pie Stampin' Blend and attached them around the label.


Supplies:
Celebration Tidings stamp set
Celebration Label die set
Brights 6x6 Designer Series Paper
Dark Pumpkin Pie Stampin' Blend
Light and Dark Mossy Meadow Stampin' Blend
Wink of Stella Glitter Pen
Rhinestone Basic Jewels
Tuxedo Black Ink
Dimensionals
Stapler
Candy
Cellophane Bag

I hope you enjoyed my project today.
See you next time!

Monday, August 24, 2020

Sunflower Box with Wreath Builder dies - Stampin' Up!

Hi Friends!
My project today is a  4 3/4  x  4 3/4  x 1 1/2"  Square lidded box.  I used the Wreath Builder dies, Arrange a Wreath Stamp set and Plaid Tidings Designer Series Paper.
I made a box but this wreath can easily be made into a card, bag or home decor piece.

You can see my video tutorial here.
I would love it if you would subscribe!


For the top of the box I started with a piece of Bumblebee Cardstock sized  6 3/4  x  6 3/4".
I scored all sides at 1"
For the Bottom of the box I used a piece of Early Espresso Cardstock sized  8  3/16  x  8  3/16".
I scored all sides at 1 3/4"
To cut and put the box together please watch my video tutorial here.


I attached a piece of the Plaid Tiding 6x6 DSP sized  4 1/2  x  4 1/2" to the top of the box.
I cut two vine wreaths using the Wreath Builder die set.  1 out of Mossy Meadow Cardstock and 1 out of Old Olive Cardstock.
I attached the wreaths with liquid adhesive to a piece of Crumb Cake Cardstock sized 3 1/2  x  3 1/2".


I stamped the greeting background from Arrange a Wreath stamp set with Crumb Cake ink that was stamped off 1 time.
The Give Thanks sentiment is from Arrange a Wreath stamp set.
The Especially for You sentiment is from Little Treats stamp set.
I stamped both sentiments with Tuxedo Black Ink.
I cut the sentiment piece out and placed it in the middle of the wreath.


I cut the Sunflowers out of Daffodil Delight Cardstock.  I used a 3/8" circle punch for the centers of the Sunflowers.
I attached the side flowers with liquid adhesive and the middle one with a Dimensional.
I tied a bow with Daffodil Delight Ruched Ribbon and attached it with a glue dot.


I attached the crumb cake square, with the wreath on it, onto a piece of Early Espresso sized 3 3/4  x  3 3/4".
I attached the entire piece to the top of the box with Dimensionals.


You can shop Stampin' Up! supplies with Me here!

Supplies:
Arrange A Wreath stamp set
Wreath Builder die set
Little Treats stamp set
Plaid Tidings 6x6 Designer Series Paper
Bumblebee Cardstock
Crumb Cake Cardstock
Early Espresso Cardstock
Whisper White Cardstock
Old Olive Cardstock
Mossy Meadow Cardstock
Crumb Cake Stampin' Pad
Tuxedo Black stamp pad
Tear and Tape
Stampin' Seal Adhesive
Liquid Adhesive
Dimenstionals
Daffodil Delight Ruched Ribbon

I hope you enjoyed my tutorial today.
See you next time!

Friday, August 21, 2020

Whale of a Time Pencil Gift Box - Stampin' Up!

Hi Friends!
My project today is a Pencil Gift Box that would be perfect for 1st day (or any day) of school Gift Giving!  I used Whale of a Time Designer Series Paper, the Whale Punch and Whale Done stamp set.


I started with a piece of Granny Apple Green Cardstock  4 1/4  x  4 5/8"
I scored the 4 1/4" side at:
1/2,  7/8,  2 3/8  and  2 3/4"
I scored the 4 5/8" side at:
3/8"
To cut and put the box together please watch my video tutorial here.


I attached (2)  4 x  1 1/4" pieces of the Whale of a Time DSP to the front and back of the box.
I put 5 pencils in a cellophane bag (optional) and slid the bottom of them into the box.


I stamped the sentiment of the Balmy Blue Cardstock with Pacific Point Ink.  I attached the sentiment piece to the Pacific Point piece with Liquid Adhesive.  I attached the entire circle piece towards the top of the box also using Liquid Adhesive.


I cut the Whale image out of the Designer Series Paper with the Whale Punch.
I attached it above the sentiment, on the pencils, with Dimensionals.
I added some Blue Adhesive Backed Gems as shown in the photo.
Finally, I tied some Snowflake Splendor 1/4" ribbon in a knot at the top of the pencils.


My Demonstrator number is: 2230782

Supplies:
Whale Done stamp set
Whale of a Time Designer Series Paper
Whale Punch
Layering Circle dies
Granny Apple Green Cardstock
Balmy Blue Cardstock
Pacific Point Cardstock
Pacific Point Stampin' Pad
Tear and Tape
Dimentionals
Snowflake Splender 1/4" Ribbon
Blue Adhesive Backed Gems
5 Pencils

I hope you enjoyed my tutorial today.
See you next time!

Thursday, August 20, 2020

Gather Together Six Sided Box - Stampin' Up!

Hi Friends!
My project today is a 6 sided box I made using the beautiful New Gilded Autumn Specialty Paper DSP.  I also used Gather Together stamp set and North Pole Wonder die set.

Please Subscribe!

I started with a piece of the Gilded Autumn Specialty paper DSP sized 6 x 8".
I scored the 8" side at:
1 1/4,  2 1/2,  3 3/4,  5,  6 1/4 and 7 1/2"
I scored the 6" side at:
1 1/2 and 4 1/2"
To cut and Put the box together please see my video tutorial here.


I punched holes in all the top pieces (see video tutorial) and threaded Copper Metallic Ribbon through the holes meeting at the front.  I put a package of nuts and raisins inside, pulled gently on both sides of the ribbon and tied a bow.


I used the North Pole Wonder die set to cut another piece of the DSP (I changed the sentiment piece from the video because the Mint Macaron Cardstock looked bright green in my pictures) and some Cajun Craze cardstock.  I stamped the sentiment on the circle with Early Espresso Ink.


I punched a hole in the Cajun Craze die cut and tied a piece of Linen Thread through it.  Next I attached the sentiment piece on top with Dimensionals.  I tied the linen thread to the Copper bow with another bow.


Supplies:
Gilded Autumn Specialty Paper
Gather Together stamp set
North Pole Wonder die set
Cajun Craze Cardstock
Gilded Gems
Tear and Tape
Basketweave and Mettaic Ribbon Combo Pack (Copper Ribbon)
Linen thread
Early Espresso Stampin' Pad
Dimentionals

Thank you for stopping by today.  I hope you enjoyed my project.
See you next time!

Monday, August 17, 2020

Ghirardelli Pumpkin Box with Everything Essential stamp set - Stampin' Up!

Hi Friends!
My project today is a box I made to fit 4 Ghirardelli Chocolates.  I used the Everything Essential stamp set and Plaid Tidings 6x6 Designer Series Paper along with some Shaded Spruce Cardstock.  The box measures 3 x 2 x 1 1/2".

You can see my video tutorial here!
Please Subscribe.


I started with a  7 1/2  x  6 1/2"  piece of Shaded Spruce Cardstock.
I scored the 7 1/2" side at:
1 1/2,  3 1/2,  5 and 7"
I scored the 6 1/2" side at:
1 1/2,  4 1/2 and 6"
To cut and put the box together please watch my video tutorial here.


I attached Plaid Tidings DSP on the box sides and top.  They are sized:
(2)   2 3/4  x  1 3/4"
(2)  2 3/4  x  1 1/4"
(1)  1 1/4  x  1 3/4"


I punched a 1 1/2" wide piece of Whisper White Cardstock with the Delightful Tag Topper Punch.  After punching the top I cut the length to 2 1/4".
I stamped the Pumpkin image with Tuxedo Black Ink.
I also punched a 1 3/4" wide piece of Pumpkin Pie Cardstock with the Delightful Tag Topper Punch and then cut it down to 2 1/2" in length.
I attached the Pumpkin stamped tag to the pumpkin pie Cardstock tag with liquid adhesive.


I stamped thebat image and also the "to" and "from" sentiments on the back of the tag.
I tied a bow around the box with Daffodil Delight Ruched Ribbon.
I tied some Linen Thread through the top of the tag and tied it to the Ribbon.
I colored some Rhinestones Basic Jewels with the Dark Shaded Spruce Stampin' Blend and attached them to the pumpkin. I also added Wink of Stella to the Pumpkin.


You can shop Stampin' Up! with Me Here!
My Demonstrator number is: 2230782

Supplies:
Everything Essential stamp set
Plaid Tidings 6x6 DSP
Whisper White Cardstock
Shaded Spruce Cardstock
Delightful Tag Topper Punch
Detail Trio Punch
Tuxedo Black Ink
Light and Dark Pumpkin Pie Stampin' Blends
Dark Shaded Spruce Blend
Rhinestone Basic Jewels
Daffodil Delight Ruched Ribbon
Linen Thread
Tear and Tape
Stampin' Seal
Liquid Adhesive
Small Circle Punch
Ghirardelli Chocolates

I hope you enjoyed my project today.
See you next time!

Friday, August 14, 2020

Festive Post Large Twisted Bag - Stampin' Up!

Hi Friends!
This is a much larger size of the Twisted Bag I did last week and it has a beautiful fold over at the top to showcase BOTH sides of the DSP.


I started with a piece of Poinsettia Place DSP sized 11 x 8 1/2"
I scored the 11" side at:
2 and 9"
I scored the 8 1/2" at:
1/2 and 4 1/2"
Turn to the opposite side of the 8 1/2" side and score ONLY to the 1st score line at:
2 and 6"

To cut and put the box together please view my video tutorial here.


I punched a piece of 2" wide Real Red Cardstock with the Delightful Tag Topper Punch.  After punching the top of the 2" side I cut the length to 3".
I stamped the line image from Festive Post stamp set on to a piece of scrap paper first, then onto  Whisper White Cardstock with Old Olive Ink.  Then I cut it out with the Rectangle Postage Stamp Punch.


When the Old Olive lines were dried I stamped the Reindeer Image from the same set with Versamark Ink.  I sprinkled the image with Gold Stampin' Emboss powder, shook it off and then heated it up with the Heat Tool.
I attached the finished, cooled image to a piece of Old Olive Cardstock sized 1 5/8  x  2 1/4", then attached it all to the red tag with Dimensitionals.


I punched 2 holes in the middle top of the closed bag.  I ran Metallic Edged Vanilla Ribbon and Real Red Sheer Ribbon together through the punched holes, attached the Tag to it and tied a bow.


I added some Metallic Pearls to the right side of the top of the bag.
I colored a Basic Rhinestone with the Dark Real Red Stampin' Blend and added it to the Reindeer's nose.


My Demonstrator Number is 2230782
Cathryn Themann

Supplies:
Festive Post stamp set
Poinsettia Place Designer Series Paper
Rectangular Postage Stamp Punch
Delightful Tag Topper Punch
Real Red Cardstock
Old Olive Cardstock
Whisper White Cardstock
Dark Real Red Stampin' Blend
Basic Rhinestones
Gold Metallic Pearls
Metallic Edged Vanilla Ribbon
Sheer Real Red Ribbon
Old Olive Stampin' Pad
Versamark Ink
Gold Stampin' Emboss Powder
Heat Tool

I hope you enjoyed my project today.
See you next time!