Friday, March 31, 2023

Very Best Treat Box with Elephant Parade - Stampin' Up!


Hi Friends!
My project today is a Treat Box I made with the Very Best Trio Punch.  It measures  4 x 4 x 1".  I also used the Elephant Parade stamp set, Elephant dies, Layering Circle dies, Something Fancy dies and Happy Forest Friends Designer Series Paper.


I started with a piece of Pear Pizzazz Cardstock sized
10 1/2  x  5".
I scored the  10 1/2" side at:
1,  5,  6  and  10".
I scored the  5" side at:
1"  and 
4" avoiding the front and back main pieces of the box.
(I use a ruler to keep my scored straight)
To cut the box you can watch my Video Tutorial Here.
Below is how your Cardstock should look after scoring and cutting.


Before putting the box together I attached 2 pieces of Happy Forest Friends Designer Series Paper to the box.
I punched the corners of the top of each piece using the Very Best Trio Punch.
(2)  3 3/4  x  3 3/4"  front and back.
I attached the DSP to the box with Liquid Glue.
Below is a picture of how your Cardstock should look after adding the Designer Series Paper.


I stamped the Elephant, Leaves and Flower from Elephant Parade stamp set onto Basic White Cardstock with Tuxedo Black Ink.
I cut the images out using the Elephant dies.
I colored the images with Stampin' Blends.
Light and Dark Smokey Slate  -  Elephant
Light Flirty Flamingo  -  Elephant's Ear and Flower
Light and Dark Old Olive  -  Leaves


I cut 2 circles out using the Layering Circle dies.
A  2 3/4" scalloped circle from Pear Pizzazz Cardstock.
A 2 5/8" circle from Happy Forest Friends DSP.
I attached them together with Liquid Glue.
I attached the Elephant to the box with Dimensionals.
I attached the Leaves and Flower to the box with Liquid Glue.
I cut some Grass from Mossy Meadow Cardstock using the Elephant dies.
I cut the grass in half and attached a piece on each side of the Elephant with Liquid Glue.


I attached the entire piece to the front of the box with Dimensionals.
I stamped the sentiment onto Sahara Sand Cardstock with Tuxedo Black Ink.
I cut the sentiment out with a label die from the Something Fancy dies.
I cut the "happy Day!" off the label and attached it to the box with a Mini Dimensional and Liquid Glue.
For the final touch I added a Classic Matte Dot to the end of the sentiment.


Supplies:
Ver Best Trio Punch
Elephant Parade stamp set
Elephant dies
Layering Circle dies
Something Fancy dies
Happy Forest Friends Designer Series Paper
Pear Pizzazz Cardstock
Sahara Sand Cardstock
Mossy Meadow Cardstock
Basic White Cardstock
Tuxedo Black Ink
Stampin' Blends
Old Olive & Sahara Sand Ribbon Combo Pack
Classic Matte Dots
Tear and Tape
Liquid Glue
Dimensionals
Simply Scored
Take Your Pick Tool

Thank you for visiting my Blog today.  I hope you enjoyed my Treat Box.
See you next time!

Love and Hugs,
Cathryn

Wednesday, March 29, 2023

RIBBON EMBELLISHED SPRING TREAT BOX with RAIN or SHINE - Stampin' Up!


Hi Friends!
My project today is a Spring Treat Box that measures  4 1/2  x  2 1/2  x  1".  I used Rain or Shine Designer Series Paper, Layering Circle dies, Natural finish Ribbon and Adhesive Backed Milky Dots.


I started with a piece of Crumb Cake Cardstock sized
7 1/2  x  7 1/4".
I scored the  7 1/2" side at:
1,  3 1/2,  4 1/2  and  7".
I scored the  7 1/4" side at:
1,  5 1/2  and  6 1/2".
To cut and put the box together you can watch my Video Tutorial Here.
Below is a picture of how your Cardstock should look after scoring and cutting.


Before I put the box together I attached 2 pieces of the Rain or Shine Designer Series Paper to the front and back of the box sized  2 1/4  x  4 1/4".
I folded the top flap flat against the inside of the box and cut two holes in the body of the box (including the flap that is folded behind).
I rounded the corners of the top flap and put the box together.


I attached 5 more pieces of Rain or Shine Designer Series Paper to the box.
(2)  2 1/4  x  4 1/4"  already attached to the front and back
(2)  3/4  x  4 1/4"  long sides
(3)  3/4  x  2 1/4"  inside and outside of top of the box (covers the holes) and bottom.
I attached the DSP to the box with Liquid Glue.


I cut 3 circles out using the Layering Circle dies.
I cut the flower image, 1 3/8", from Rain or Shine DSP.
I cut a 1 1/2" scalloped circle from Flirty Flamingo Cardstock.
I cut a 1 3/4" scalloped circle form Old Olive Cardstock.
I attached the circles together with Liquid Glue and punched a 1/4" hole in the top.
I tool a 9" piece of Natural Finish Ribbon and put it through the holes in the box with the ends on the outside.
I put the ends of the Ribbon through the top of the circles from the top through to the bottom.
I attached the Circle down to the box with Dimensionals.
For the final touch I added Mango Melody Milky Dots to the middle of the Flowers and the top/right of the box.


Supplies:
Rain or Shine Designer Series Paper
Layering Circle dies
Crumb Cake Cardstock
Flirty Flamingo Cardstock
Old Olive Cardstock
Natural Finish Ribbon
Adhesive Backed Milky Dots
Tear & Tape
Liquid Glue
Dimensionals
Simply Scored
Take Your Pick Tool
1/4" Hole Punch
Corner Rounder

Thank you for visiting my Blog today.  I hope you enjoyed my Treat Box.
See you next time!

Love and Hugs,
Cathryn

Tuesday, March 28, 2023

MINI EASTER BUNY TREAT BOX with the VERY BEST TRIO PUNCH - Stampin' Up!


Hi Friends!
My project today is a Mini Treat box that measures  3 x 3 x 1".  I used the Easter Bunny Punch, Very Best Trio Punch, Country Gingham Designer Series Paper and Awash in Beauty Designer Series Paper.


I started with a piece of Mint Macaron Cardstock sized
8 1/2  x  4 1/4".
I scored the  8 1/2" side at:
1/2,  1 1/2,  4 1/2  and  5 1/2".
I scored the  4 1/4" side at:
1,  2 3/4  and  3 1/2".
To cut and put the box together you can watch my Video tutorial Here.
Below is a picture of how your Cardstock should look after scoring, cutting, punching the slits for the Ribbon with the Very Best Trio Punch and rounding the corners of the top flaps.


I attached several pieces of Country Gingham Designer Series Paper to the box.
(2)  2 3/4  x  1 1/2"  front/bottom
(2)  1/2  x  2 3/4"  front/top
(2)  3/4  x  1 1/2"  sides
I attached the DSP to the box with Liquid Glue.


I punched a Bunny from Awash in Beauty Designer Series Paper using the Easter Bunny Punch.
I cut another Bunny from Mint Macaron Cardstock and attached them together with Liquid Glue.
I attached the Bunny to the front of the Box with Dimensionals.


I attached a Pompom from my stash to the Bunny tail with Liquid Glue.
I ran a 5" piece of Glittered Organdy Ribbon through the slits and tied a bow around it with White Baker's Twine.
For the final touch I added 3 White Opaque Adhesive Backed Gems to the top of the box.


Supplies:
Easter Bunny Punch
Very Best Trio Punch
Country Gingham Designer Series Paper
Awash in Beauty Designer Series Paper
Mint Macaron Cardstock
Glittered Organdy Ribbon
Opaque Gems
White Baker's Twine
Tear & Tape
Liquid Glue
Dimensionals
Simply Scored
 Take Your Pick Tool
Corner Rounder
Pompom

Thank you for visiting my Blog today.  I hope you enjoyed my Treat Box.
See you next time!

Love and Hugs,
Cathryn

Friday, March 24, 2023

BIG BUNNY TREAT BOX with PLAYING in the RAIN - Stampin' Up!


Hi Friends!
My project today is a Treat Box that fits a Big Bunny Russell Stover Candy.  It measures  3  x  5 3/4  x  1".  I used the Playing in the Rain stamp set and die sets, Layering Circle dies, Rain or Shine Designer Series Paper and Thick Basic White Cardstock.


I started with a piece of Thick Basic White Cardstock sized
8 1/2  x  8 1/2".
I scored the first  8 1/2" side at:
1/2,  3 1/2,  4 1/2  and  7 1/2".
I turned the paper 1/4 turn and scored the next  8 1/2" side at:
1,  6 3/4  and  7 3/4".
To cut and put the box together you can watch my Video Tutorial Here.
Below is a picture of how your Cardstock should look after scoring, cutting and rounding the corners of the top flap.


I attached several pieces of Rain or Shine Designer Series Paper to the box.
(2)  2 3/4  x  5 1/2"  front and back
(1)  2  x  5 1/2"  middle of front
(2)  3/4  x  5 1/2"  long sides
(2)  3/4  x  2 3/4"  short sides
I attached the DSP to the box with Liquid Glue.


I cut a 2 1/8" circle from Basic White Cardstock using the Layering Circle dies.
I stamped the Flowers, from Playing in the Rain stamp set, onto each side of the bottom of the circle with Tuxedo Black Ink.
I stamped the Turtle onto Basic White Cardstock with Tuxedo Black Ink also.


I colored the images with Stampin' Blends.
Light and Dark Mango Melody (or Daffodil Delight)  -  Flowers
Light Old Olive  -  Head, Arms, Legs and Spots on Shell
Dark Old Olive  -  Rest of Shell
Light and Dark Daffodil Delight  -  Belly
I cut the Turtle out using the Playing in the Rain dies.


I tied Burlap Ribbon, from the Real Red and Burlap Ribbon Combo Pack, around the box about 1 1/2" up from the bottom and tied a bow at the front.  I secured the bow with a Glue Dot behind the Knot.
I cut a 2 1/2" Scalloped Circle from Mango Melody Cardstock using the Layering Circle dies.
I attached the Flowered Circle onto the Scalloped Circle with Liquid Glue.


I attached the Turtle to the circles with Dimensionals and Mini Dimensionals.
I attached the entire piece to the front of the box in-between the Bow and top.
For the final touch I added 3 Mango Melody Milky Dots to the front of the box.


Supplies:
Playing in the Rain stamp set
Playing in the Rain dies
Rain or Shine Designer Series Paper
Thick Basic White Cardstock
Basic White Cardstock
Mango Melody Cardstock
Tuxedo Black Ink
Stampin' Blends
Real Red & Burlap Ribbon Combo Pack
Milky Dots
Tear and Tape
Liquid Glue
Glue Dot
Dimensionals
Mini Dimensionals
Corner Rounder
Small Circle Punch

Thank you for visiting my Blog today.  I hope you enjoyed my Large Treat Box.
See you next time!

Love and Hugs,
Cathryn

Wednesday, March 22, 2023

MARSHMALLOW Easter egg GIFT BOX with PETAL PARK - Stampin' Up!


Shop Stampin' Up! Here
Hi Friends!
My project today is a Treat box for a Russell Stover Marshmallow Easter egg.  It measures  3  x  4  x  1".  I used the Petal Park stamp set, Petal Park Builder Punch, Easter Bunny stamp set, Something Fancy dies, Decorative Circle Punch and Regency Park Designer Series Paper.

You can watch my Video Tutorial Here!


I started with a piece of Sweet Sorbet Cardstock sized
8 1/2  x  8".
I scored the  8 1/2" side at:
1/2,  3 1/2,  4 1/2  and  7 1/2".
I scored the  8" side at:
1,  5  and  6".
To cut and put the box together you can watch my Video Tutorial Here.
Below is a picture of how your Cardstock should look after scoring, cutting and rounding the corners of the top.


I attached several pieces of Regency Park Designer Series Paper to the box.
(2)  2 3/4  x  3 3/4"  front and back
(2)  2 3/4  x  1 3/4"  front and back of flap
(2)  3/4  x  3 3/4"  long sides
(2)  3/4  x  2 3/4"  short sides
I attached the DSP to the box with Liquid Glue.


I cut a circle from Sweet Sorbet Cardstock using the Decorative Circle Punch.
I cut another circle from Basic White Cardstock using the 2" Circle Punch.
I attached them together with Liquid Glue.
I stamped the Flowers, from Petal Park stamp set, onto Basic White Cardstock with Balmy Blue Ink.
I stamped 5 of the Leaves with Pear Pizzazz Ink.
I cut the images out using the Petal Park Builder Punch.


I attached the Flowers to the circles first with Mini Dimensionals.
Then I attached the Leaves, under the edges of the Flowers, with Liquid Glue.
I attached the top half of the circles to the front flap with Liquid Glue.
I attached a set of Low Profile Adhesive Velcro Dots to the bottom of the circle and the body of the box for the closure.


I stamped the sentiment onto Basic White Cardstock with Sweet Sorbet Ink.
I cut the sentiment out using a slanted label from Something Fancy dies.
I attached the label inside the front flap with Liquid Glue.


I tied a bow with Glittered Organdy Ribbon and attached it to the upper right of the Flowers with Glue Dots and Liquid Glue.
For the final touch I added 5 Sweet Sorbet Solid Faceted Dots to the front of the box.  Three in the middle of the Flowers and two on the bottom right.


Supplies:
Petal Park stamp set
Petal Park Builder Punch
Easter Bunny stamp set
Something Fancy dies
Decorative Circle Punch
2" Circle Punch
Regency Park Designer Series Paper
Sweet Sorbet Cardstock
Basic White Cardstock
Balmy Blue Ink
Sweet Sorbet Ink
Glittered Organdy Ribbon
Stampin' Pierce Mat
Tear & Tape
Liquid Glue
Mini Dimensionals
Glue Dots
Corner Rounder
Low Profile Adhesive Velcro Dots

Thank you for visiting my Blog today.  I hope you enjoyed my Treat Box.
See you next time!

Love and Hugs,
Cathryn

Tuesday, March 21, 2023

EASTER BUNNY TREAT BOX with SOMETHING FANCY DIES - Stampin' Up!


Hi Friends!
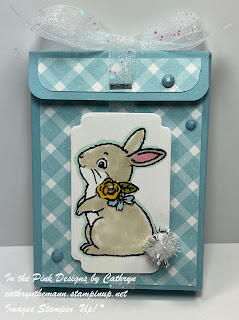
My project today is an Easter Bunny Treat Box that holds a Snoopy Easter Pin and some Fun Size Candy.
It measures  2 3/4  x  3 3/4  x  3/4".  I used the Easter Bunny stamp set, Something Fancy dies, Very Best Trio Punch and Country Gingham Designer Series Paper.


I started with a piece of Balmy Blue Cardstock sized
7 1/2  x  6"
I scored the  7 1/2" side at:
1/2,  3 1/4,  4  and  6 3/4".
I scored the  6" side at:
3/4,  4 1/2  and  6 3/4".
To cut and put the box together you can watch my Video Tutorial Here.
Below is a picture of how your Cardstock should look after scoring, cutting and rounding the corners of the front flap.


I attached 3 pieces of Country Gingham Designer Series Paper to the box.
(2)  2 1/2  x  3 1/2"  front and back
(1)  2 1/2  x  3/4"  front flap - round the corners of the bottom long side
I attached the DSP to the box with Liquid Glue.


I stamped the Bunny and Flower images, from the Easter Bunny stamp set, onto Basic White Cardstock with Tuxedo Black Ink.
I cut the Bunny out with a  1 1/8  x  2 1/8" label die from the Something Fancy dies.
I fussy cut a portion of the Flowers out by hand.


I colored the images with Stampin' Blends.
Light Crumb Cake  -  Bunny
Light Flirty Flamingo  -  Nose and Inner Ear
Dark Daffodil Delight  -  Rose
Light Balmy Blue  -  Lower Flower
Light Old Olive  -  Leaf


I punched a slit in the front flap of the box with the Very Best Trio Punch.
I ran Glittered Organdy Ribbon through the back of the flap and around the box.
Then I tied a box at the top of the Box.
I attached the Flowers to the Bunny's Neck with Liquid Glue.
I attached the Bunny Label to the front of the box, over the Ribbon, with Dimensionals.


I added a small Pom-Pom over the Bunny's Tail with Liquid Glue.
I added a Rhinestone Basic Jewel to the middle of the Rose and 3 Balmy Blue Solid Faceted Gems around the Label.


Supplies:
Easter Bunny stamp set
Something Fancy dies
Country Gingham Designer Series Paper
Very Best Trio Punch
Balmy Blue Cardstock
Basic White Cardstock
Tuxedo Black Ink
Stampin' Blends
Glittered Organdy Ribbon
Rhinestone Basic Jewels
Solid Faceted Gems
Simply Scored
Take Your Pick Tool
Tear & Tape
Liquid Glue
Dimensionals
Pom Pom
Snoopy Pin from Oriental Trading online

Thank you for visiting my Blog today.  I hope you enjoyed my Bunny Treat Box.
See you next time!

Love and Hugs,
Cathryn

Friday, March 17, 2023

GHIRARDELLI BUNNY SLEEVE with PLAYING IN THE RAIN - Stampin' Up!


Hi Friends!
My project today is a Treat Sleeve that holds a Ghirardelli Chocolate Bunny.  It measures  2 1/4  x  3 1/4  x  1/2".  I used  Playing in the Rain stamp set, Layering Circle dies, Hues of Happiness Designer Series Paper and Pool Party Grosgrain Ribbon.


I started with a piece of Coastal Cabana Cardstock sized:
5  x  3 3/4"
I scored the  5" side at:
2 1/4  and  4 1/2".
I scored the  3 3/4" side at:
1/2".
To cut and put the box together you can watch my Video Tutorial Here.
Below is a picture of how your Cardstock should look after scoring and cutting.


Before putting the box together I attached 2 pieces of Hues of Happiness Designer Series Paper to the Cardstock.
(2)  2  x  3"  front and back
I attached the DSP to the box with Liquid Glue.
I rounded the corners of the bottom flap and put the box together.


I stamped the Bunny Image, from Playing in the Rain stamp set, onto Basic White Cardstock with Tuxedo Black Ink.
I cut the top of the image out using a 1 7/8" circle punch from the Layering Circle dies.


I colored the image with Stampin' Blends.
Light Smokey Slate  -  Top Corner of Ears and bottom of Hands
Light Flirty Flamingo  -  Inner Ears, Nose and Cheeks
Color Lifter  -  Blend Edges of Ears, Hands and Cheeks
Light Bermuda Bay  -  Jacket


I cut a 2" scalloped circle from Coastal Cabana Cardstock using the Layering Circle dies.
I attached the image onto of the Scalloped Circle with Liquid Glue.
I put the Bunny Chocolate inside the Sleeve and tied Pool Party Grosgrain Ribbon around the middle of the box, tying a bow on the left side.


I attached the image piece to the front of the box, over the ribbon, with Dimensionals.
For the final touch I added 3 Pool Party Glossy Dots around the Bunny.


Supplies:
Playing in the Rain stamp set
Layering Circle dies
Hues of Happiness Designer Series Paper
Coastal Cabana Cardstock
Basic White Cardstock
Tuxedo Black Ink
Stampin' Blends
Pool Party Grosgrain Ribbon
Glossy Dots Assortment
Tear & Tape
Liquid Glue
Dimensionals
Simply Scored
Take Your Pick Tool
1 3/4" Circle Punch or similar
Corner Rounder

Thank you for visiting my Blog today.  I hope you enjoyed my Chocolate Bunny Holder.
See you next time!

Love and Hugs,
Cathryn