Friday, July 29, 2022

Celebrations Tag dies Shaker Tag and Quick Treat Box with Bewitching stamp set - Stampin' Up!


Hi Friends!
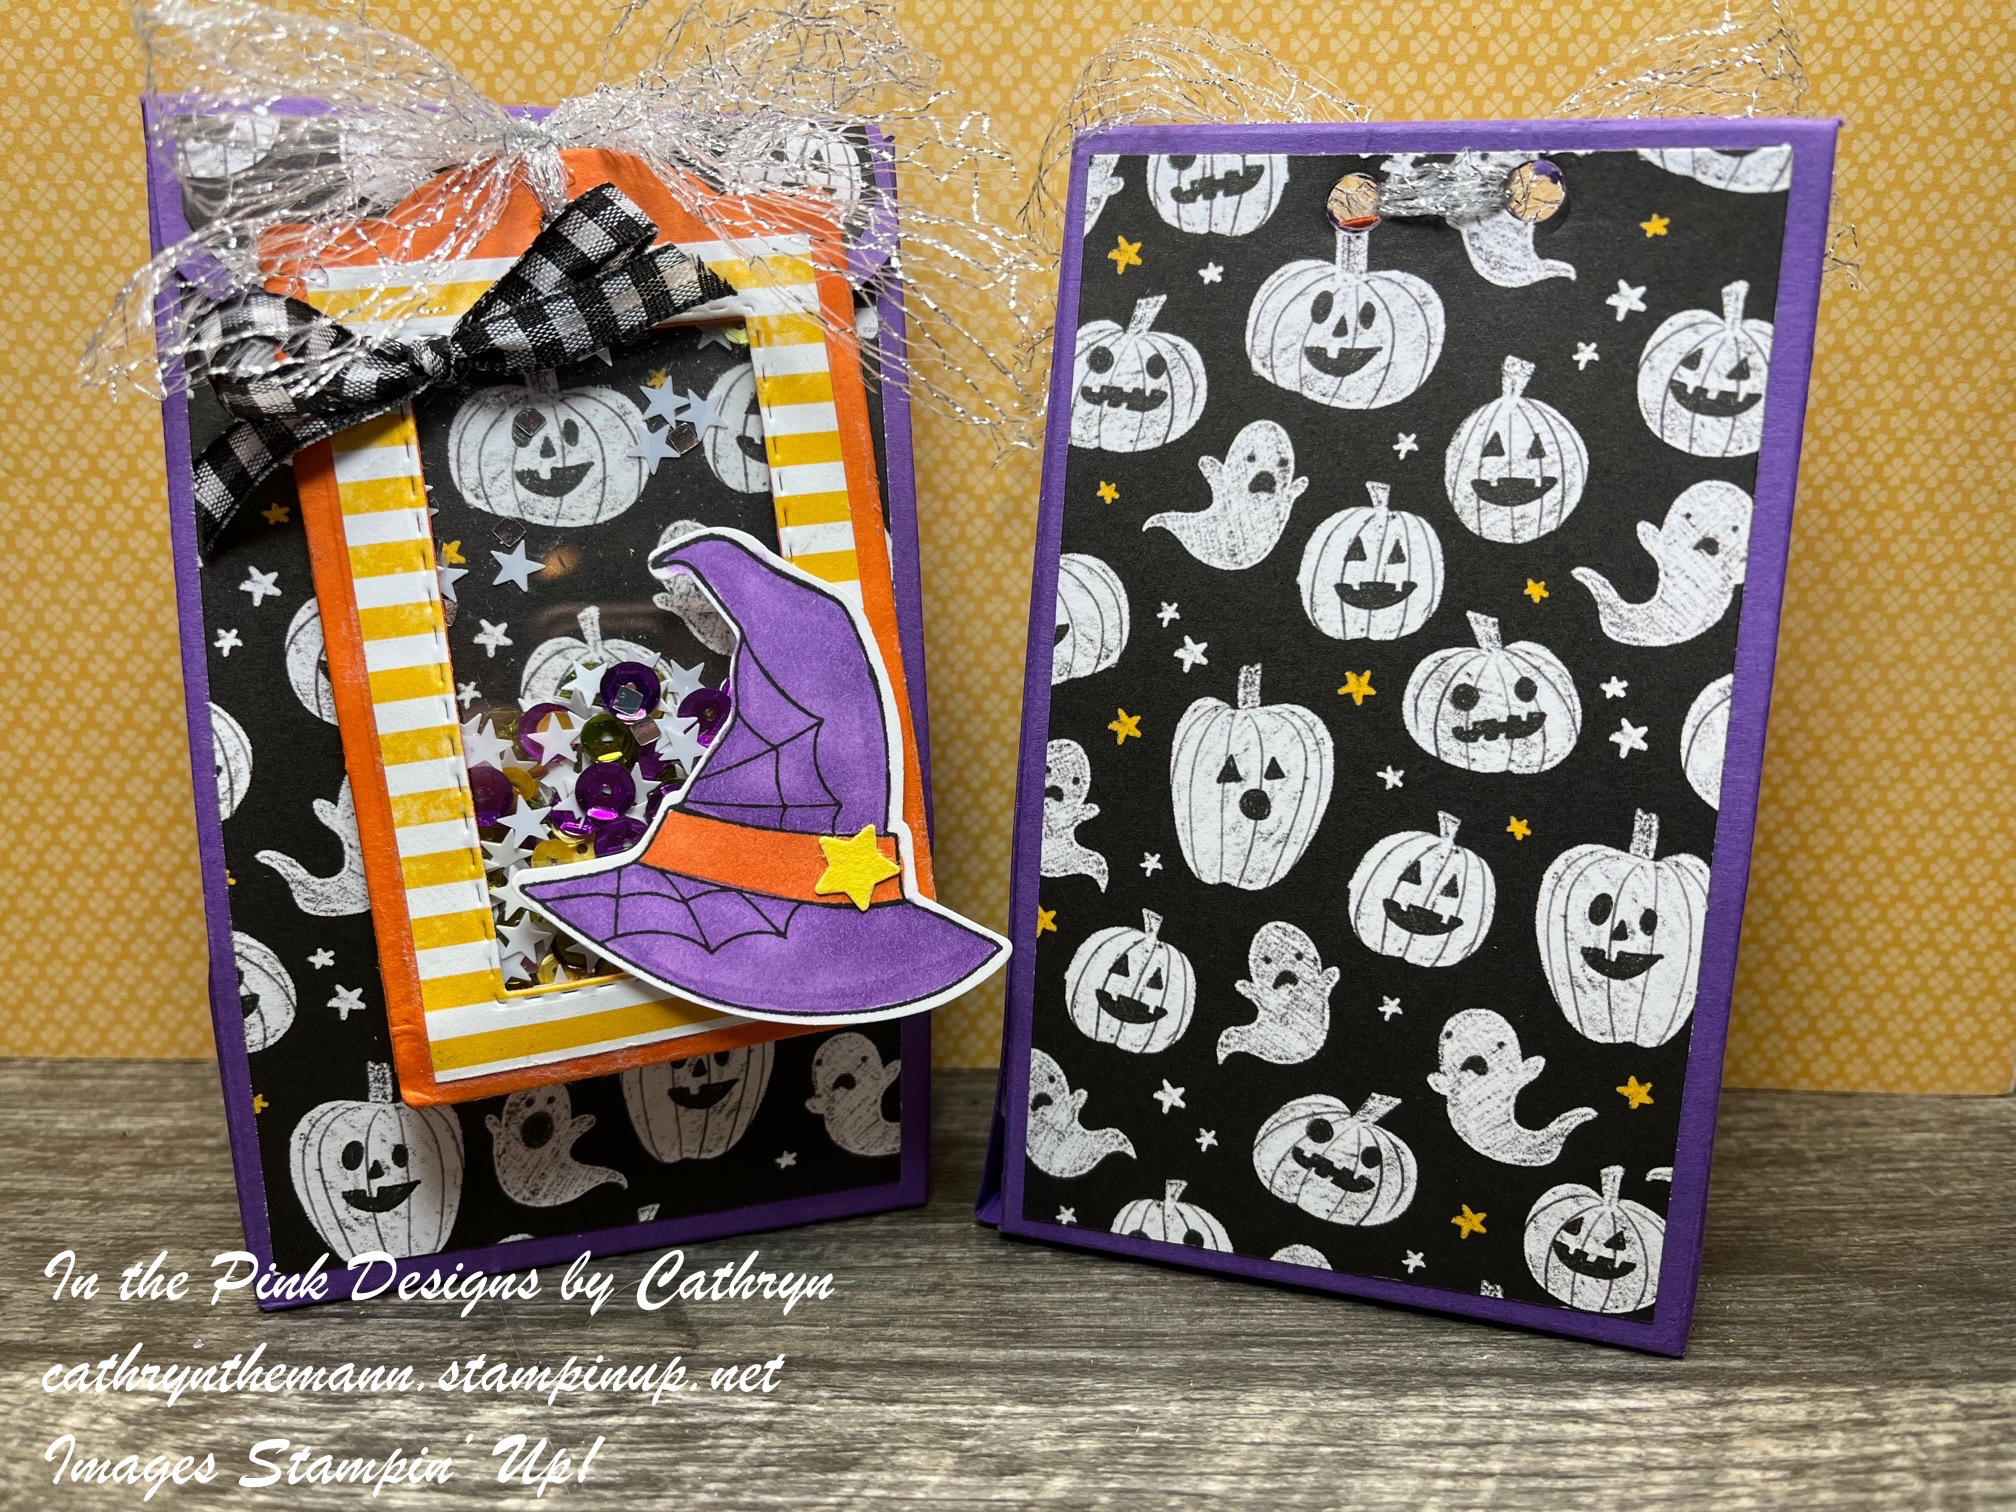
My project today is a Halloween Shaker Tag with a Quick Treat box.  The box measures  5 x 3 x 1 1/2".  I used the Celebrations Tag dies, Celebrate with Tags stamp set, Bewitching stamp set, the Witch Hat Builder Punch and Celebrate Everything Host Designer Series Paper.


I started with a piece of Gorgeous Grape Cardstock sized
9 1/2  x  7 1/2".
I scored the  9 1/2" side at:
1/2,  3 1/2,  5  and  8".
I scored the  7 1/2" side at:
1 1/2  and  6 1/2".
To cut and put the box together you can watch my Video Tutorial Here.
Below is a picture of how your Cardstock should look after scoring, cutting and rounding the corners of the flap.


I attached 3 pieces of Celebrate Everything Host Designer Series paper to the box.
(2)  2 3/4  x  4 3/4  for the front and back.
(1)  2 3/4  x  3/4  for the flap.  Make sure to round the bottom corners to match the flap.
I attached the DSP to the box with Liquid Glue.


Now for the tag.  I cut the tag from Pumpkin Pie Cardstock using the Celebrations Tag dies.
I stamped the sentiment, from Celebrate with Tags stamp set, onto the back of the tag with Tuxedo Black Ink.
I attached a piece of the other side of the same DSP, sized  2  x  3 1/4", to the front of the tag with Stampin' Seal.
I cut a rectangle out of the front of the tag using the Celebrations Tag dies.
I attached a piece of Window Sheet onto the inside of the opening,  sized  2  x  3 1/4", with Glue Dots.
I cut just the back piece of the tag from the same DSP we used on the treat box.
I trimmed down the side edges to fit in the inside/back of the tag and attached it with Liquid Glue.
I put Tear and Tape on the side flaps and attached the front and back of the Tag together.
I added some Sequins inside the top opening.  Then I closed the top opening with Liquid Glue.


I stamped the Witch Hat, from Bewitched stamp set, onto Basic White Cardstock with Tuxedo Black Ink.
I colored the Hat Band with a Dark Pumpkin Pie Stampin' Blend.
I colored the rest of the Hat with Dark Highland Heather Stampin' Blend.
I cut the hat out using the Witch Hat Builder Punch.
I cut a star from Daffodil Delight Cardstock using the Witch Hat Builder Punch.  I attached it to the Hat Band with Liquid Glue.
I attached the Hat to the bottom right side of the Tag with Dimeniosnals.


I punched holes in the Flap and both sides of the body of the box with a 1/4" hole punch.
I ran Mesh Metallic Ribbon through the holes, threaded the tag onto the right side and tied a bow.
I tied a small bow with Black and White Gingham Ribbon and attached it to the top left of the tag with a Glue Dot.
For the final touch I added Wink of Stella Glitter onto the Hat Band and Star.


Supplies:
Celebrations Tag dies
Celebrate with Tags stamp set
Bewitching stamp set
Witch Hat Builder Punch
Celebrate Everything Host Designer Series Paper
Gorgeous Grape Cardstock
Pumpkin Pie Cardstock
Daffodil Delight Cardstock
Basic White Cardstock
Window Sheets
Tuxedo Black Ink
Dark Highland Heather Stampin' Blend
Dark Pumpkin Pie Stampin' Blend
Metallic Mesh Ribbon
Black and White Gingham Ribbon
Tear and Tape
Liquid Glue
Stampin' Seal
Dimensionals
1/4" Hole Punch
Assorted Sequins from my Stash

Thank you for visiting my Blog today.  I hope you enjoyed my Halloween project.
See you next time!

Love and Hugs,
Cathryn

Wednesday, July 27, 2022

SCARY CUTE HALLOWEEN TREAT HOLDER with the SCARY SILHOUETTE DIES - Stampin' Up!


Hi Friends!
My project today is a Halloween Treat Holder that measures
3 1/4  x  3 3/4".  I used Scary Cute stamp set, Scary Silhouettes dies, Black and White Designs Designer Series Paper and the Glossy Dots Assortment.  I will fit 2 Nestle Crunch, 2 Hershey Bars or M&Ms - Fun Sized - inside.


I started with a piece of Granny Apple Green Cardstock sized
9  x  4 1/4".
I scored the  9" side at:
1 1/2  and  5 1/4".
I scored the  4 1/4" side at:
1/2  and  3 3/4".
To cut and put the treat holder together you can watch my Video Tutorial Here.
Below is a picture of how your Cardstock should look after scoring and cutting.


I attached 3 pieces of Black and White Designs Designer Series Paper to the treat holder.
(2)  3  x  3 1/2"  for the front and inside flaps.
(1)  3  x  1 1/4"  for the lower inside piece.
I attached the DSP to the treat holder with Liquid Glue.


I put my candy inside, closed the treat holder and wound Glittered Organdy Ribbon around the short side of the box, tying a bow on the left side.
I stamped the Frankenstein image, from Scary Cute stamp set, onto a piece of Granny Apple Green Cardstock with Tuxedo Black Ink.
I cut the image out with the larger frame die from the Scary Silhouette dies.


I cut another frame from Gorgeous Grape Cardstock using the 2 frame dies from the Scary Silhouette dies, together.
I attached the Gorgeous Grape frame over the piece with the Frankenstein image on it with Liquid Glue.
I attached the entire piece to the front of the treat holder, over the ribbon, with Dimensionals.


I stamped the sentiment, from Scary Cute stamp set, onto Pumpkin Pie Cardstock with Tuxedo Black Ink.
I cut the sentiment out using a label die from the Scary Silhouette dies.
I attached the label to the upper right side of the frames with Liquid Glue.
I cut 2 Bats from Basic Black Cardstock using the Scary Silhouette dies.
I added some Wink of Stella Glitter and attached the bats to the frames with Liquid Glue.
For the final touch I added Daffodil Delight Glossy Dots around the image and sentiment.


Supplies:
Scary Cute stamp set
Silhouette dies
Black and White Designs Designer Series Paper
Granny Apple Green Cardstock
Gorgeous Grape Cardstock
Pumpkin Pie Cardstock
Basic Black Cardstock
Tuxedo Black Ink
Glossy Dots Assortment
Wink of Stella Glitter
Liquid Glue
Dimensionals
Silicone Mat
Simply Scored
Take Your Pick Tool

Thank you for visiting my Blog today.  I hope you enjoyed my Halloween Treat Holder.
See you next time.

Love and Hugs,
Cathryn

Monday, July 25, 2022

ALL THAT DIES PUMPKIN BOX with KINDEST GNOMES - Stampin' Up!


Hi Friends!
My project today is a treat box that measures  5 1/4  x  3  x  2".  I used the Oval and small Label dies from the All That Dies to make a cute Pumpkin for the front of the box.  I also used Kindest Gnomes stamp set, the Gnome dies,  Stylish Shapes dies, Forever Flourishing dies, the Essential Tag Punch, Celebrate Everything Host Designer Series paper and Gingham Cottage Designer Series Paper.


I started with a piece of Old Olive Cardstock sized
10 1/2  x  7 1/2".
I scored the  10 1/2" side at:
1/2,  2 1/2,  5 1/2  and  7 1/2".
I scored the  7 1/2" side at:
2  and  5".
To cut and put the box together you can watch my Video Tutorial here.
Below is a picture of how your Cardstock should look after scoring, cutting and rounding the corners of the top flaps with a corner rounder.


I attached a piece of Celebrate Everything Host Designer Series Paper to the box sized
12  x  2 3/4".
I wound the entire piece around the box creasing the edges.
I took the DSP off the box and Burnished the folds with a Bone Folder.  Then I attached the paper to the box with Liquid Glue.


I cut 3 Ovals from Gingham Cottage Designer Series Paper using the All That dies.
I attached two together, slightly overlapping the inside edges, with Liquid Glue.
I attached the third Oval in the middle to make the Pumpkin.
I cut a small label from Early Espresso Cardstock using the All That dies.
I attached it to the back of the Ovals with about 3/8" of the pointed end sticking up behind the top of the Ovals.
I cut three Sprigs from Mossy Meadow Cardstock using the Forever Flourishing dies.
I attached the Sprigs to the top of the Pumpkin with Liquid Glue.


I cut a square (about 2 3/8  x  2 3/8") from Crushed Curry Cardstock using the Stylish Shapes dies.
I attached the Pumpkin onto the Square with a Mini Dimensional and Dimensionals.
I attached the entire piece to the front of the box with Dimensionals.


I stamped the Gnome image, from Kindest Gnomes stamp set, onto Basic White Cardstock with Tuxedo Black Ink.
 I colored the Gnome with Stampin' Blends.
Light Flirty Flamingo for the top of the nose.
Dark Petal Pink for the Nose, Face and Mouth.
Light and Dark Pumpkin Pie for the Hat.
Light Soft Suede for the Shirt.
Dark Soft Suede for the Shoes.
Light and Dark Old Olive for the Mittens and Pants.
I cut the image out using the Gnomes dies.


I cut out 2 tags, 1 from Crushed Curry Cardstock and 1 from Gingham Cottage DSP using the Essential Tag Punch.
I attached the Tags together with Liquid Glue.
I punched a small hole in the top of the tag with a 1/8" hole punch.
I attached the Gnome to the Tags with Dimensionals.
I punched two holes in the top flaps of the box with a 1/8" hole punch.
I tied Soft Seafoam Seam Binding Ribbon through the holes and strung the Tags onto the right side and then tied a bow.
For the final touch I added a large and Small Pale Papaya Loose Flower Flourish to the Pumpkin and the Gnome's Hat using Glue Dots.


Supplies:
All That dies
Kindest Gnomes stamp set
Stylish Shapes dies
Forever Flourishing dies
Essential Tag Punch
Celebrate Everything Host Designer Series Paper
Gingham Cottage Designer Series Paper
Old Olive Cardstock
Crushed Curry Cardstock
Mossy Meadow Cardstock
Basic White Cardstock
Tuxedo Black Ink
Light and Dark Pumpkin Pie Stampin' Blends
Light and Dark Old Olive Stampin' Blends
Light Flirty Flamingo  Stampin' Blend
Light and Dark Soft Suede  Stampin' Blends
Dark Petal Pink  Stampin' Blend
Light Smokey Slate  Stampin' Blend
Loose Flower Flourishes
Soft Seafoam Seam Binding Ribbon
Simply Scored
Take Your Pick Tool
Liquid Glue
Tear and Tape
Mini Dimensionals
Dimensionals
Glue Dots
1/8" Hole Punch
Corner Rounder

Thank you for visiting my Blog today.  I hope you enjoyed my Pumpkin and Gnome treat box.
See you next time!

Love and Hugs,
Cathryn

Wednesday, July 20, 2022

CHRISTMAS SCOTTIE GHIRARDELLI TREAT BOX with ALL THAT DIES - Stampin' Up!


Hi Friends!
My project today is a Quick and Easy Ghirardelli Treat Box.  It measures  3 x 2 x 5/8".  I used Christmas Scottie stamp set, the Scottie Dog Punch, All That dies, Brights Designer Series Paper and Gold & Vanilla Satin Edged Ribbon.  It will fit 2 chocolates inside.


I started with a piece of Real Red Cardstock sized
7 3/4  x  4 1/4".
I scored the 7 3/4" side at:
5/8,  3 5/8,  4 1/4  and  7 1/4".
I scored the  4 1/4" side at:
5/8,  2 5/8  and  3 1/4".
To cut and put the box together you can watch my Video Tutorial Here.
Below is a picture of how your Cardstock should look after scoring, cutting and rounding the corners of the flap.


I attached 3 pieces of Brights, Granny Apple Green, Designer Series Paper to the box.
(2)  2 3/4  x  1 3/4"  for the front and back.
(1)  2 3/4  x  3/4"  for the front flap.  I rounded the corners of the bottom side of this piece to match the flap.
I attached the DSP to the box with Liquid Glue.


I stamped the Scottie image, from Christmas Scottie stamp set, onto Basic White Cardstock with Tuxedo Black Ink.
I stamped the Bow onto the same Brights DSP with Granny Apple Green Ink.
I cut he images out using the Scottie Dog Punch.


I cut a label from Real Red Cardstock using the All That dies.
I stamped the Snowflakes, from Scottie Dot stamp set, onto the Label with Real Red Ink.
I attached the Scottie Dog to the Label with Mini and regular Dimensionals.
I attached the Bow to the Scottie Dog with Liquid Glue.


I tied Gold & Vanilla Satin Edged Ribbon around the short side of the box and tied a bow at the top.
I attached the Label, with Dimensionals ON THE BOTTOM ONLY, to the front of the box.
For the final touch I added an Opal Round to the middle of the Bow.


Supplies:
Real Red Cardstock
Basic White Cardstock
Tuxedo Black Ink
Granny Apple Green Ink
Opal Rounds
Tear and Tape
Liquid Glue
Mini Dimensionals
Dimensionals
Stamp and Pierce Mat
Simply Scored
Take Your Pick Tool
Corner Rounder

Thank you for visiting my Blog today.  I hope you enjoyed my Christmas in July project.
See you next time!

Love and Hugs,
Cathryn

Tuesday, July 19, 2022

BEST WITCHES HALLOWEEN GIFT BOX with ALL THAT DIES - Stampin' Up!


Hi Friends!
My project today is a Halloween Treat Box that measures  4 1/2  x  2 1/2  x  1".  I used Best Witches stamp set, All That dies, Stylish Shapes dies, Celebrate Everything Host Designer Series Paper and Glossy Dots Assortment.


I started with a piece of Gorgeous Grape Cardstock sized
7 1/2  x  6 1/2".
I scored the  7 1/2" side at:
1,  3 1/2,  4 1/2  and  7".
I scored the  6 1/2" side at:
1,  5  and  5 3/4".
To cut and put the box together you can watch my Video Tutorial Here.
Below is a picture of how your Cardstock should look after scoring and cutting.


I attached 3/8" Adhesive Velcro Dots to the top flaps for a closure.
I attached 2 pieces of Celebrate Everything Host Designer Series paper to the box.
(1)  2 1/4  x  3 3/4"  for the front.
(1)  2 1/4  x  3/4"  for the front of the flap.
I attached the DSP to the box with Liquid Glue.


I stamped the Witch image, from Best Witches stamp set, onto Basic White Cardstock with Tuxedo Black Ink.
I cut the top of the image out with a 2" circle die from All That dies.
I colored the image with Stampin' Blends.
Light Flirty Flamingo for the Cheeks
Light Petal Pink for the Face and Hands.
Light Basic Black for the top of the Hat and Cape.
Light Smokey Slate for the inside of the Hat.
Dark Daffodil Delight for the Buckle.
Dark So Saffron for the Hair.
Dark Soft Suede for the Broom Handle.


I cut a label from Pumpkin Pie Cardstock using the Stylish Shapes dies.
I cut a Rectangle from Gorgeous Grape Cardstock using the All That dies.
I attached the Image Circle to the Gorgeous Grape Rectangle and then to the Pumpkin Pie Label together with Dimensionals.


I stamped the sentiment, from Best Witches stamp set, onto Pumpkin Pie Cardstock with Tuxedo Black Ink.
I cut the sentiment out, with the beginning of the sentiment to the left, with a label from the Stylish Shapes dies.
I cut off about 1/4" of the right end of the label and punched a small hole in it.
I ran Glittered Organdy and Black and White Gingham Ribbons together around the box.
I fed the sentiment onto the right side of the ribbons and tied a bow on the left side of the box.


I attached the Image piece to the middle, over the ribbons, with Dimensionals.
For the final touch I added 3 Gorgeous Grape Dots, from the Glossy Dots Assortment, around the Image.


Supplies:
Best Witches stamp set
All That dies
Stylish Shapes dies
Celebrate Everything Host Designer Series Paper
Gorgeous Grape Cardstock
Pumpkin Pie Cardstock
Basic White Cardstock
Tuxedo Black Ink
Light Flirty Flamingo Stampin' Blend
Light Petal Pink Stampin' Blend
Light Basic Black Stampin' Blend
Light Smokey Slate Stampin' Blend
Dark Daffodil Delight Stampin' Blend
Dark So Saffron Stampin' Blend
Glittered Organdy Ribbon
Black and White Gingham Ribbon
Glossy Dots Assortment
Tear and Tape
Liquid Glue
Dimensionals
3/8" Adhesive Velcro Dots

Thank you for visiting my Blog today.  I hope you enjoyed my Halloween Treat Box.
See you next time!

Love and Hugs,
Cathryn

Friday, July 15, 2022

DECORATED with HAPPINESS BELLY BAND CHRISTMAS GIFT BOX with DECORATED PINE DIES - Stampin' Up!


Hi Friends!
My project today is a Belly Band Box that measures  3  x  3  x  1".  I used Decorated with Happiness stamp set, Decorated Pine dies, Celebrate Everything Host Designer Series Paper and Stylish Shapes dies.  It will fit 3 to 4 Chocolate Truffles inside each box.


I started with a piece of Garden Green Cardstock sized
11  x  5".
I scored the 11" side at:
3,  4,  7  and  8".
I scored the  5" side at:
1  and  4".
To cut and put the box together you can watch my Video Tutorial Here.
Below is a picture of how your Cardstock should look after scoring and cutting.


I attached 8 pieces of Celebrate Everything Host Designer Series Paper to the box.
(4)  2 3/4  x  2 3/4  for the top, bottom, inside the flap and body of the box.
(4)  2 3/4  x  3/4"  for the sides.
I attached the DSP to the box with Liquid Glue.


I stamped several images from Decorated with Happiness stamp set onto Basic White Cardstock.
Real Red Ink for the Ornament (stamped off for the inside).
Garden Green Ink for the Branch.
Granny Apple Green Ink, stamped off, for the background of the Branch.
Daffodil Delight Ink for the long Ornament (stamped off for the inside).
I cut the images out using the Decorated Pine dies.


I cut two 2 1/2" circles out using the Stylish Shapes dies.
One from Celebrate Everything Host Designer Series Paper and one from Velum.
I attached the Branch to the Velum first with Liquid Glue.
I attached the Real Red Ornament onto the Branch with a Dimensional on the ornament and a little Liquid Glue at the top.
I attached the Velum on top of the DSP circle with Liquid Glue in the areas were images are placed so it will not show through the front.


I cut a 1 1/2" square from Basic White Cardstock using the Stylish Shapes dies.
I stamped the sentiment, from Decorated in Happiness stamp set, onto the square with Real Red Ink.
I attached the square inside the flap with Liquid Glue.
I attached the Daffodil Delight Ornament to the left side of the square with Liquid Glue.


I closed the box and folded a  9 1/2  x  1 1/4" piece of Garden Green Cardstock around the box to make a Belly Band.  I attached it together, in the front, with Stampin' Seal+.
I ran Real Red Ribbon around the Belly Band and tied a bow at the top of the front.
I attached the image piece over the Ribbon and Belly Band with Dimensionals.


For the final touches I added a Red Rhinestone Basic Jewel to the middle of the Ornament and 3 Iridescent Rhinestone Basic Jewels to the Branch.


Supplies:
Garden Green Cardstock
Basic White Cardstock
Velum
Real Red Ink
Daffodil Delight Ink
Garden Green Ink
Granny Apple Green Ink
Real Red and Garden Green Ribbon Combo Pack
Red Rhinestone Basic Jewels
Iridescent Rhinestone Basic Jewels
Tear and Tape
Liquid Glue
Stampin' Seal+
Dimensionals
Simply Scored
Take Your Pick Tool

Thank you for visiting my Blog today.  I hope you enjoyed my Christmas in July project.
See you next time!

Love and Hugs,
Cathryn