Wednesday, June 30, 2021

CRAYON and PAPER PAD GIFT BOX TUTORIAL with COUNT ON ME - Stampin' Up!


Hi Friends!
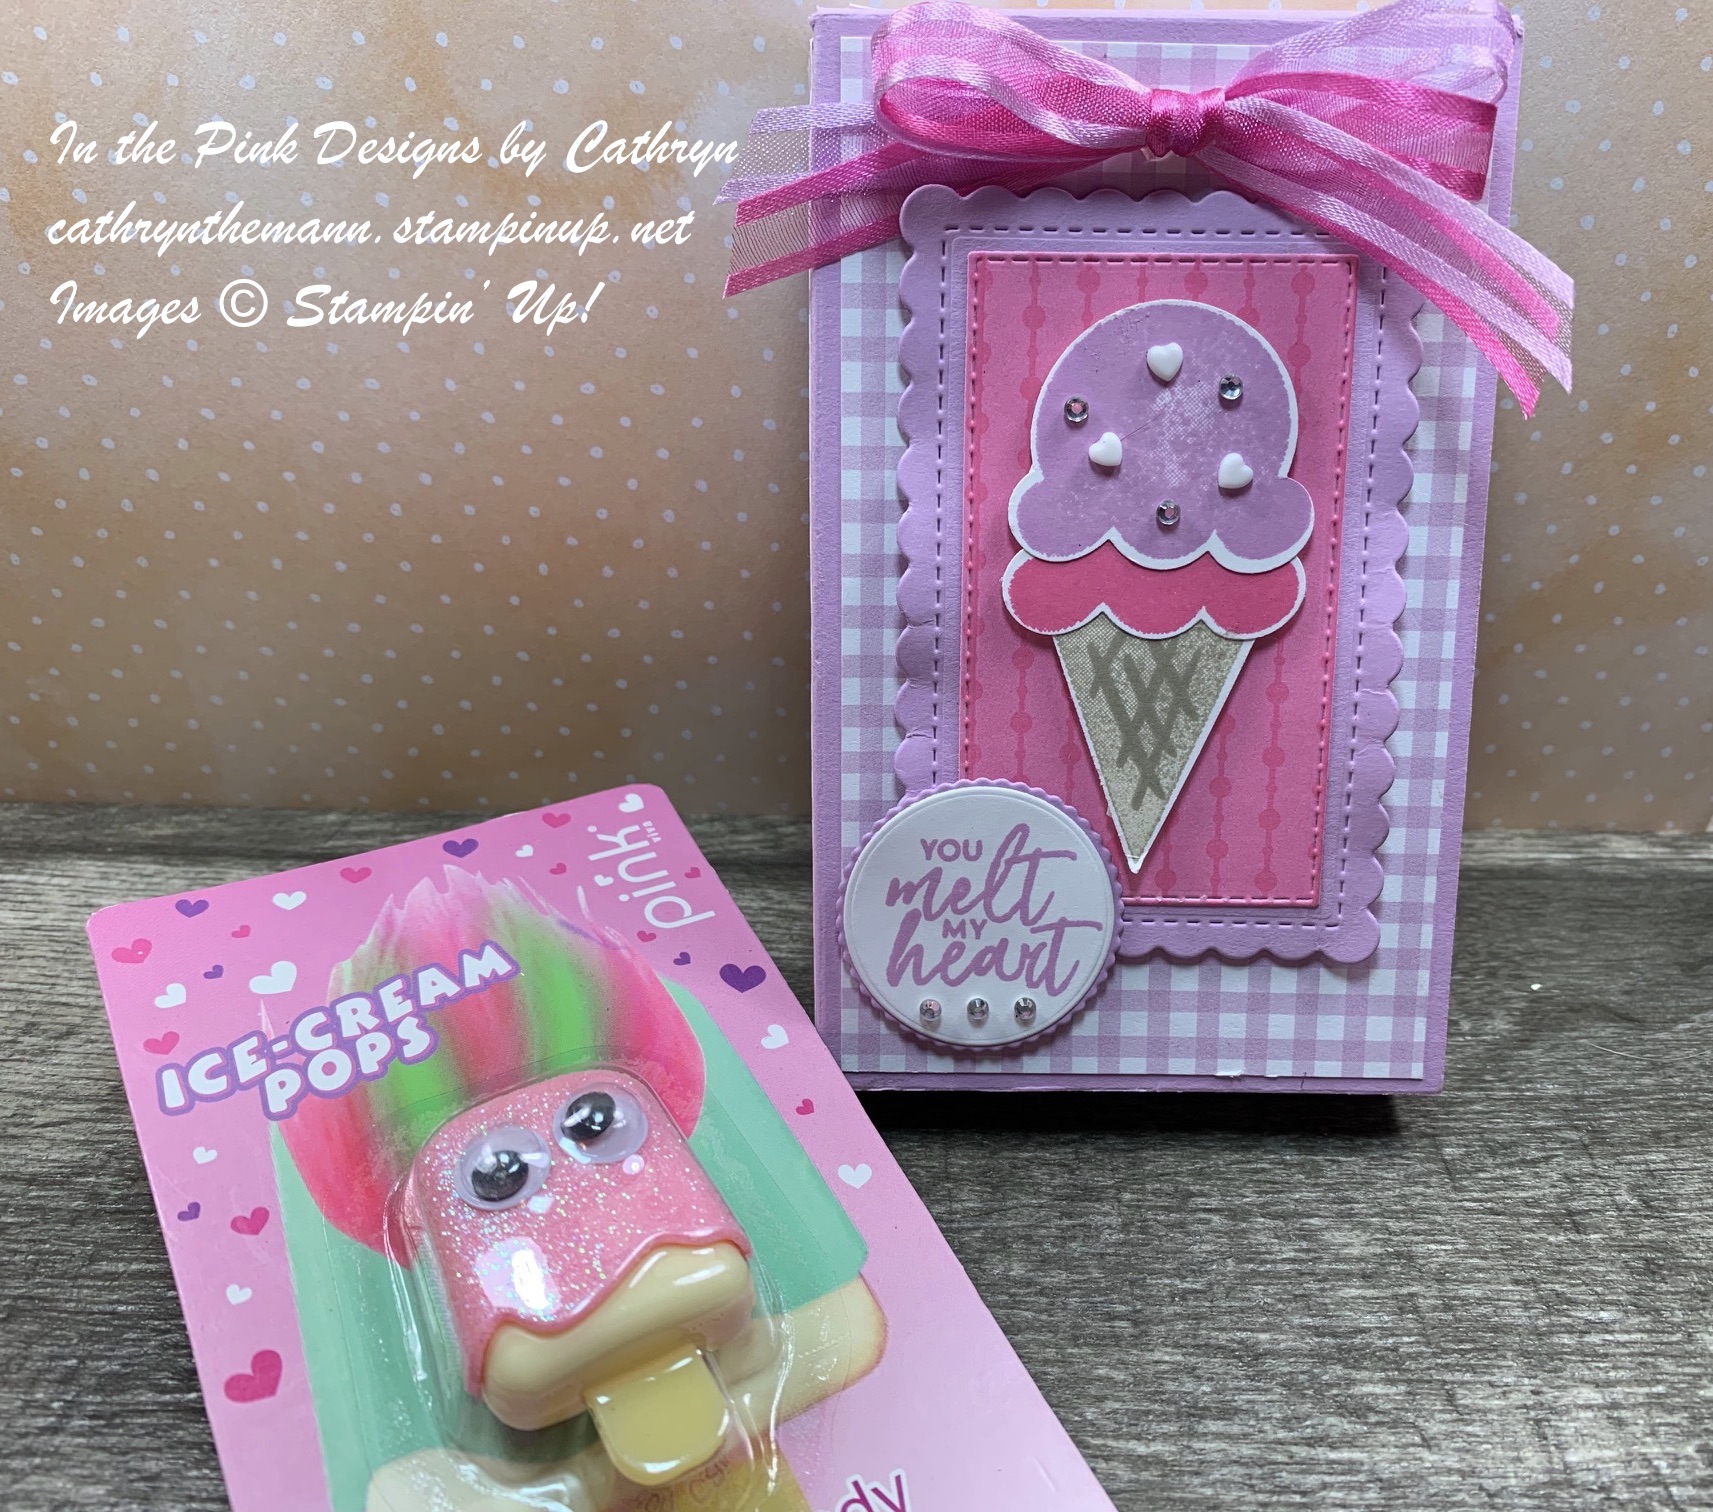
For my project today I made a Crayon and Paper Pad Box.  I think this is the perfect thing to bring along  to keep kids busy during the summer!  I used Count on Me stamp set, Brights 6x6 Designer Series Paper and the Layering Circle dies.


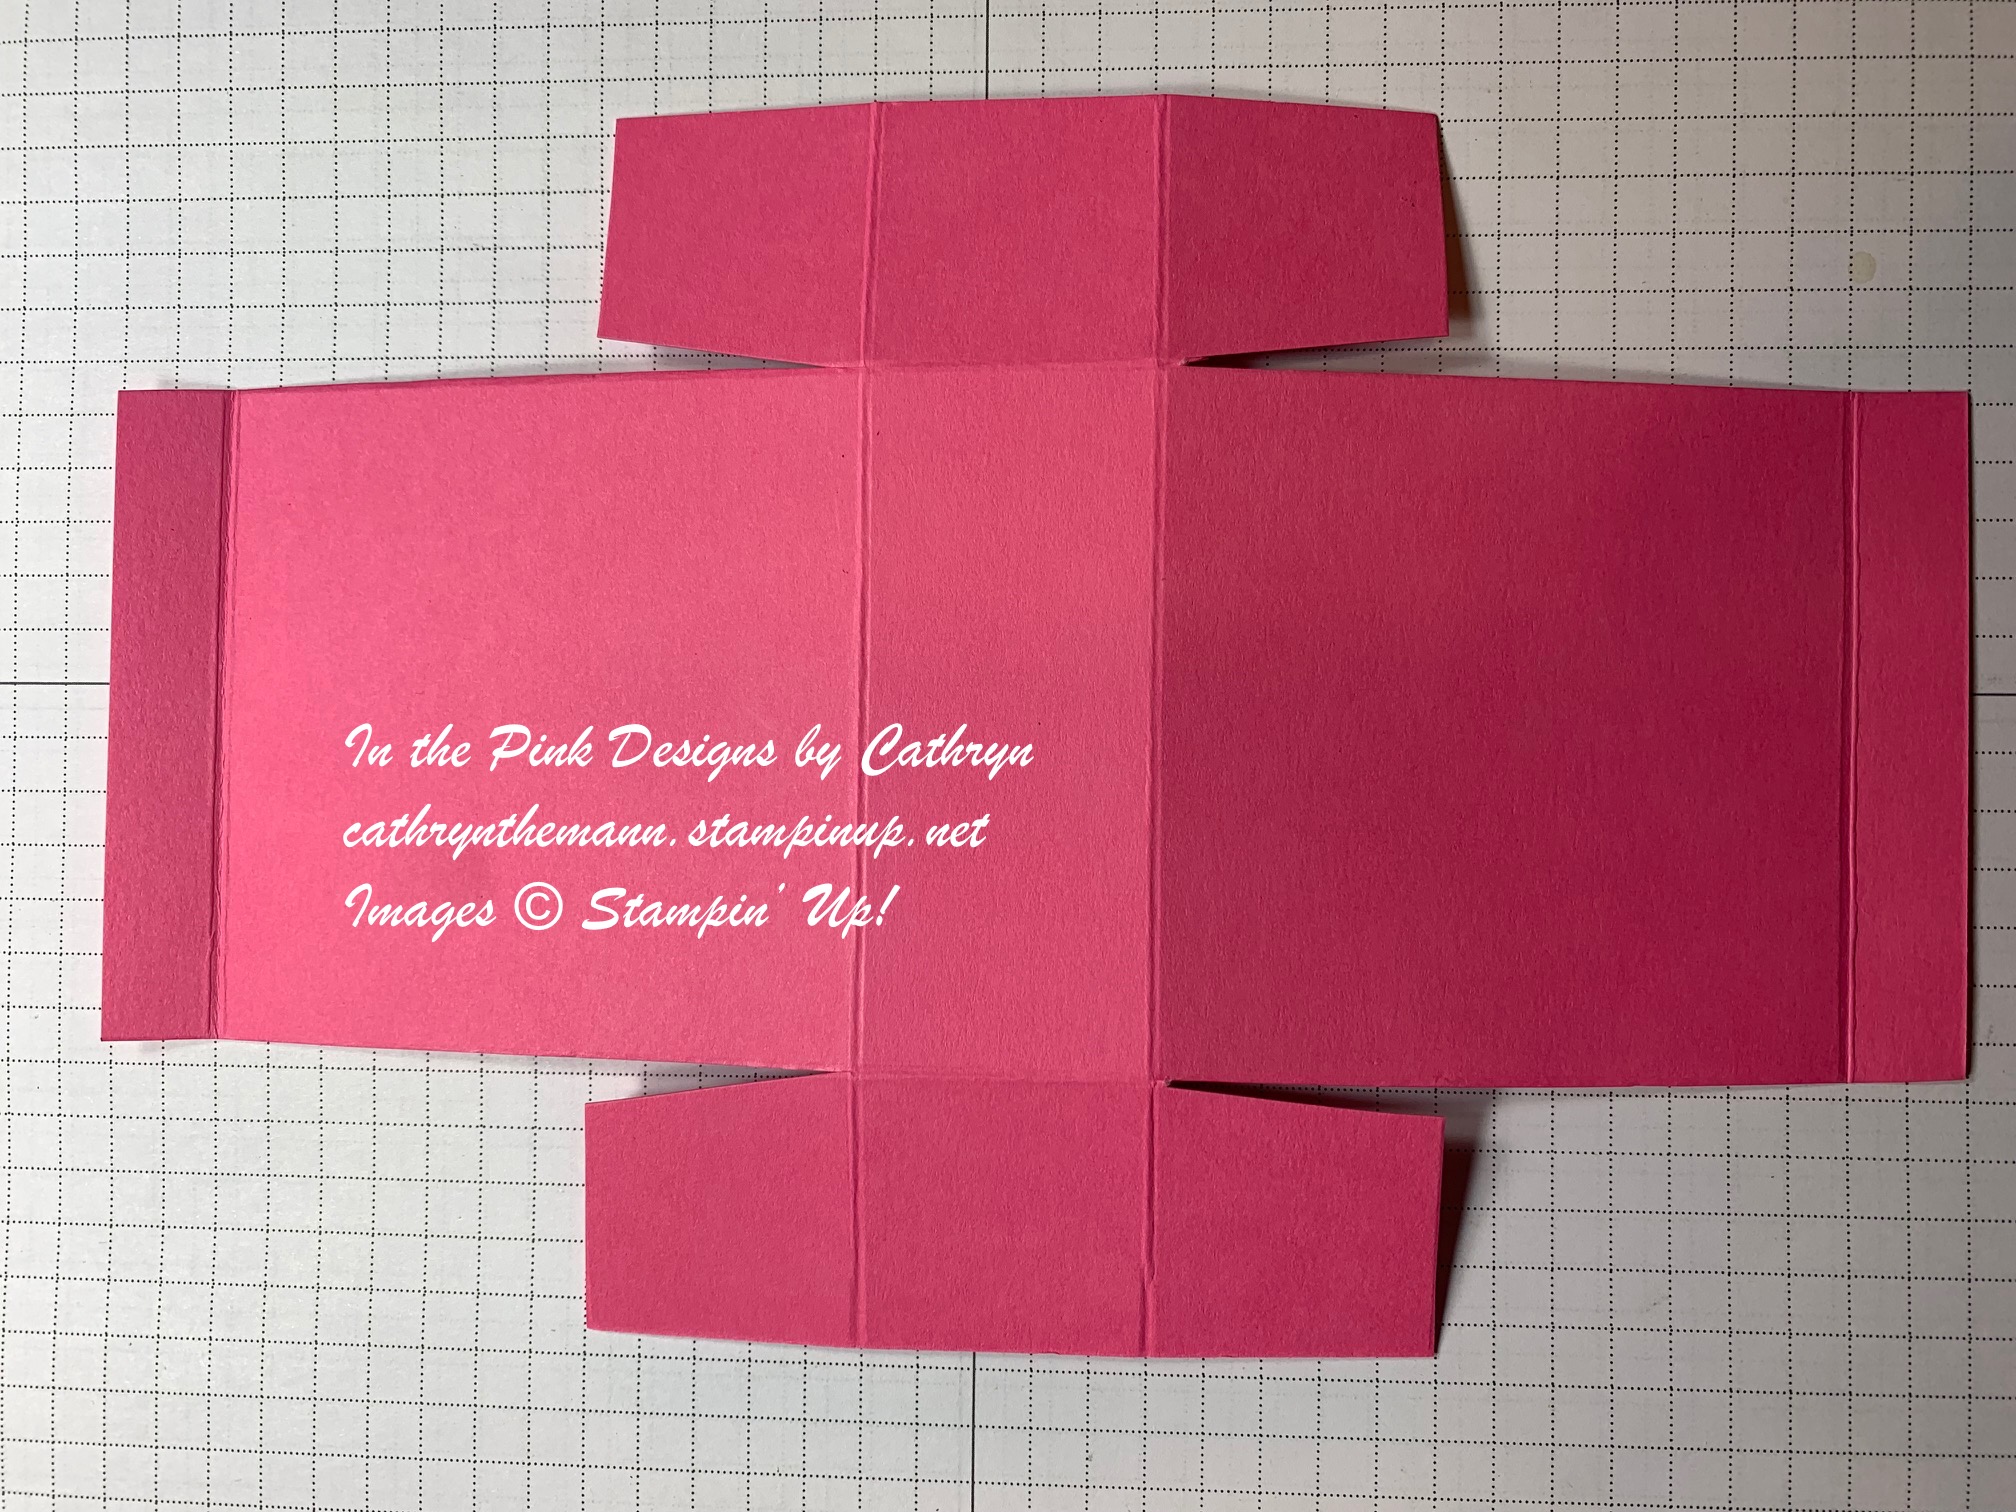
I started with a piece of Bermuda Bay Cardstock sized
8 1/2  x  8 1/4".
I scored the  8 1/2" side at:
3/4,  6  and  6 3/4".
I scored the  8 1/4" side at:
3/4,  3 7/8",  4 5/8  and  7 3/4".
To cut and put the box together you can watch my Video Tutorial Here.
There is a picture below of how the Cardstock should look after scoring, cutting and rounded the corners of the flap using the Detail Trio Punch.


I attached 3 pieces of the Brights 6x6 Designer Series Paper to the box in sizes:
(2)  2 7/8  x  5"
(1)  2 7/8  x  1 1/2"
I cut part of a circle 1" down from the top of the side without the flap using a 2 1/2" circle punch after attaching the DSP.
I used Tear and Tape to put the box together.


I attached 5/8" Adhesive Velcro Dot to the top of the inside of the box and the back of the flap for a closure.
I stamped the Kangaroo image from Count on Me stamp set onto Basic White Cardstock with Tuxedo Black Ink.
I cut the image out using the Layering Circle dies.  I also cut a Scalloped Circle from Bermuda Bay Cardstock using the same dies.


I stamped the grass image around the Kangaroo with Old Olive Ink.
I colored the Kangaroo with Stampin' Blends:
Light Crumb Cake for the belly
Light Flirty Flamingo for the nose
Light and Dark Soft Suede for the rest of the body
Light Mossy Meadow for the leaf.
I attached the Basic White onto the Bermuda Bay Cardstock with Liquid Glue.


I attached the image piece onto the front of the box with Dimensionals.
I attached 3 small Polished Pink Flowers, from the Loose Flower Flourishes, around the grass with Liquid Glue.
For the final touch I added Polished Pink Open Weave Ribbon and Pool Party Sheer Ribbon together in a bow and attached it to the front flap with Glue Dots.


Supplies:
Count on Me stamp set
Layering Circle dies
Bermuda Bay Cardstock
Basic White Cardstock
Brights 6x6 Designer Series Paper
Detail Trio Punch
Light and Dark Soft Suede Stampin' Blends
Dark Polished Pink Stampin' Blend
Light Crumb Cake Stampin' Blend
Light Flirty Flamingo Stampin' Blend
Light Mossy Meadow Stampin' Blend
Tuxedo Black Ink
Old Olive Ink
Loose Flower Flourishes
Pool Party Sheer Ribbon
Polished Pink Open Weave Ribbon
Liquid Glue
Glue Dots
Tear and Tape
Simply Scored
Take Your Pick Tool
5/8" Adhesive Velcro Dots
2 1/2" Circle Punch or similar

Thank you for visiting my Blog Today.  I hope you enjoyed this project today!
See you soon.

Love and Hugs,
Cathryn

Monday, June 28, 2021

PLENTIFUL PLANTS DIY GIFT BOX with SCALLIOED CONTOURS - Stampin' Up!


Hi Friends!
My project today is a  3 1/4  x  4  x  1 1/4"  Gift Box.  This box is pretty versatile and can be made with any stamps and colors you like.  I used Plentiful Plants stamp set, Perfect Plants dies, Scalloped Contours dies, the Messages die and Sweet Symmetry Designer Series Paper.


I started with a piece of Crumb Cake Cardstock sized  9 1/2  x  7".
I scored the  9 1/2" side at:
1/2,  3 3/4,  5  and  8 1/4".
I scored the  7" side at:
1 1/4,  5 1/4  and  6 1/2".
To cut and put the box together you can watch my Video Tutorial Here.
Below is a picture of how your Cardstock should look after scoring, cutting and using the Detail Trio punch and circle punch.


I cut a Scalloped Rectangle from Basic White Cardstock using the Scalloped Contours dies.  I cut about  1/8" off the top of the long side of the rectangle and attached it flush to the top of the box about  1/4"  from the left side, with Liquid Glue.
I cut a piece of Sweet Symmetry  Designer Series Paper to  3 3/8  x  1 7/8"  and attached it, flush to the top of the box, on top of the White Scalloped Rectangle with Liquid Glue.


I stamped 3 images from the Plentiful Plants stamp set onto Basic White Cardstock.
I stamped the 3 leaf image with Garden Green ink two times.
I stamped the pot image with Polished Pink ink once.
I cut them all out using the Perfect Plants dies.


I glued the 2 plant images overlapping behind the top of the Polished Pink Pot.  I attached the entire piece to the bottom left side of the DSP with some of the leaves hanging over the right side of the Scalloped Rectangle with Dimensionals.
I attached 2 of the Pale Papaya Loose Flower Flourishes to the leaves with Glue Dots.


I cut a label from Polished Pink Cardstock using the Messages die.  I stamped the sentiment from Plentiful  Plants stamp set onto the label, as close to the bottom as possible, with Tuxedo Black Ink.
I cut the top of the label off and glue it flush to the top of the DSP with Liquid Glue.
For the final touch I added 3 Polished Pink jewels, from the 2021-2023 In Color Jewels, to the right side of the box.


Supplies:
Plentiful Plants stamp set
Perfect Plants dies
Scalloped Contours dies
Messages die
Sweet Symmetry Designer Series Paper
Detail Trio Punch
Crumb Cake Cardstock
Basic White Cardstock
Polished Pink Cardstock
Garden Green Ink
Polished Pink Ink
Tuxedo Black Ink
Loose Flower Flourishes
2021-2023 In Color Jewels
Dimensionals
Tear and Tape
Liquid Glue
Glue Dots
Simply Scored
Take Your Pick Tool
7/8" Circle Punch

I hope you enjoyed my box tutorial today.  Thank you for visiting my Blog today.
See you next time!

Love and Hugs,
Cathryn


Thursday, June 24, 2021

Chicken Coop Ghirardelli Chocolate Gift Box Tutorial with Hey Chick - Stampin' Up!


Hi Friends!
My project today is a Tutorial for a Gift Box that holds 3 Ghirardelli Chocolate squares.  I used Hey Chick stamp set, Chick dies, Penned Flowers dies, Messages die, Fine Art Floral Designer Series Paper and Bumblebee Gingham Ribbon.


I started with a piece of Real Red Cardstock sized  6 1/2  x  5 1/2".
I scored the 6 1/2" side at:
1,  3,  4  and  6".
I scored the 5 1/2" side at:
1,  3 1/2  and  4 1/2".
I cut the bottom of the flap with the scalloped die from Penned Flowers dies.
To cut and put the box together you can watch My Video Tutorial Here.
Below is a picture of how your Cardstock should look after scoring, cutting and die cutting it.


I attached a few pieces of Fine Art Floral Designer Series Paper to the box using Liquid Glue.
(2)  1 3/4  x  2 1/4"
(2)  1 3/4  x  3/4"
(2)  3/4  x  2 1/4"


I stamped the chick image from Hey Chick Stamp Set onto Basic White Cardstock using Tuxedo Black Ink.
I cut the chick out using the Hey Chick dies.
I colored the image with Stampin' Blends:
Dark Daffodil Delight for the body,
Dark Real Red for the Comb,
Dark Pumpkin Pie for the feet and
Light Pumpkin Pie for the beak.
I attached the image to the front of the box with Dimensionals.


I stamped the sentiment from Hey Chick stamp set with Tuxedo Black Ink onto a label I cut from Basic White Cardstock using the Messages die.  I cut it down and attached it to the front flap of the box with a Glue Dot.


I tied a bow with some Bumblebee Gingham Ribbon and attached it over the end of the sentiment with another Glue Dot.


I attached a 3/8" Velcro Dot to the underside of the flap and top of the box for a closure.


Supplies:
Hey Chick stamp set
Chick dies
Messages die
Penned Flowers dies
Fine Art Floral Designer Series Paper
Real Red Cardstock
Basic White Cardstock
Dark Daffodil Delight Stampin' Blend
Light and Dark Pumpkin Pie Stampin' Blends
Dark Real Red Stampin' Blend
Dimensionals
Basic White Cardstock
Bumblebee Gingham Ribbon
Glue Dots
Liquid Glue
3/8" Velcro Dots

Thank you for visiting my Blog today.  I hope you enjoyed my Chicken Box Tutorial.
See you next time!

Love and Hugs,
Cathryn


Tuesday, June 22, 2021

SNAILED IT GIFT BOX WITH HANDLES - Stampin' Up!


Hi Friends!
My project today is a Gift Box that has handles on it.  I used Snailed It stamp set, Snail dies, Layering Circle dies and Hippo and Friends dies.  The box measures  2 1/2  x  1 1/2  x  4 1/4".  It fits 2 rolls of Stampin' Up! Baker's Twine perfectly.  It is also a great size for treats or small gifts and jewelry.


I started with a piece of Real Red Cardstock sized  8 1/2  x  6".
I scored the 8 1/2" side at:
1/2,  2,  4 1/2  and  6".
I scored the 6" side at:
1 1/2  and  4".
To cut and put the box together you can watch my Video Tutorial Here.
Below is a picture of what your Cardstock should look like after scoring, cutting, rounding the corners with the Detail Trio Punch and pushing holes for the handles.


I attached a piece of Coastal Cabana Cardstock sized  10  x  2 1/4" to the body of the box by creasing it with my fingers and taking it off and reinforcing the folds with my Bone Folder.
I attached the Coastal Cabana Cardstock to the box with Liquid Glue.


I attached a few pieces of the Regals 6x6 Designer Series Paper to the front, back and sides of the box in sizes:
(2)  2 1/8  x  2 3/8"
(2)  2 1/8  x  1 3/8"
I attached the DSP to the box with Liquid Glue.
I cut 2 pieces of Pool Party Sheer Ribbon 14" long.
I tied them together through the handles, on the right side of the box, and tied a bow at the front.


I cut a scalloped circle from Real Red Cardstock and a smooth circle from Coastal Cabana Cardstock using the Layering Circle dies.  I attached them together with Liquid Glue.
I cut a shape from Basic White Cardstock using the Hippo and Friends dies.  I attached the die cut on top of the circles with Liquid Glue.


I stamped the snail image from Snailed It stamp set onto Basic White Cardstock using Tuxedo Black Ink.
I stamped the sentiment onto a Coastal Cabana Label, cut from the Messages die, and attached it to the top of the box with Liquid Glue.
I colored the snail body with Light Bermuda Bay and Light Pool Party Stampin' Blends.
I colored the shell with a Light Daffodil Delight Stampin' Blend.
I die cut the snail out using the Snail dies and attached it to the white shape with Dimensionals.
I attached the entire piece to the front of the box with Dimensionals.
For the final touch I added Resin Heart Embellishments to the sides of the sentiment and the letter on the snail.


Supplies:
Snailed It stamp set
Snail dies
Layering Circle dies
Hippo and Friends dies
Messages die
Detail Trio Punch
Resin Heart Embellishments
Real Red Cardstock
Coastal Cabana Cardstock
Basic White Cardstock
Tuxedo Black Ink
Light Daffodil Delight Stampin' Blend
Light Bermuda Bay Stampin' Blend
Light Pool Party Blend
Pool Party Sheer Ribbon
Dimensionals
Liquid Glue
Tear and Tape
7/8" Circle Punch
Simply Scored
Take Your Pick Tool

I hope you enjoyed my project today.  Thank you for visiting my Blog.
See you next time!

Love and Hugs,
Cathryn


Friday, June 18, 2021

SWEET ICE CREAM LIP GLOSS GIFT BOX with SCALLOPED CONTOURS DIES - Stampin' Up!


Hi Friends!
Today's project is a gift box for some adorable Lip Glosses I found at Walmart this week.  It also has a place inside to write a greeting to the recipient.  I used Sweet Ice Cream stamp set, the Ice Cream Cone Builder Punch, Pansy Petals Designer Series Paper and Layering Circle dies.


I started with a piece of Fresh Freesia Cardstock sized  9  x  8 1/4".
I scored the 9" side at:
3 1/4,  4 1/4,  7 1/2  and  8 1/2".
I scored the  8 1/4" side at:
1/2,  1 1/2,  6 3/4  and  7 3/4".
To cut and put the box together you can watch my Video Tutorial Here.
Below is a picture of how your Cardstock should look after scoring, cutting and rounding the corners with the Detail Trio Punch.  I put the box together with Tear and Tape.


I attached several pieces of Pansy Petals Designer Series Paper in sizes:
(1)  5  x  3"
(2)  5  x  3/4"
(2)  3  x  3/4"
I attached the DSP to the box with Liquid Glue.


I cut a scalloped square out of Fresh Freesia Cardstock using the Scalloped Contours dies.
I cut a stitched rectangle out of 2021-2023 In Color Designser Series Paper using the Rectangle Stitched dies.  I attached them together with Liquid Glue and attached them to the cover of the box with Dimensionals.


I stamped the cone pieces from Sweet Ice Cream stamp set onto Basic White Cardstock.
I stamped the cone with Crumb Cake Ink.  The triangle piece I stamped off and then the criss-cross pieces I stamped with full strength Crumb Cake.
I stamped the bottom ice cream with Polished Pink Ink and the top one with Fresh Freesia Ink.
I glued the Pink ice cream top to the top of the cone and the Purple on top of the pink with Liquid Glue.
I attached the ice cream to the stitched rectangles with Dimensionals.


I tied Polished Pink and Fresh Freesia Open Weave Ribbons together in a bow and attached it above the rectangles with 2 glue dots.
For the final touches I added White Resin Heart Embellishments and Rhinestone Basic Jewels to the ice cream and sentiment circles.


You can shop for your Stampin' Up! supplies with Me here.

Supplies:

Thank you for visiting my Blog today.  I hope you enjoyed my project today.
See you next time!

Love and Hugs,
Cathryn


Wednesday, June 16, 2021

SWEET STRAWBERRY FRENCH MACAROON GIFT BOX - Stampin' Up!


Hi Friends!
I used the Sweet Strawberry Bundle for my project today.  I made a gift box for 3 French Macaroons that are 1 1/2" circles.  The box measures  2 x 2 x 3 1/2".  It will also fit larger Macaroons.  I used Sweet Strawberry stamp set, the Strawberry Builder Punch and 2021-23 In Color Designser Series Paper.


I started with a piece of Soft Seafoam Cardstock sized  8 1/2  x  8".
I scored the  8 1/2"  side at:
1/2,  2 1/2,  4 1/2  and  6 1/2".
I scored the  8" side at:
2,  5 1/2  and  7 1/2".
Below is an example of how your paper should look after scoring and cutting.
To cut the box you can watch my Video Tutorial Here.


For this box I used several pieces of 2021-2023 In Color Designer Series Paper in sizes:
(3)  3 3/8  x  1 7/8"
(2)  1 7/8  x  1 7/8"
Before putting the box together,  I attached one piece of DSP, sized  3 3/8  x  1 7/8", to the side that has the flap at the end.  I cut the window in that side using the Tasteful Label dies.
I attached a piece of Window Sheet,  3 3/8  x  1 7/8",  inside the box over the window opening with Glue Dots.
I put the box together using Tear and Tape.


I stamped 2 strawberry images from Sweet Strawberry stamp set onto Basic White Cardstock with Polished Pink Ink.
I stamped the strawberry tops with Soft Seafoam Ink.
I stamped the flowers (that fit in the punch) with Polished Pink Ink.
I stamped one of the large leaves with Soft Seafoam Ink.
I stamped the larger leaves and flowers image with Soft Seafoam Ink.
I punched out the strawberries and larger flowers using the Strawberry Builder Punch.
I fussy cut the small leaves and flowers from the larger image.


I attached the leaves to the box, as shown in the pictures, with Liquid Glue and I popped the Strawberries up with Dimensionals, and the flowers with Glue Dots.
I tied White and Blushing Bride Twine together in a bow and attached it the the top of one of the Strawberries with a Glue Dot.
For the final touch I added In Color Jewels to the middle of the flowers.


Supplies:
Small Circle Punch

I hope you enjoyed my project today.  Thank you for visiting my Blog today.
See you next time!

Love and Hugs,
Cathryn


Monday, June 14, 2021

ELEGANT FAVOR BOX with EXPRESSONS IN INK and ARTISTIC DIES - Stampin' Up!


Hi Friends!
Today I made a quick and easy Elegant Favor Box.  You can make 2 of these boxes from one piece of 8 1/2 x 11" Cardstock.  I used Expressions in Ink Designer Series Paper, Artistic dies, Encircled in Friendship stamp set and Layering Circle dies.


I started with a piece of Polished Pink Cardstock sized
8 1/4  x  5 1/2".
I scored the  8 1/4"  side at:
1/2,  3 1/2,  4 3/4  and  7 3/4".
I scored the  5 1/2"  side at:
1 1/4  and  4 1/4".
I scored each side of the  8 1/4"  side of the Cardstock to the 1st scoreline ONLY at:
2 1/4  and  6".
To cut and put the box together you can watch my Video Tutorial Here.
I also included a photo below of how your Cardstock should look after  scoring and cutting.


I attached Expressions in Ink Designer Series Paper to the front and back flap of the box in sizes:
(2)  2 3/4  x  2 3/4".
I attached the DSP to the box with Liquid Glue.


I cut the branch of leaves from Gold Foil Sheet using the Artistic dies.  I used only the 4 lowest leaves and stems of the die cut.
I used Liquid Glue only the top stem and the bases of the top leaves to the front of the box.


I punched two holes at the top of the box, through the front and back flaps together, with a 1/8" hole punch.  I put 2 Peppermint Patties inside and ran some Pale Papaya Open Weave Ribbon through the holes and tied a bow at the front.


I used the smallest circle and scalloped circle dies from the Layering Circle dies to cut a tag out of Espressions in Ink Designer Series Paper.
I stamped the sentiment from Encircled in Friendship stamp set onto the circle with Tuxedo Black Ink.


I punched a hole in the top of the tag with a 1/8" circle punch and tied some Gold Trim, from the Simply Elegant Trim Pack, through the hole.
I tied the tag underneath the Pale Papaya Ribbon.


Supplies:

Thank you for visiting my Blog today.  I hope you enjoyed my favor box today!
See you next time.

Love and Hugs,
Cathryn