Monday, August 30, 2021

PUMPKIN FOLD OVER TREAT BOX with CLEVER CATS - Stampin' Up!


Hi Friends!
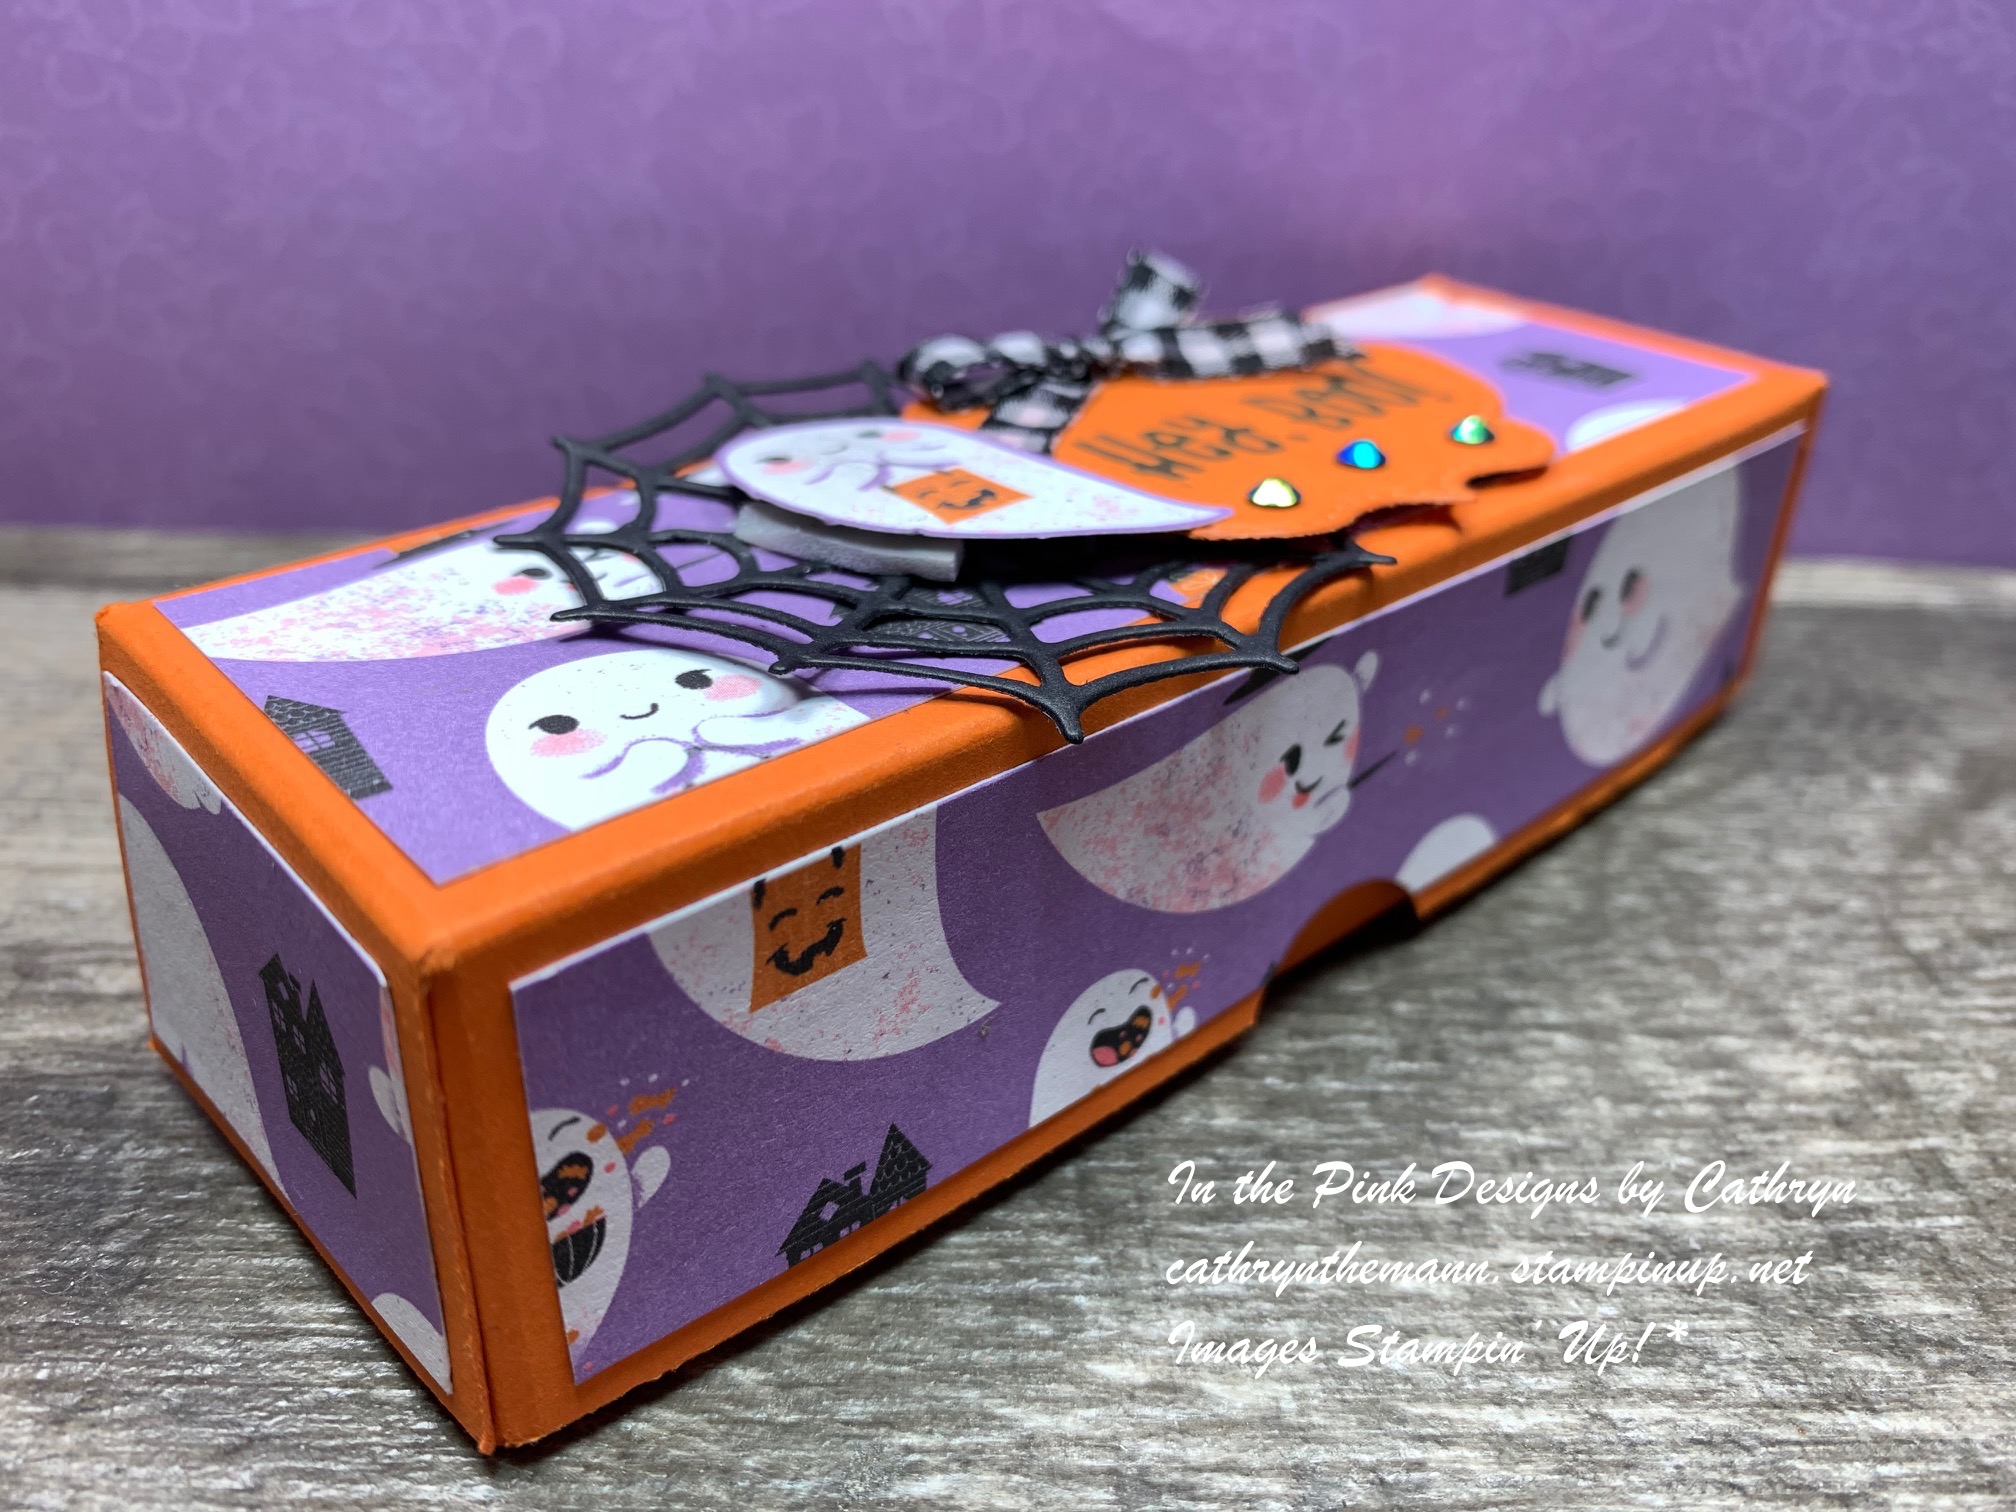
I have another Halloween project today!  It is a Pumpkin fold over treat box that measures  2 1/4  x  2 1/4  x  3/4".  I used Clever Cats stamp set, Frightfully Cute stamp set, Frightful Tags dies, Layering Circle dies, Cute Halloween Designer Series Paper, Cute Stars Adhesive Backed Sequins and Glittered Organdy Ribbon.  You can fit 2 fun sized candy bars or 1 Reese's Peanut Butter Cup inside the box.


I started with a piece of Pumpkin Pie Cardstock sized
9 3/4  x  4 1/4".
I scored the  9 3/4" side at:
2 3/4,  3 1/2,  6 1/4  and  7".
I scored the 4 1/4" side at:
3/4  and  3 1/2".
To cut and put the box together you can watch my Video Tutorial Here.
Below is a picture of what your Cardstock should look like after scoring, cutting and rounding the corners of the flap with the Detail Trio Punch.


I attached 7 pieces of Cute Halloween Designer Series Paper to the box.
(2)  2 1/2  x  2 1/2"  of pattern 1 for the flap and body of the box.
(1)  2 1/2  x  2 1/2" of pattern 2 for inside of the flap.
(4)  2 1/2  x  1/2"  of pattern 1 for the sides.
I attached the DSP to the box with Liquid Glue.


I stamped the pumpkin and witch hat from Clever Cats stamp set onto Basic White Cardstock.
I stamped the outline of the pumpkin with Tuxedo Black Ink.
I stamped the inside of the pumpkin with Pumpkin Pie Ink.
I colored the edges of the pumpkin with a Light Pumpkin Pie Stampin' Blend.
I stamped the witch hat with Tuxedo Black Ink.
I colored in the buckle with a Dark Daffodil Delight Stampin' Blend.
I fussy cut the pumpkin and hat out by hand.


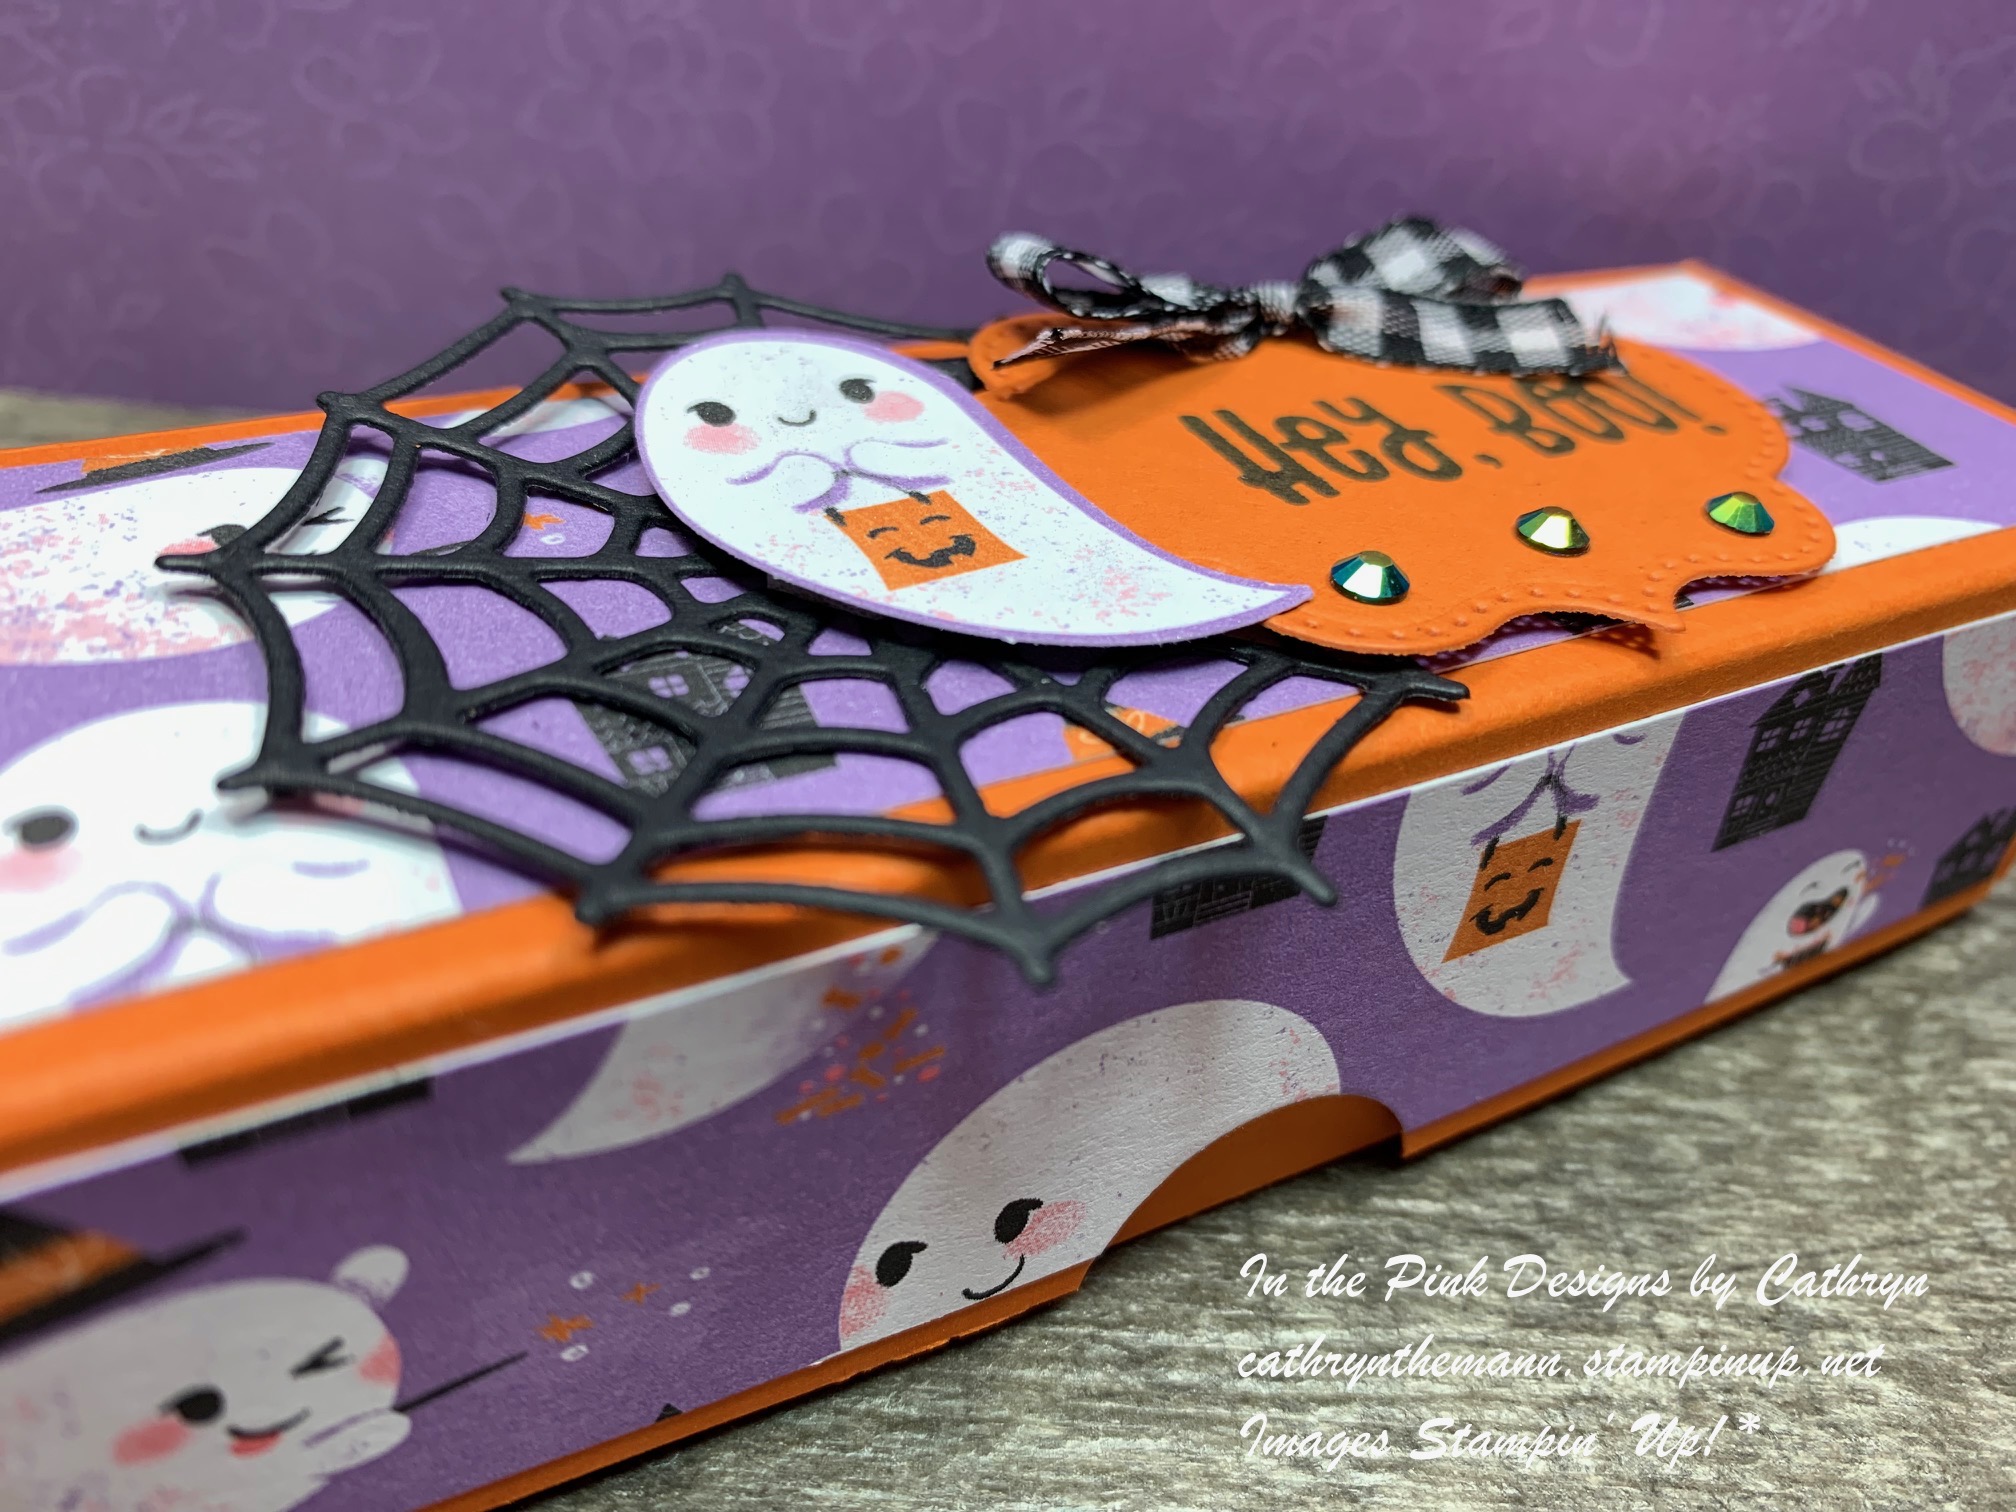
I stamped the sentiment from Frightfully Cute stamp set onto Basic White Cardstock with Pumpkin Pie Ink.
I cut the sentiment out with the circle die from the Frightful Tags die.
I attached the sentiment to the inside flap of the box with Liquid Glue.
I attached some Adhesive Velcro Dots to the inside of the box for the closure.


I cut a circle from the Cute Halloween DSP and a scallop circle from Basic Black Cardstock using the Layering Circle dies.  I attached them together with Liquid Glue.
I attached the pumpkin to the circles with Dimensionals.
I attached the witch hat to the top of the pumpkin with a Dimensional and a little Liquid Glue at the bottom.
I tied some Glittered Organdy Ribbon around the top of the box and tied a bow at the top.
I added some Wink of Stella Glitter to the hat and for the final touch I added 3 Cute Stars Adhesive Backed Sequins to the right of the pumpkin.


Supplies:
Clever Cats stamp set
Frightfully Cute stamps et
Frightful Tag dies
Layering Circle dies
Cute Halloween Designer Series Paper
Cute Stars Adhesive Backed Sequins
Glittered Organdy Ribbon
Pumpkin Pie Cardstock
Basic Black Cardstock
Basic White Cardstock
Light Pumpkin Pie Stampin' Blend
Dark Daffodil Delight Stampin' Blend
Tear and Tape
Liquid Glue
Dimensionals
Simply Scored
Take Your Pick Tool
Adhesive Backed Velcro Dots (Amazon)

Thank you for visiting my Blog today!  I hope you enjoyed my Halloween project.  See you next time.

Love and Hugs,
Cathryn

Friday, August 27, 2021

HALLOWEEN PUMPKIN TREAT BOX with CUTEST HALLOWEEN - Stampin' Up!


Hi Friends!
My project today is a Pumpkin treat box that measures
3 1/2  x  1 1/2  x  3 3/4".  I fit 2 Ring Pops inside very nicely.  I used Cutest Halloween stamp set, the Halloween Punch, Cute Halloween Designer Series Paper, Rectangle Stitched dies, Scalloped Contours dies and Glittered Organdy Ribbon.


I started with a pice of Pumpkin Pie Cardstock sized  10 1/2  x  5 1/4".
I scored the 10 1/2" side at:
1 1/2,  5,  6 1/2  and  10".
I scored the 5 1/4" side at:
1 1/2,  3 3/4  and  4 3/4".
Below is a picture of how your Cardstock should look after scoring and cutting.
To cut and put the box together you can also watch my Video Tutorial Here.


I attached several pieces of Cute Halloween Designer Series Paper to the box.
(2)  3 1/4  x  2"
(2)  3 1/4  x  3/4"
(2)  1 1/4  x  2"
I attached the DSP to the box with Liquid Glue.
I punched two holes in the top of the box with a hole punch.
I ran Glittered Organdy Ribbon through the holes and tied a bow at the front.


I cut a Scalloped Rectangle from Old Olive Cardstock using the Scalloped Contours dies.
I attached the rectangle to the front of the box with Liquid Glue.
I cut a Stitched Rectangle from Basic White Cardstock using the Stitched Rectangle dies.
I stamped the sentiment from Cute Halloween stamp set onto the rectangle with Tuxedo Black Ink.
I attached the Basic White rectangle on top of the Olive Olive rectangle with Liquid Glue.


I stamped the pumpkin outline onto Basic White Cardstock with Tuxedo Black Ink.
I stamped the inside of the pumpkin with Pumpkin Pie Ink and the smile with Tuxedo Black Ink.
I stamped the cheeks with Flirty Flamingo Ink.
I colored in the stem with a Light Mossy Meadow Stampin' Blend.
I cut the pumpkin out using the Halloween Punch and attached it next to the sentiment with Dimensionals.
For the final touch I added 3 Matte Decorative Dots around the pumpkin.


Supplies:
Cutest Halloween stamp set
Cute Halloween Designer Series Paper
Halloween Punch
Rectangle Stitched dies
Scalloped Contours dies
Glittered Organdy Ribbon
Pumpkin Pie Cardstock
Old Olive Card-stock
Tuxedo Black Ink
Pumpkin Pie Ink
Flirty Flamingo Ink
Matte Decorative Dots
Liquid Glue
Dimensionals
Simply Scored
Take Your Pick Tool
Hole Punch

Thank you for visiting my Blog today!  I hope you enjoyed my Pumpkin Box today.
See you next time!

Love and Hugs,
Cathryn


Wednesday, August 25, 2021

CUTEST HALLOWEEN VAMPIRE BAT WINDOW BOX TUTORIAL with SEASONAL LABELS DIES - Stampin' Up!


Hi Friends!
My project today is a Vampire Bat Window Box that measures
5 1/4  x 3 x 2".  I used Cutest Halloween stamp set, Cute Halloween Designer Series Paper, Frightful Tags dies, Seasonal Labels dies, Layering Circles dies and the Checks Embossing Folder.  This box will hold a lot of treats or gifts.


I started with a piece of Basic Black Cardstock sized  10 1/2  x  7 1/4".
I scored the 10 1/2" side at:
2,  5,  7  and  10".
I scored the 7 1/4" side at:
2".
To cut and put the box together you can watch my Video Tutorial Here.
Below is a picture of my Template.


I used 2 pieces of Cute Halloween Designer Series Paper on the box sized  5  x  2 3/4".
I attached ONLY 1 piece on the front panel of the box with Stampin' Seal.
I used a label die from the Seasonal Labels dies to cut a window in the same panel.
After cutting I added a piece of Window Sheet to the inside of the window sized 3 x 2 1/2" with Glue Dots.
I attached the other piece of DSP to the remaining panel with Liquid Glue.


I cut a large label from Highland Heather Cardstock using the Seasonal Labels dies.
I embossed the label using the Checks Embossing Folder.
I scored the long side of the label at  1 7/8".
I attached the back half of the label to the back of the box with Liquid Glue.
I added Adhesive Velcro Dots to the inside of the label and front of the box for the closure.


I cut the bat image from the Cute Halloween DSP with a 1 5/8" circle from the Layering Circle dies.
I cut a larger scalloped circle from Highland Heather Cardstock and a Basic Black Cardstock 1 7/8" circle using the same dies.
I attached the bat circle to the scalloped circle with Liquid Glue.
I attached the scallop to the Basic Black Circle with Dimensionals.
I attached the entire piece to the front flap with Liquid Glue.


I cut a small label from Highland Heather Cardstock using the Frightful Tags dies.
I stamped the sentiment from Cutest Halloween stamp set onto the tag with Tuxedo Black Ink.
I attached the label to the box with a glue dot at the top of the window.
I tied a bow with Black and White Gingham Ribbon and attached it over the tip of the label with 2 Glue Dots.


I added 3 Evening Evergreen Jewels, from the 2021-2023 In Color Jewels, to the bottom left side of the box.
For the final touch I added some Wink of Stella Glitter to the Vampire Bats cape and pants.


Supplies:
Cutest Halloween stamp set
Cute Halloween Designer Series Paper
Seasonal Labels dies
Frightful Tags dies
Layering Circle dies
Checks Embossing Folder
Window Sheets
Basic Black Cardstock
Highland Heather Cardstock
Black and White Gingham Ribbon
Tuxedo Black Ink
2021-2023 In Color Jewels
Simply Scored
Take Your Pick Tool
Tear and Tape
Stampin' Seal
Liquid Glue
5/8" Adhesive Velcro Dots (Amazon)

Thank you for visiting my Blog today.  I hope you enjoyed my Halloween Window Box!
See you next time.

Love and Hugs,
Cathryn

Tuesday, August 24, 2021

TEA LIGHT WINDOW BOX with WHIMSICAL TREES and HOLLY JOLLY WISHES - Stampin' Up!


Hi Friends!
My project today is a gift box that fits 4 tea lights.  It has a window on the inside so you can see the tea lights without opening the package. The box measures  3 x 3 x 3/4".  I used  Whimsical Trees stamp set, Holly Jolly Wishes,  Christmas Tree dies, Seasonal Labels dies, Layering Circle dies and Tidings of Christmas Designer Series Paper.


I started with a piece of Evening Evergreen Cardstock sized  8 x 5".
I scored the 8" side at:
3/4,  3 3/4,  4 1/2  and  7 1/2".
I scored the 5" side at:
3/4,  3 3/4  and  4 1/2".

I used a second piece of Evening Evergreen Cardstock sized
3 3/4 x 3".
I scored the  3 3/4" side ONLY at 3/4".
Below is a picture of what your Cardstock should look like after scoring, cutting and rounded the corners of the flap with the Detail Trio Punch.
To cut and put the box together you can watch my Video Tutorial Here.


Before putting  the box together I attached a  2 3/4  x  2 3/4" piece of Tidings of Christmas Designer Series Paper, to the side of the box that has the flap, with Stampin' Seal.
I cut a hole in that side using the Layering Circle dies.
I attached a piece Window Sheet to the inside of the circle hole sized  2 1/2 x 2 1/2" with Glue Dots.


I attached the second piece of Evening Evergreen Cardstock to the side of the box with Liquid Glue.  Make sure you do not put the extra Cardstock over the box flap.


I attached the rest of the Tidings of Christmas Designer Series Paper to the box with Liquid Glue.
(1) 2 3/4  x  2 3/4" for the top of the box.
(4)  2 3/4  x  1/2"  for the sides of the box
.

I stamped the sentiment from Holly Jolly Wishes stamp set onto Basic White Cardstock with Cherry Cobbler Ink.  I cut the sentiment out with a label from the Seasonal Labels dies.
I attached the piece of Cardstock and DSP that I cut out of the box, to the inside of the extra piece of Cardstock that is now the top flap.
I attached the sentiment label onto of the circle with Liquid Glue.


I stamped the Christmas tree image from Whimsical Trees stamp set onto Basic White Cardstock with Evening Evergreen Ink.  I cut it out using the Christmas Tree dies.
I cut the garland from Cherry Cobbler Cardstock using the same dies.
I cut the bottom two layers off the tree and attached the garland that would fit, then clipped the extra off.
I cut a circle from Evening Evergreen Cardstock and a scalloped circle form Basic White Cardstock using the Layering Circle dies.  I attached the circles together with Liquid Glue.
I attached the tree to the circles with Liquid Glue also.


I tied Cherry Cobbler and Gold Ribbon around the box and tied a bow at the side where the flap is.
I attached the Tree and circles on top of the ribbon with Dimensionals.
For the final touch I added 3 Gilded Gems around the tree.


Supplies:
Whimsical Trees stamp set
Christmas Tree dies
Holly Jolly Wishes stamp set
Seasonal Labels dies
Layering Circle dies
Tidings of Christmas Designer Series Paper
Evening Evergreen Cardstock
Cherry Cobbler Cardstock
Basic White Cardstock
Cherry Cobbler and Gold Ribbon
Gilded Gems
Tear and Tape
Liquid Glue
Glue Dots
Stampin' Seal
Dimensionals
Simply Scored
Take Your Pick Tool

Thank you for visiting my Blog today!  I hope you enjoyed my Tea Light box.
See you soon.

Love and Hugs,
Cathryn

Friday, August 20, 2021

PEACEFUL DEER SCALLOPED BOX with DEER BUILDER PUNCH - Stampin' Up!


Hi Friends!
My project today is a  3 3/4  x  3 5/8  x  1 1/4" gift box that has a Scalloped front flap.  I used Peaceful Deer stamp set, the Deer Builder Punch, Peaceful Prints SALEABRATION Designer Series Paper and Matte Decorative Dots.  I did a version of the box with Polished Pink and one with Real Red.


I started with a pieces of the Peaceful Prints Designer Series Paper sized  10 1/2  x  6".
I scored the 10 1/2" side at:
1 1/4,  5,  6 1/4  and  10".
I scored the 6" side at:
1 1/4,  4  and  5".
After cutting I cut the edge of the flap with the Scallop die from the Penned Flower dies.
To cut and put the box together you can watch my Video Tutorial Here.
Below is a picture of what your DSP should look like after scoring and cutting.


I cut two holes in the scalloped flap with a 1/16" hole punch.  (You can also just poke holes with the paper piercer on your Take Your Pick Tool).
I closed the box and used a pencil to mark where the 2 holes were onto the lower flap.  Then I punched 2 more holes.
I ran Linen Thread and White Baker's Twine through the holes and tied the box closed with a bow in the front.


I stamped the 3 tree image from Peaceful Deer stamp set onto a
3 1/4  x  2 1/4" piece of Peaceful Prints Designer Series Paper with Evening Evergreen Ink.
I stamped the Deer image from Peaceful Deer stamp set onto Crumb Cake Cardstock with Crumb Cake Ink.
I attached the Deer to the DSP with Dimensionals.


I attached the DSP to a piece of Real Red (or Polished Pink) Cardstock, sized  3 1/2  x  2 1/2", with Liquid Glue.
I attached the Cardstock to the box with Dimensionals.
I cut the antlers from Early Espresso Cardstock using the Deer Builder Punch.
I attached them behind the deers head on the DSP with Liquid Glue.


I added some Wink of Stella Glitter to the trees and for the final touch I added a red nose (or Polished Pink) to the deer from the Matte Decorative Dots.


Supplies:
Peaceful Deer stamp set
Deer Builder Punch
Peaceful Prints Designer Series Paper
Real Red Cardstock
Polished Pink Cardstock
Crumb Cake Cardstock
Early Espresso Cardstock
Evening Evergreen Ink
Crumb Cake Ink
Matte Decorative Dots
2021-2023 In Color Jewels
Linen Thread
White Baker's Twine
Tear and Tape
Liquid Glue
Dimensionals
Simply Scored Tool
Take Your Pick Tool

I hope you enjoyed my project today.  Thank you for visiting my Blog today.
See you next time!
 
Love and Hugs,
Cathryn


Wednesday, August 18, 2021

CHRISTMAS SEASON GREENERY GIFT BOX with HOLLY JOLLY WISHES - Stampin' Up!


Hi Friends!
My project today is a side flap gift box that measures  5 x 4  x 1 1/2".  I used  Christmas Season stamp set, Seasonal Labels dies, Holly Jolly Wishes stamp set and Tidings of Christmas Designer Series Paper.  This box will fit a large "share size" bag of M&M's or 2 Stampin' Up! Ink Pads.


I started with a piece of Garden Green Cardstock sized  11 x 7 1/2".
I scored the 11" side at:
1/2,  1 3/4,  5 3/4  and  7".
I scored the 7 1/2" side at:
1 1/4  and  6 1/4".
To cut and put the box together you can watch my Video Tutorial here.
Below is a picture of how your Cardstock should look after scoring and cutting.
I put the box together with Tear and Tape.


I attached 5 pieces of Tidings of Christmas Designer Series Paper to the box.
(1)  3 3/4  x  4 3/4"  for the top.
(2)  1  x  4 3/4"  for the long sides
(2)  1  x  3 3/4"  for the short sides
I attached the DSP to the box with Liquid Glue.


I cut a large label from Tidings of Christmas DSP using the Seasonal Labels dies.
I attached it to the middle of the box top with Liquid Glue.
I stamped the sentiment from Holly Jolly Wishes stamp set onto Basic White Cardstock with Cherry Cobbler Ink.
I cut the sentiment out with a small label from the Seasonal Labels dies.
I attached it in the middle of the large label with Dimensionals in the middle of the label back.


I stamped several images from Christmas Season stamp set onto Basic White Cardstock.
I used Garden Green Ink for the holly leaves, pine and berry sprig.
I used Cherry Cobbler Ink for the berries.
I used Crumb Cake and Early Espresso Inks for the Pine Cones.
I cut the images out using the Seasonal Labels dies.


I attached all of the images around the sentiment label with Liquid Glue and Dimensionals.
I tied a bow with Metallic Mesh Ribbon and attached it to the box with Glue Dots.
I added some Red Holiday Rhinestone Basic Jewels to the label and for the final touch I added Wink of Stella Glitter to the images.


Supplies:
Christmas Season stamp set
Seasonal Labels dies
Holly Jolly Wishes stamp set
Tidings of Christmas Designer Series Paper
Metallic Mesh Ribbon
Holiday Rhinestone Basic Jewels
Garden Green Cardstock
Basic White Cardstock
Cherry Cobbler Ink
Garden Green Ink
Crumb Cake Ink
Early Espresso Ink
Detail Trio Punch
Tear and Tape
Liquid Glue
Mini Dimensionals
Dimensionals
Wink of Stella
7/8" Circle Punch

I hope you enjoyed my box today.  Thank you for visiting my Blog.
See you next time!

Love and Hugs,
Cathryn


Monday, August 16, 2021

CUTEST HALLOWEEN REGULAR SIZE CANDY BAR BOX with the HALLOWEEN PUNCH - Stampin' Up!


Hi Friends!
I had a request a regular size candy bar sized box so I made one that is  5 1/4  x  1 3/4  x  1 1/4".  This we fit a Snickers or Milky Way bar with some extra room for a little shredded paper.  I made it a little bigger so other sizes of candy bars will fit too.
I used Cutest Halloween stamp set, the Halloween Punch, Frightful Tags dies, Cute Halloween Designer Series Paper and Black and White Gingham Ribbon.


I started with a piece of Pumpkin Pie Cardstock sized
7 3/4  x  7 1/4".
I scored the  7 3/4" side at:
1 1/4  and  6 1/2".
I scored the  7 1/4" side at:
1 1/4,  3,  4 1/4  and  6".
To cut and put the box together you can watch my Video Tutorial Here.
Below is what your Cardstock should look like after scoring and cutting.
I put the box together with Tear and Tape.


I attached 5 pieces of Cute Halloween 6x6 Designer Series Paper to the box.
(1)  5  x  1 1/2"  for the top.
(2)  5  x  1"  for the long sides.
(2)  1 1/2  x  1"  for the short sides.
I attached the DSP to the box with Liquid Glue.


I cut the Label from Pumpkin Pie Cardstock and the Spider Web from Basic Black Cardstock using the Frightful Label dies.
I stamped the sentiment from Cutest Halloween stamp set onto the Pumpkin Pie Label with Tuxedo Black Ink.


I attached the Spider Web, with a dot of Liquid Glue in the center, to the Left/Middle of the box lid.
I attached the sentiment label to the Right/Middle, covering a little of the Spider Web, with Dimensionals.


I cut a ghost from the Cute Halloween Designer Series Paper using the Halloween Punch.
I attached it, next to the label - on top of the Spider Web - with Dimensionals on the left and a dot of glue on the right


I tied a small bow with Black and White Gingham Ribbon and attached it to the Label with a Glue Dot.
I put my Snickers bar inside the box with some Shredded paper.
I added 3 2021-2023 In Color Jewels to the bottom of the label.
For the finishing touch I added some Wink of Stella Glitter to the ghost.


Supplies:
Cutest Halloween stamp set
Halloween Punch
Cute Halloween Designer Series Paper
Frightful Tags dies
Black and White Gingham Ribbon
Pumpkin Pie Cardstock
Basic Black Cardstock
2021-2023 In Color Jewels
Wink of Stella Glitter Pen
Liquid Glue
Glue dots
Simply Scored Tool
Take Your Pick Tool
7/8" hole punch or similar size

Thank you for visiting my Blog today.  I hope you enjoyed my tutorial.
See you next time!

Love and Hugs,
Cathryn