Tuesday, January 31, 2023

Valentine's Day TREAT BOX with SHARE A MILKSHAKE - Stampin' Up!


Hi Friends!
My project today is a Valentine's Day Treat Box that measures  3 1/2  x  5 3/4 x  1".  I used Share a MilkShake stamp set and die set, Dandy Designs Saleabration Designer Series Paper, Stylish Shapes dies and Layering Circle dies.


I started with a piece of Fresh Freesia Cardstock sized
9 1/2  x  6 3/4".
I scored the  9 1/2" side at:
1,  4 1/2,  5 1/2  and  9".
I scored the  6 3/4" side at:
1,  5 1/2  and  6 1/4".
To cut and put the box together you can watch my Video Tutorial Here.
Below is a picture of how your Cardstock should look after scoring, cutting and rounding the corners of the top flaps.


I attached 4 pieces of Dandy Designs Designer Series Paper to the box.
(2)  3 1/4  x  4 1/4"  for the front and back.
(2)  1/2  x  3 1/4"  top.
I attached the DSP to the box with Liquid Glue.


I stamped the Dish of Ice Cream onto Basic White Cardstock.
Dish & Spoon  -  Fresh Freesia Ink
Ice Cream  -  Polished Pink Ink
Cherry  -  Sweet Sorbet Ink
I cut the images out using the Share a Milkshake dies.


I put the Ice Cream together with Liquid Glue and a Silicone Mat.
I cut a  2 5/8" circle from Basic White Cardstock using the Stylish Shapes dies.
I cut a  2 7/8" scalloped circle from Fresh Freesia Cardstock using the Layering Circle dies.
I attached the circles together with Liquid Glue.
I attached the Ice Cream to the middle of the circles with Dimensionals.  I attached the end of the spoon with a small dab of Liquid Glue.


I attached the entire embellishment to the middle of the box front with Dimensionals.
I stamped the sentiment onto Basic White Cardstock with Polished Pink Ink.
I cut just the word "Valentine" out and attached it to the bottom right of the box with Liquid Glue.
I cut 3 Hearts from Polished Pink Cardstock using the Share a Milkshake dies.
I attached the Large and Small Hearts to the upper left corner and the Medium Heart to the lower right corner with Liquid Glue.


I punched holes in the top flaps with a 1/8" (or 1/4") Hole Punch.
I ran Fresh Freesia Open Weave Ribbon through the holes and tied a bow at the front.
For the final touch I added 3 Fresh Freesia Opaque Adhesive Backed Gems to the Ice Cream.


Supplies:
Share a Milkshake stamp set
Share a Milkshake dies
Stylish Shapes dies
Layering Circle dies
Dandy Designs Designer Series Paper
Fresh Freesia Cardstock
Polished Pink Cardstock
Basic White Cardstock
Fresh Freesia Ink
Polished Pink Ink
Sweet Sorbet Ink
Opaque Adhesive Backed Gems
Fresh Freesia Open Weave Ribbon
Tear & Tape
Liquid Glue
Dimensionals
Simply Scored
Take Your Pick Tool
Corner Rounder
Nik-L-Nips Wax Bottle Candy  -  Walmart Valentine's Section

Thank you for visiting my Blog today.  I hope you enjoyed my Valentine's Day Treat Box.
See you next time!

Love and Hugs,
Cathryn

Friday, January 27, 2023

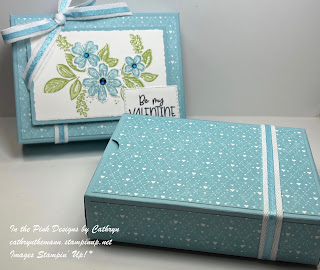
PETAL PARK VALENTINE with COUNTRY FLORAL LANE - Stampin' Up!


Hi Friends!
My project today is a large Valentine Treat/Gift Box that measures  5  x  3 3/4  x  1 1/4".   I used Petal Park stamps set, Petal Park Builder Punch, Deckled Rectangle dies, Rectangle Stitched dies, Country Floral lane Designer Series Paper and Adhesive Backed Milky Dots.


I started with a piece of Balmy Blue Cardstock sized
10 1/2  x  8 1/4".
I scored the  10 1/2" side at:
1 1/4,  5,  6 1/4  and  10".
I scored the  8 1/4" side at:
1 1/4,  6 1/4  and  7 1/2".
To cut and put the box together you can watch my Video Tutorial Here.
Below is a picture of how your Cardstock should look after scoring, cutting and rounding the top flap.


I attached 6 pieces of Country Floral Lane Designer Series Paper to the box.
(2)  4 3/4  x  3 1/2"  front and back.
(2)  4 3/4  x  1"  long sides.
(2)  3 1/2  x  1"  short sides.
I attached the DSP to the box with Liquid Glue.


I cut a  3 7/8  x  2 1/2" rectangle from Basic White Cardstock using the Deckled Rectangle dies.
I stamped the outline of the Leaves, from Petal Park stamp set, onto the rectangle with Pear Pizzazz Ink.
I stamped the inside of the Leaves with stamped off Pear Pizzazz Ink.
I stamped the outline of the Flowers onto a separate piece of Basic White Cardstock with Balmy Blue Ink.
I stamped the inside of the Flowers with stamped off Balmy Blue Ink.
I cut the Flowers out using the Petal Park Builder Punch.


I attached the flowers around the leaves with Liquid Glue.
I cut another rectangle from Balmy Blue Cardstock sized  4 1/8  x  2 3/4".
I attached the Deckled Rectangle on top of the Balmy Blue one with Liquid Glue.
I wound Balmy Blue & White Double Stitched Ribbon around the left side of the box and tied a bow at the top.


I attached the rectangles over the ribbon with Dimensionals.
I cut a  1 5/8  x  1 1/8"  rectangle from Basic White Cardstock using the Rectangle Stitched dies.
I stamped the sentiment, from Share a Milkshake stamp set, onto the rectangle with Night of Navy Ink.
I attached the sentiment to the lower right side of the box with Dimensionals and Liquid Glue.
For the final touch I added 3 Night of Navy Milky Dots to the middle of the flowers.


Supplies:
Petal Park stamp set
Petal Park Builder Punch
Share a Milkshake stamp set
Deckled Rectangle dies
Rectangle Stitched dies
Country Floral lane Designer Series Paper
Balmy Blue Cardstock
Basic White Cardstock
Balmy Blue Ink
Night of Navy Ink
Balmy Blue & White Double Stitched Ribbon
Adhesive Backed Milky Dots
Tear and Tape
Liquid Glue
Dimensionals
Small Circle Punch
Simply Scored
Take Your Pick Tool

Thank you for visiting my Blog today.  I hope you enjoyed my Blue Valentine Gift Box.
See you next time!

Love and Hugs,
Cathryn

Wednesday, January 25, 2023

SILLY GOOSE Valentine's Day TREAT BOX with RECTANGLE STITCHED DIES - Stampin' Up!


Hi Friends!
My project today is a Valentine's Day Treat Box that measures  4 1/2  x  3  x  3/4".  I used Silly Goose stamp set, Country Bouquet stamp set, Rectangle Stitched dies, Stylish Shapes dies and Country Floral Lane Designer Series Paper.


I started with a piece of Sweet Sorbet Cardstock sized
11  x  7 1/2".
I scored the  11" side at:
1/2,  5,  5 3/4  and  10 1/4".
I scored the  7 1/2" side at:
3/4,  3 3/4  and  4 1/2".
To cut and put the box together you can watch my Video Tutorial Here.
Below is a picture of how your Cardstock should look after scoring and cutting.


I attached several pieces of Country Floral Lane Designer Series Paper to the box.
(4)  4 1/4  x  2 3/4
3 of the Heart Pattern for the front flap, back of the front flap and the back of the box.
1 of the Striped Pattern for the inside body of the box.
I attached the DSP to the box with Liquid Glue.


I cut a  3 1/2  x  2 1/4" Rectangle from Basic White Cardstock using the Rectangle Stitched dies.
I stamped the Geese, from Silly Goose stamp set, onto the Rectangle with Tuxedo Black Ink.
I colored the image with Stampin' Blends.
Light Smokey Slate and a Color Lifter  -  Ducks
Light and Dark Pumpkin Pie  -  Beaks
Dark Daffodil Delight  -  Feet
Light Pool Party  -  Shadow


I attached the Rectangle to the front of the box with Dimensionals.
I cut two labels out using the Stylish Shapes dies.
A small one from Sweet Sorbet Cardstock and a large one from Basic White Cardstock
I stamped the sentiment "Goose Bumps" onto the small label with Tuxedo Black Ink.
I attached the small label to the right side of the Geese with a Mini Dimensional and Liquid Glue.
I stamped the "Happy Valentine's Day" sentiment, from Country Bouquet stamp set, onto the large label with Sweet Sorbet Ink.
I attached the large label inside the box with Liquid Glue.


I attached 2 low profile Adhesive Velcro Dots to the inside of the flap and body of the box for the closure.
I tied Burlap Stitched Ribbon around the top of the box and tied a bow at the center.
For the final touch I added 3 2022-2024 In Color Matte Decorative Dots around the Geese.


Supplies:
Silly Goose stamp set
Country Bouquet stamp set
Rectangle Stitched dies
Stylish Shapes dies
Country floral Lane Designer Series Paper
Sweet Sorbet Cardstock
Basic White Cardstock
Tuxedo Black Ink
Sweet Sorbet Ink
Stampin' Blends
Real Red & Burlap Ribbon Combo Pack
2022-2024 In Color Matte Decorative Dots
Tear and Tape
Liquid Glue
Dimensionals
Mini Dimensionals
Simply Scored
Take Your Pick Tool
Low Profile Adhesive Velcro Dots - Walmart

Thank you for visiting my Blog today.  I hope you enjoyed my Valentine's Day Treat Box.
See you next time!

Love and Hugs,
Cathryn

Tuesday, January 24, 2023

SPRING CARROT TREAT BOX with THANKS a BUNCH SALEABRATION stamp set


Hi Friends!
My project today is a Carrot Treat Box that measures  4 3/4  x  2 1/2  x  1 1/4".  I used Saleabration items.  Thanks a Bunch stamp set and Day at the Farm Designer Series Paper (earn each free with a $50 purchase).  I also used All that dies and Adhesive Backed Milky Dots.


I started with a piece of Pumpkin Pie Cardstock sized
8 x 8"
I scored the first 8" side at:
1/2,  3,  4 1/4  and  6 3/4".
I turned the paper 1/4 turn and scored that 8" side at:
1 1/4,  6  and  7 1/4".
To cut and put the box together you can watch my Video Tutorial Here.
Below is a picture of how your Cardstock should look after scoring, cutting and rounding the corners of the top flap.


I attached several piece of Day at the Farm Designer Series Paper to the box.
(2)  2 1/4  x  4 1/2"
(2)  1  x  4 1/2"
(2)  2 1/4  x  1"
I attached the DSP to the box with Liquid Glue.


I stamped the dark portion of the Carrot 3 times with Pumpkin Pie Ink.
I stamped the light area with Mango Melody Ink.
I stamped the large leaf with Parakeet Party Ink.
I stamped the top leaves with Garden Gren Ink.
I fussy cut the Carrots out by hand.
 

I attached the Carrots together first with Liquid Glue.
Next I attached them to the box with Mini Dimensionals and Dimensionals.
I tied a bow with Garden Green 3/8" Ribbon and attached it to the top of the Carrots with a Glue Dot and Liquid Glue.


I stamped the sentiment onto Basic White Cardstock with Garden Green Ink.
I cut the sentiment out using the oval die from All That dies.
I attached the Oval to the left side of the Carrots with a Dimensional and Liquid Glue.


I used a small circle punch to cut a finger grip in the top back of the box.
For the final touch I added 3 Mango Melody Adhesive Backed Milky Dots to the bottom of the sentiment oval.


Supplies:
Thanks a Bunch stamp set
Day at the Farm Designer Series Paper
All That dies
Pumpkin Pie Cardstock
Basic White Cardstock
Pumpkin Pie Ink
Mango Melody Ink
Parakeet Party Ink
Garden Green Ink
Real Red & Garden Green Ribbon Combo Pack
Adhesive Backed Milky Dots
Tear & Tape
Liquid Glue
Dimensionals
Mini Dimensionals
Simply Scored
Take Your Pick Tool
Corner Rounder
Small Circle Punch

Thank you for visiting my Blog today.  I hope you enjoyed my Spring Treat Box.
See you next time!

Love and Hugs,
Cathryn

Friday, January 20, 2023

SIMPLE EASTER BUNNY TREAT BOX with DANDY DESIGNS - Stampin' Up!


Hi Friends!
My project today is a treat box for a large size Reese's Peanut Butter Egg.  It measures  4  x  2 1/4  x  1".  I used the Easter Bunny stamp set, Easter Bunny Punch, Dandy Designs Saleabration Designer Series Paper and Something Fancy dies.


I started with a piece of Balmy Blue Cardstock sized
11  x  4 1/4".
I scored the  11" side at:
1,  5,  6  and  10".
I scored the  4 1/4" side at:
1  and  3 1/4".
To cut and put the box together you can watch my Video Tutorial Here.
Below is a picture of how your Cardstock should look after scoring and cutting.


I tied Fresh Freesia Open Weave Ribbon around the left side of the box and tied a bow on the top edge.
I attached several pieces of Dandy Designs Saleabration Designer Series Paper to the box.
(1)  3 3/4  x  2"  for the top.  I added this piece with Dimensionals.
(2)  3/4  x  3 3/4"  for the long sides.
(2)  3/4  x  2"  for the short sides.
I attached the side pieces with Liquid Glue.


I stamped the images, from the Easter Bunny stamp set, onto Basic White Cardstock with Tuxedo Black Ink.
I stamped 4 of the Grass image next to each other.
I colored the images with Stampin' Blends.
Light and Dark Smokey Slate  -  Bunny
Light Flirty Flamingo & Color Lifter -  Bunny's Nose and Ear\
Light and Dark Old Olive  -  Grass
Light Balmy Blue, Light Daffodil Delight, Light Polished Pink and Light & Dark Fresh Freesia  -  Eggs
I cut the Bunny out using the Easter Bunny Punch.
I fussy cut the Grass and Eggs out by hand.


I attached the Grass first, to the bottom of the DSP, with Liquid Glue.
Next I attached the Bunny with Dimensionals and Mini Dimensionals.
Then I attached the Eggs with Liquid Glue.


I cut a label from Basic White Using the Something Fancy dies.
I stamped the sentiment to the right side of the label with Liquid Glue.
I trimmed the left side of the label off and attached it to the upper left side with Liquid Glue.


I added some Wink of Stella Glitter to the Bunny's Tail, Ear and Nose.
For the final touch I added 3 White Opaque Adhesive Backed Gems to the upper right side of the box and 2 Fresh Freesia ones to the sentiment.


Supplies:
Balmy Blue Cardstock
Basic White Cardstock
Tuxedo Black Ink
Stampin' Blends
Fresh Freesia Open Weave Ribbon
Liquid Glue
Dimensionals
Mini Dimensionals
Small Circle Punch

Thank you for visiting my Blog today.  I hope you enjoyed my Easter Bunny Box.
See you next time!

Love and Hugs,
Cathryn


Wednesday, January 18, 2023

LINDT CHOCOLATE HEART VALENTINE WINDOW BOX with COUNTRY BOUQUET - Stampin' Up!


Hi Friends!
My project today is a Valentine's Day Treat Box that holds a Lindt Chocolate Heart.  It measures  3 1/2  x  2 1/2  x  1/2".  I used the Country Bouquet stamp set, Country Bouquet Punch, Stylish Shapes dies, Something Fancy dies and Country Gingham Designer Series Paper.


I started with a piece of Sweet Sorbet Cardstock sized
6 1/2  x  4".
I scored the  6 1/2" side at:
1/2,  3  and  3 1/2".
I scored the  4" side at:
1/2,  3  and  3 1/2".
To cut and put the box together you can watch my Video Tutorial Here.
Below is a picture of how your Cardstock should look after scoring and cutting.


I attached 2 pieces of Country Gingham Designer Series Paper to the box.
(2)  2 1/4  x  2 1/4".
I attached the front piece to the left hand side of the Cardstock before putting it together.
I cut the window out using a 1 3/4" circle die from the Stylish Shapes dies.
I attached a piece of Window Sheet, sized  2 1/4  x  2 1/4", to the inside of the box with Liquid Glue.
To put the rest of the box together you can watch my Video Tutorial Here.


I stamped the images, from Country Bouquet stamp set,  onto Basic White Cardstock.
Large Heart and Small Heart  -  Sweet Sorbet Ink
Leaves  -  Soft Seafoam Ink
I cut the images out using the Country Bouquet Punch.
I cut a label from Basic White Cardstock using the Something Fancy dies.
I stamped the sentiment on the right hand side of the label with Sweet Sorbet Ink.


I attached the large Heart to the box with Dimensionals.
I attached 3 leaves, under the edges of the Heart, with Liquid Glue.
I attached the Small Heart to the left side of the large Heart with a Dimensional and Liquid Glue.
I cut the sentiment short on the left side and attached it under the large Heart with Liquid Glue.


I punched 2 small holes in the top flaps of the box.
I ran Glittered Organdy Ribbon through the holes and tied a bow at the front.
For the final touch I added Sweet Sorbet 2022 - 2024 In Color Matte Decorated Dots to the large Heart and label.


Supplies:
 Country Bouquet stamp set
Country Bouquet Punch
Something Fancy dies
Stylish Shapes dies
Sweet Sorbet Cardstock
Basic White Cardstock
Sweet Sorbet Ink
Soft Seafoam Ink
Window Sheets
Glittered Organdy Ribbon
2022-2024 In Color Matte Decorative Dots
Liquid Glue
Dimensionals
Tear and Tape
Simply Scored
Take Your Pick Tool
Small Hole Punch

Thank you for visiting my Blog today.  I hope your enjoyed my Valentine's Day Window Box.
See you next time!

Love and Hugs,
Cathryn

Tuesday, January 17, 2023

SHARE A MILKSHAKE VALENTINE CRAFT TREAT BOX with COUNTRY GINGHAM - Stampin' Up!


Hi Friends!
My project today is a Valentine Treat Box that I made to hole a small craft kit and some Fruit Snacks.  I used the Share a Milkshake stamp set, Share a Milkshake dies, Country Gingham Designer Series paper and Opaque Adhesive Backed Gems.


I started with a piece of Gorgeous Grape Cardstock sized
8 1/2  x  6 3/4"
I scored the  8 1/2" side at:
1/2,  3 1/2,  4 1/2  and  7 1/2".
I scored the  6 3/4" side at:
1,  5  and  6".
To cut and put the box together you can watch my Video Tutorial Here.
Below is a picture of how your Cardstock should look after scoring and cutting.


I attached 6 pieces of Country Gingham Designer Series Paper to the box.
(2)  2 3/4  x  3 3/4"  front and back
(2)  3/4  x  3 3/4"  long sides
(2)  2 3/4  x  3/4"  short sides
I attached the DSP to the box with Liquid Glue.


I stamped the images, from Share a Milkshake stamp set, onto Basic White Cardstock.
Dark side of the Glass  -  Highland Heather Ink
Light part of the Glass  -  Fresh Freesia Ink
Ice Cream  -  Polished Pink Ink stamped off one time
Cherry  -  Sweet Sorbet Ink
Straw  -  Highland Heather Ink
I cut the images out using the Share a Milkshake dies.
I cut the Hot Fudge from Early Espresso Cardstock.


I cut the grid piece from Gorgeous Grape Cardstock using the Share a Milkshake dies.
I attached the Grid to the box using Liquid Glue, a Small piece of a Sponge and my Silicone Mat.
I attached the pieces of the Milkshake together with Liquid Glue and my Silicone Mat.
I attached the Milkshake to the box with Dimensionals and Mini Dimensionals.


I stamped the sentiment onto Basic White Cardstock with Sweet Sorbet Ink.
I cut the sentiment into 2 pieces by hand.
I attached the pieces to the lower right side of the Milkshake with Liquid Glue and Mini Dimensionals.
I tied a small bow with Fresh Freesia Open Weave Ribbon and attached it to the upper left of the box with a Glue Dot and Liquid Glue.
For the final touch I added 3 Gorgeous Grape Opaque Adhesive Backed Gems to the ice cream.


Supplies:
Gorgeous Grape Cardstock
Early Espresso Cardstock
Basic White Cardstock
Highland Heather Ink
Fresh Freesia Ink
Polished Pink Ink
Sweet Sorbet Ink
Opaque Adhesive Backed Gems
Fresh Freesia Open Weave Ribbon
Tear and Tape
Liquid Glue
Dimensionals
Mini Dimensionals
Glue Dots
Silicone Mat
Simply Scored
Take Your Pick Tool
Corner Rounder
Small Circle Punch
Craft Packs - Dollar Tree

Thank you for visiting my Blog today.  I hope you enjoyed my Valentine Box.
See you next time!

Love and Hugs,
Cathryn