Saturday, July 31, 2021

COUNTING SHEEP SALEABRATION DIY SCHOOL SUPPLY GIFT BOX with HARVEST MEADOW - Stampin' Up!


Hi Friends!
For my project today I used tome new SALEABRATION FREE ITEMS.  You can get the Counting Sheep Stamp set and Sheep dies free with purchase starting August 2, 2021.  Each of these SALEABRATION items are FREE with a $50 purchase from Stampin' Up!
My project is a School Supply Gift Box that uses the Counting Sheep stamp set, Sheep dies and Harvest Meadow Designer Series Paper.  The box measures  3 1/2  x  4 1/4  x  1 1/2".  Lots of different  gifts and treats will fit inside this box!


I started with a piece of Crumb Cake Cardstock sized
10 1/2  x  7 1/2".
I scored the  10 1/2" side at:
1/2,  4,  5 1/2  and  9".
I scored the  7 1/2" side at:
1 1/2,  4 1/2  and  6".
To cut and put the box together you can watch my Video Tutorial Here.
Below is a picture of what your Cardstock should look like after scoring and cutting it.
I put the Box together using Tear and Tape.


I attached several pieces of Harvest Meadow Designer Series Paper in sizes:
(2)  3 1/4  x  2 3/4"  for the front and back.
(2)  3 1/4  x  1 1/4"  for the fold over flap.
(2)  2 3/4  x  1 1/4"  for the sides.
I attached the DSP to the box with Liquid Glue.
I attached 5/8" Adhesive Velcro Dots to the inside of the front part of the fold over flap and the inside flap of the box.


I stamped one of the sheep images from Counting Sheep stamp set onto Basic White Cardstock with Tuxedo Black Ink.
I colored the Sheep with Light and Dark Smokey Slate Stampin' Blends.
I cut the image out using the Sheep dies.


I cut a piece of Old Olive Cardstock to  3/4  x  3 1/4".  I stamped the grass, from Counting Sheep stamp set, with Old Olive Ink 5 times.
I cut out the fence, clouds and sun using the Sheep dies.
I cut the fence from Soft Suede Cardstock, the sun from Daffodil Delight Cardstock and the clouds from Basic White Cardstock.
I attached them to the from of the box, as shown in the picture, with Liquid Glue.
I attached the sheep over the fence with Dimensionals.


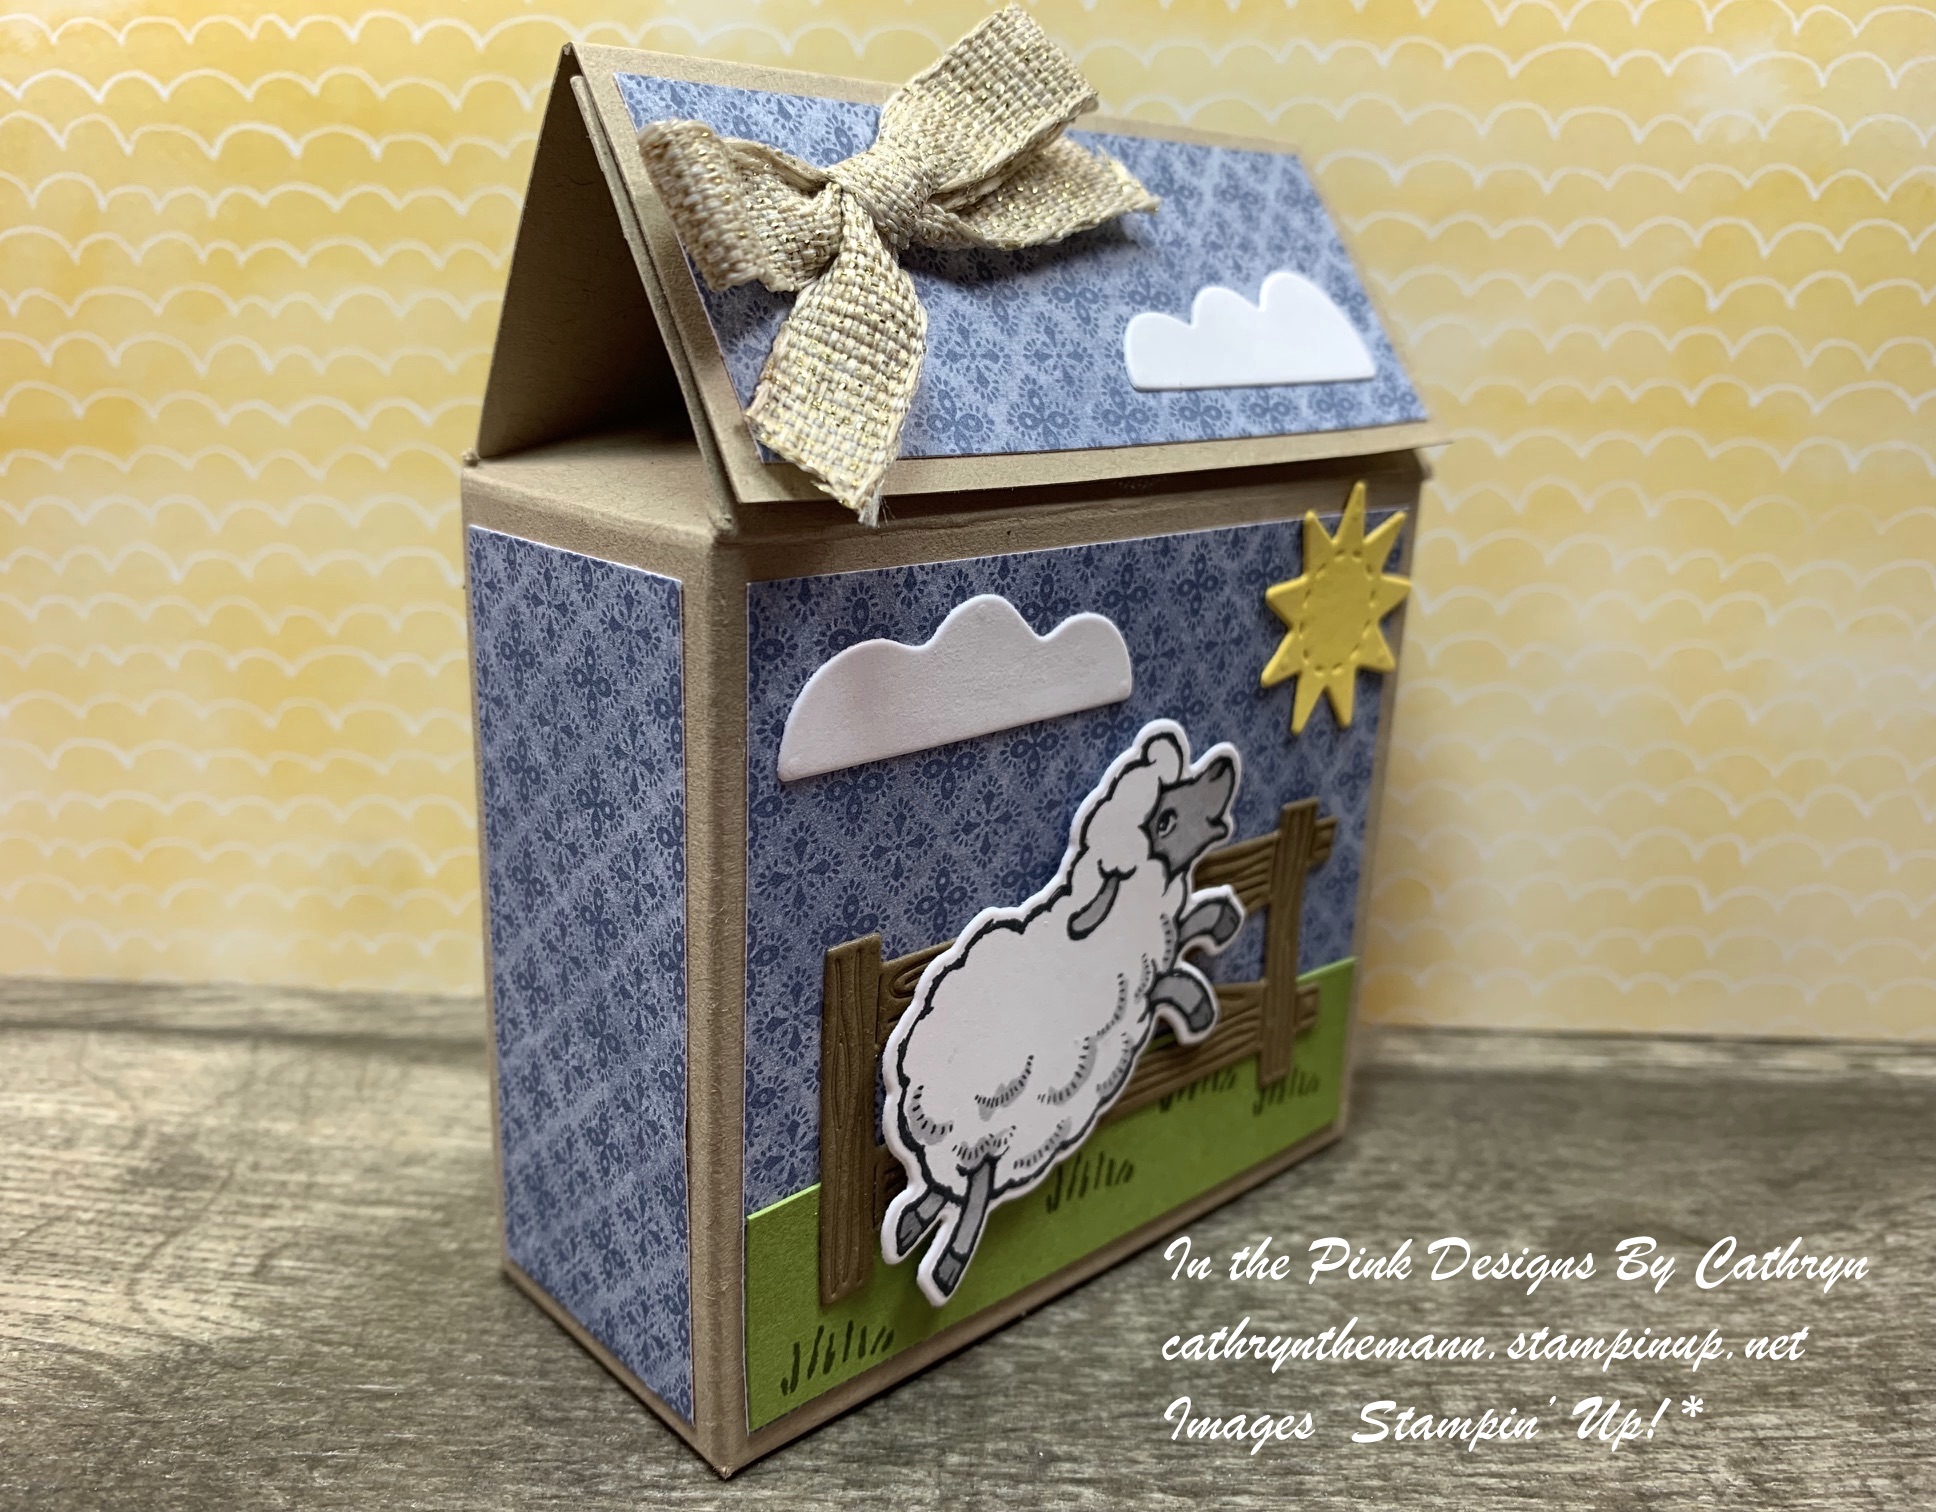
I tied a bow with Fine Art Ribbon and attached it to the front flap with Glue Dots.
For the final touch I added Wink of Stella Glitter to the sun and clouds.


Supplies:
Counting Sheep stamp set - Free SALEABRATION ITEM
Sheep dies - Free SALEABRATION ITEM
Harvest Meadow Designer Series Paper
Crumb Cake Cardstock
Old Olive Cardstock
Soft Suede Cardstock
Daffodil Delight Cardstock
Basic White Cardstock
Tuxedo Black Ink
Old Olive Ink
Light and Dark Smokey Slate Stampin' Blends
Liquid Glue
Tear and Tape
Glue Dots
Dimensionals
Fine Art Ribbon
Simply Scored
Take Your Pick Tool
Wink of Stella

Thank you for visiting my Blog today.  I hope you enjoyed my project.
See you next time!

Love and Hugs,
Cathryn


Wednesday, July 28, 2021

LITTLE PIGGY COFFEE GIFT BOX with JOYFUL LIFE and GINGERBREAD & PEPPERMINT - Stampin' Up!


Hi Friends!
My project today is a Gift Box for some Starbucks Via Coffee Packets.  I used Joyful Life stamp set, Gingerbread and Peppermint 6x6 Designer Series Paper, Real Red Sheer Ribbon, Scalloped Contours dies and Rectangle Stitched dies.


I started with a piece of Old Olive Cardstock sized  6 1/2  x  5 1/2".
I scored the  6 1/2" side at:
1,  3,  4  and  6".
I scored the  5 1/2" side at:
1".
To cut and put the box together you can watch my Video Tutorial Here.


I attached 4 pieces of Gingerbread and Peppermint Designer Series Paper in sizes:
(2)  4 1/4  x  1 3/4  for the front and back
(2)  4 1/4  x  3/4"  for the sides
I attached the DSP with Liquid Glue.
I cut a piece of Basic White Cardstock to  1  x  8 1/2".
I cut one of the edges using the Scallop die from the Scalloped Contours dies.
I attached the scallop around the top of the box, even with the top of the DSP, with Liquid Glue.


I cut a  2 3/4 x 1 3/8"  rectangle from Basic White Cardstock using the Stitched Rectangle dies.  I stamped the sentiment, from Joyful Life stamp set, at the bottom with Tuxedo Black Ink.
I stamped the Pig image from Joyful Life stamp set onto Basic White Cardstock.
I colored the image with Stampin' Blends:
Light and Dark Petal Pink for the Pig.
Dark Real Red for the stripes in the scarf and coffee cup.
Light Mossy Meadow for the rest of the scarf.
Dark Crumb Cake for the coffee sleeve.


I attached the rectangle to the front of the box with Liquid Glue.
I fussy cut the pig out and attached onto the rectangle, above the sentiment, with Dimensionals.
I slipped the coffee packets into a 3x5 Cellophane Bag, folded it and tied the top closed with Real Red Sheer Ribbon.  Then I placed it into the top of the box.


Supplies:
Joyful Life stamp set
Gingerbread and Peppermint Designer Series Paper
Scalloped Contours dies
Rectangle Stitched dies
Real Red Sheer Ribbon
Old Olive Cardstock
Basic White Cardstock
Light and Dark Petal Pink Stampin' Blends
Dark Crumb Cake Stampin' Blends
Dark Real Red Stampin' Blends
Light Mossy Meadow Stampin' Blends
Dimensionals
Mini Dimensionals
Liquid Glue
Tear and Tape
3x5 Cellophane Bags from Amazon

Thank you for visiting my Blog today.  I hope you enjoyed the Pig Box I made today!
See you next time.

Love and Hugs,
Cathryn


Monday, July 26, 2021

NUTS ABOUT SQUIRRELS TREAT BOX with PEACEFUL MINDS - Stampin' U


Hi Friends!
For my project today I used Nuts About Squirrels stamp set, Peaceful Prints Designer Series Paper, Layering Circle dies, Matte Decorative Dots, and Fine Art Ribbon.  I made a gift box that fits some Caramel Popcorn with Peanuts.
The box measures  4 1/4  x  3  x 1/4".  This is perfect for a little fall favor box!


I started with a piece of Pumpkin Pie Cardstock sized  9  x  7 1/4".
I scored the 9" side at:
1/2,  3 1/2,  4 3/4  and  7 3/4".
I scored the 7 1/4" side at:
1 1/4,  5 1/2  and  6 3/4".
To cut and put the box together you can watch my Video Tutorial Here.
Below is a picture of how your Cardstock should look after scoring, cutting and rounding the corners of the flap with the Detail Trio Punch.
I put the box together with Tear and Tape.


I wrapped a  3 1/4  x  9 3/4" piece of Peaceful Prints Designer Series Paper around the box by creasing each corner, then taking the paper off and burnishing the fold with a bone folder.
I attached the DSP to the box with a small amount of Liquid Glue on each part.


I stamped the Squirrel, branch and leaf veins onto Basic White Cardstock with Tuxedo Black Ink.
I stamped the inside fur of the squirrel with Pumpkin Pie Ink.
I stamped the leaves with Pear Pizzazz, Calypso Coral, Daffodil Delight and Mango Melody Inks.
I stamped the acorn bottom with Crumb Cake Ink and the top with Early Espresso Ink.
I fussy cut the branch and leaves out together and the Squirrel and Acorn together.


I attached the Squirrel to the bottom right side of the box with Dimensionals.
I attached the leaves to the top left side of the box with Mini-Dimensionals on the leaves and Liquid Glue on the end of the branch.  I put the end of the branch around the side of the box.


I stamped the sentiment from Nuts About Squirrels stamp set onto Sahara Sand Cardstock with Tuxedo Black Ink.  I cut the sentiment out using one of the Layering Circle dies.  I cut a larger scalloped circle from Pumpkin Pie Cardstock.
I attached the circles together with Liquid Glue.


I ran Fine Art Ribbon under the box lid and tied a bow at the top.
I punched a 1/8" hole in the circles, above the sentiment, and tied it around the bow with Linen Thread.
For the final touch I added 6 Matte Decorative Dots above and next to the squirrel.


Supplies:
Nuts About Squirrels stamp set
Peaceful Prints Designer Series Paper
Matte Decorative Dots
Layering Circle dies
Fine Art Ribbon
Pumpkin Pie Cardstock
Sahara Sand Cardstock
Basic White Cardstock
Pumpkin Pie Ink
Pear Pizzazz Ink
Daffodil Delight Ink
Mango Melody Ink
Calypso Coral Ink
Tuxedo Black Ink
Crumb Cake Ink
Early Espresso Ink
Linen Thread
Dimensionals
Mini Dimensionals
Liquid Glue
Detail Trio Punch
1/8" hole punch
3 1/2  x  5" Lip and Tape Bags for the popcorn

I hope you enjoyed my tutorial today!  Thank you for visiting my Blog.
See you next time!

Love and Hugs,
Cathryn


Friday, July 23, 2021

JOYFUL LIFE A2 CARD BOX TUTORIAL with HARVEST MEADOW


Hi Friends!
My project for today is a Box that will fit A2 cards and envelopes.  The box measures 6  x  4 3/4  x  1".  It will fit  about 5-7 inside  depending on the thickness of your cards.  I used more products from the NEW MINI CATALOG including, Joyful Life stamp set, Seasonal Labels dies, Harvest Meadow Designer Series Paper and Matte Decorative Dots.


I started with 2 pieces of Pear Pizzazz Cardstock.
Piece (1) is   11  x  8 1/4".
I scored the 11" side at:
1 1/2,  2 1/2,  8 1/2  and  9 1/2".
I scored the  8 1/4" side at:
2 1/2  and  3 1/2".
Below is a picture of how your Cardstock should look after scoring and cutting Piece (1).


Piece (2) is  7 1/4  x  6".
I scored only the  7 1/4" side at:
2 1/2  and  3 1/2.
Below is what Piece (2) should look like after scoring.  There is no cutting needed for this piece.
To cut and put the box together you can watch my Video Tutorial Here!


I attached 1 piece of Basic White Cardstock to the front flap of the box sized  5 3/4  x  3 1/2".  I rounded the bottom corners of this piece with the Detail Trio Punch and attached it with Stampin' Seal.
I attached 3 pieces of Harvest Meadow Designer Series Paper to the box in sizes:
(1)  5 5/8  x  3 3/8"  (rounded the bottoms corners also) for on top of the Basic White Cardstock on the flap.
(1)  5 3/4  x  2 1/4"  for the inside of the box.
(1)  5 3/4  x  4 1/2" for the back of the box.
I attached the pieces to the box with Stampin' Seal.


I cut a label from Pear Pizzazz Cardstock using the largest label from the Seasonal Labels dies.
I embossed the label using the Dots Embossing Folder from the Checks and Dots Embossing Folders.
I attached the label to the middle of the flap with Dimensionals.


I stamped the Bear and Bunny image from Joyful Life stamp set onto Basic White Cardstock with Tuxedo Black Ink.
I colored the image with Stampin' Blends.
Light and Dark Crumb Cake for the Bear.
Dark Smokey Slate for the Bike.
Light Smokey Slate for the Bunny,
Light Petal Pink for the inside of the Bear and Bunny ears.
Dark Pumpkin Pie for the Bear's sweater.
Light Cinnamon Cider for the basket
I fussy cut the image out and attached it to the Pear Pizzazz label with Dimensionals.


I stamped the sentiment from Joyful Life stamp set onto Bumblebee Cardstock using Tuxedo Black Ink.  I cut the sentiment out with a label from Seasonal Labels dies.
I attached the label to the front of the box with Liquid Glue on the left and a Dimensional on the right.


I attached a 5/8" Velcro Dot on the inside of the flap and on the body of the box for a closure.
For the final touch I added 3 Matte Decorative Dots to the upper left side of the box.


Supplies:
Joyful Life stamp set
Harvest Meadow Designer Series Paper
Seasonal Labels dies
Pear Pizzazz Cardstock
Bumblebee Cardstock
Basic White Cardstock
Tuxedo Black Ink
Dots and Checks Embossing Folders
Light and Dark Crumb Cake Stampin' Blends
Light Petal Pink Stampin' Blend
Light and Dark Smokey Slate Stampin' Blends
Light Cinnamon Cider Stampin' Blend
Dark Pumpkin Pie Stampin' Blend
Detail Trio Punch
Matte Decorative Dots
Dimensionals
Liquid Glue
Stampin' Seal
Tear and Tape
Simply Scored Tool
Take Your Pick Tool

Thank you for visiting my Blog today.  I hope you enjoyed my A2 Card Box Tutorial!
See you next time.

Love and Hugs,
Cathryn

Wednesday, July 21, 2021

PENGUIN PLACE FOLD OVER TOP GIFT BOX DIY with FRIGHTFUL TAGS


Hi Friends!
My project today is a Gift Box with a Fold Over Top.  I used some of the NEW Products from the Mini Catalog that goes live on 8/03/21.  I used Penguin Place stamp set, Penguin Builder Punch, Frightful Tag dies, Penguin Playmates SALEABRATION Designer Series Paper and Glittered Organdy Ribbon.


I started with a piece of Fresh Freesia Cardstock sized  8 1/2  x  8".
I scored the  8 1/2" side at:
1 1/2,  4,  5 1/2  and  8".
I scored the  8 " side at:
1 1/2,  5  and  6".
To cut and put the box together you can watch my Video Tutorial Here.
I put the box together with Tear and Tape.


I attached 4 pieces of Penguin Playmates Designer Series Paper (SALEABRATION item, FREE with 50$ purchase) in sizes:
(2)  3 1/4  x  2 1/4"  for the front and back.
(1)  2 1/4  x  1 3/4"  for the front flap.
(1)  2 1/4  x  3/4"  for the top.
I attached the DSP to the box with Liquid Glue.


I cut 2 labels using the Frightful Labels dies.  One from the Penguin Playmates DSP and one from Fresh Freesia Cardstock.  I attached them together, DSP on top of Cardstock, with Liquid Glue.
I attached the label to the front flap of the box, with Liquid Glue on the top half only of the label.
I attached a 5/8" Adhesive Velcro Dot on the back of the flap and on the body of the box.


I stamped the Penguin image from Penguin Place stamp set onto Basic White Cardstock with Tuxedo Black Ink.
I stamped the beak onto the Penguin Image with Mango Melody Ink.
I stamped the feet with Mango Melody Ink also.
I cut the Penguin and Feet out using the Penguin Builder Punch.
I attached the feet behind the Penguin body with Liquid Glue.


I stamped the Hat and Scarf images, from Penguin Place stamp set, onto Basic White Cardstock with Fresh Freesia Ink.
I fussy cut the images and attached them to the Penguin with Liquid Glue.
I attached the Penguin to the label on the front of the box with Dimensionals.


I tied Glittered Organdy Ribbon around the top of the Flap and tied a bow at the top.
I added 3 Purple Posy dots, from Playing with Patterns Resin Dots, to the top left of the flap  and  a Fresh Freesia Jewel, from 2021-2023 In Color Jewels, to the Penguin's Hat.


Supplies:
Penguin Place stamp set
Penguin Builder Punch
Penguin Playmates SALEABRATION Designer Series Paper
Frightful Tag dies
Glittered Organdy Ribbon
Playing with Patterns Resin Dots
2021-2023 In Color Jewels
Fresh Freesia Cardstock
Basic White Cardstock
Tuxedo Black Ink
Mango Melody Ink
Fresh Freesia Ink
Dimensionals
Liquid Glue
Tear and Tape
Simply Scored Tool
Take Your Pick Tool
5/8" Adhesive Velcro Dots

Thank you for visiting my Blog today!  I hope you enjoyed my tutorial.
See you next time!

Love and Hugs,
Cathryn


Tuesday, July 20, 2021

SWEET LITTLE STOCKING PUPPY GIFT BOX with SEASONAL LABELS DIES


Hi Friends!
Today I used some NEW products from the Mini Catalog that goes live on August 3!  I made a  5 3/4  x  3 x  1 1/4" gift box with a ribbon tie at the top.  I used Sweet Little Stocking stamp set, Stocking dies, Seasonal Labels dies, Sweet Stockings Designer Series Paper, Scalloped contours dies and Glittered Organdy Ribbon.


I started with a piece of Real Red Cardstock sized  9  x  7".
I scored the 9" side at:
1/2,  3 1/2,  4 3/4  and  7 3/4".
I scored the 7" side at:
1 1/4,  5 1/2  and  6 1/2".
To cut and put the box together you can watch my Video Tutorial Here.
Below is a picture of how your Cardstock should look after scoring, cutting and putting the box together with Tear and Tape.


I attached Sweet Stockings Designer Series Paper in sizes:
(2)  4  x  2 3/4"  for the front and back
(2)  4  x  1"  for the sides
(2)  2 3/4  x  3/4"  for the flaps
and
(1)  2  x  3 1/4" for the mat inside the scalloped rectangle.
I attached the DSP to the box with Liquid Glue.
I cut a scalloped square from Evening Evergreen Cardstock using the middle size rectangle die from the Scalloped Contours dies.
I attached the 2 x 3 1/4" piece of DSP on top of the Scalloped Rectangle with Liquid Glue.


I stamped the puppy, long stocking and Santa hat images from Sweet Little Stockings stamp set onto Basic White Cardstock with Tuxedo Black Ink.
I colored the puppy using Light and Dark Soft Suede Stampin' Blends.
I colored the Stocking with a Dark Real Red Stampin' Blend.
I glued the puppy to the stocking first, then the hat onto the puppy's head.


I cut holly leaves from Evening Evergreen Cardstock and berries from Real Red Cardstock using the Stocking dies.
I glued them to the bottom of the white area of the stocking.
I attached the puppy and stocking on top of the Scalloped Rectangle piece with Dimensionals.
Then, I attached the entire piece to the front of the box with Dimensionals also.


I punched 2 holes in the top of the flaps with a 1/8" hole punch.  I ran Glittered Organdy Ribbon through the holes and tied a bow at the front.
I cut a label from Real Red Cardstock using the Seasonal Labels dies.
I stamped the sentiment from Sweet Little Stockings stamp set with Tuxedo Black Ink.
I cut the label down to  2 3/4", punched a hole in the end and tied it with White Baker's Twine around the bow.
For the final touch I added a small Opal Round to the pompom on the Santa hat.


Supplies:
Sweet Little Stockings stamp set
Stocking dies
Seasonal Labels dies
Sweet Stockings Designer Series Paper
Scalloped Contours dies
Glittered Organdy Ribbon
Light and Dark Soft Suede Stampin' Blends
Dark Real Red Stampin' Blends
Real Red Cardstock
Evening Evergreen Cardstock
Basic White Cardstock
Opal Rounds
White Bakers Twine
Liquid Glue
Tear and Tape
Simply Scored Tool
Take Your Pick Tool
1/8" hole punch

Thank you for visiting my Blog today.  I hope you enjoyed my tutorial today!
See you next time!

Love and Hugs,
Cathryn


Friday, July 16, 2021

HALLOWEEN GOODIES BOX TUTORIAL with CUTEST HALLOWEEN and FRIGHTFUL TAGS


Hi Friends!
My project today is a Halloween Goodie Box.  I made this box to fit some Cat licorice I put into a Cellophane Bag.  I used some NEW products from the Mini Catalog that are available on August 3rd.  I used Cutest Halloween stamp set, the Halloween Punch, Frightful Tags dies, Cute Halloween 6x6 Designer Series Paper and Cute StarsAdhesive Backed Sequins.


I started with a piece of Pumpkin Pie Cardstock sized  10  x  4 1/4".
I scored the 10" side at:
4, 5  and  9".
I scored the  4 1/4" side at:
1  and  3 1/4".
I turned the Cardstock back to the original 10" side at scored to the FIRST SCORELINE ONLY at:
2 1/2  and  6 1/2".
Turn to the OTHER SIDE OF THE 10" SIDE and score to the FIRST SCORELINE ONLY at:
3 1/2  and  7 1/2".
To cut and put the box together you can watch my Video Tutorial Here!
Below is a picture of what your Cardstock should look like after you score and cut the Cardstock.


I attached 3 pieces of Cute Halloween 6x6 Designer Series Paper to the box in sizes:
(2)  3 3/4  x  2"  for the front and back
(1)  3/4  x  2"  for the top flap
I attached the DSP to the box with Liquid Glue.


I cut a Scalloped Circle from Basic Black Cardstock using the Layering Circle dies.
I cut a spider web from Pumpkin Pie Cardstock and a label from Gorgeous Grape Cardstock using the Frightful Tag dies.
I stamped the sentiment from Cutest Halloween stamp set on the top of the Gorgeous Grape Tag with Tuxedo Black Ink.
I punched a Cat Images from the Cute Halloween DSP using the Halloween Punch.
I attached the cat onto the label, below the sentiment, with a Dimensional.


I attached the Spiderweb to the Black Scalloped Circle with a Dot of Liquid Glue in the center.
I attached the Gorgeous Grape Label on top of the Spider Web with 2 Dimensionals.
I placed the entire piece on the front of the box with Dimensionals too.
I punched 2 holes in the front flap and front wall of the box using a 1/8" hole punch.
I cut 12" piece of Glittered Organdy Ribbon and ran it from the inside of the box through the back of the flap and tied a bow at the front.
For the final touch I added 3 Cute Stars Adhesive Backed Sequins onto the label.


Supplies:
Cutest Halloween stamp set
Halloween Punch
Frightful Tag dies
Cute Halloween 6x6 Designer Series Paper
Pumpkin Pie Cardstock
Gorgeous Grape Cardstock
Basic White Cardstock
Basic Black Cardstock
Cute Stars Adhesive Backed Sequins
Liquid Glue
Tear and Tape
Simply Scored Tool
Take Your Pick Tool
1/8" hole punch

Thank you for visiting my Blog today.  I hope you enjoyed my Halloween box.
See you next time!

Love and Hugs,
Cathryn