Hi Friends!
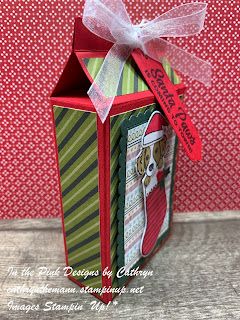
Today I used some NEW products from the Mini Catalog that goes live on August 3! I made a 5 3/4 x 3 x 1 1/4" gift box with a ribbon tie at the top. I used Sweet Little Stocking stamp set, Stocking dies, Seasonal Labels dies, Sweet Stockings Designer Series Paper, Scalloped contours dies and Glittered Organdy Ribbon.
I started with a piece of Real Red Cardstock sized 9 x 7".
I scored the 9" side at:
1/2, 3 1/2, 4 3/4 and 7 3/4".
I scored the 7" side at:
1 1/4, 5 1/2 and 6 1/2".
To cut and put the box together you can watch my Video Tutorial Here.
Below is a picture of how your Cardstock should look after scoring, cutting and putting the box together with Tear and Tape.
I attached Sweet Stockings Designer Series Paper in sizes:
(2) 4 x 2 3/4" for the front and back
(2) 4 x 1" for the sides
(2) 2 3/4 x 3/4" for the flaps
and
(1) 2 x 3 1/4" for the mat inside the scalloped rectangle.
I attached the DSP to the box with Liquid Glue.
I cut a scalloped square from Evening Evergreen Cardstock using the middle size rectangle die from the Scalloped Contours dies.
I attached the 2 x 3 1/4" piece of DSP on top of the Scalloped Rectangle with Liquid Glue.
I stamped the puppy, long stocking and Santa hat images from Sweet Little Stockings stamp set onto Basic White Cardstock with Tuxedo Black Ink.
I colored the puppy using Light and Dark Soft Suede Stampin' Blends.
I colored the Stocking with a Dark Real Red Stampin' Blend.
I glued the puppy to the stocking first, then the hat onto the puppy's head.
I cut holly leaves from Evening Evergreen Cardstock and berries from Real Red Cardstock using the Stocking dies.
I glued them to the bottom of the white area of the stocking.
I attached the puppy and stocking on top of the Scalloped Rectangle piece with Dimensionals.
Then, I attached the entire piece to the front of the box with Dimensionals also.
I punched 2 holes in the top of the flaps with a 1/8" hole punch. I ran Glittered Organdy Ribbon through the holes and tied a bow at the front.
I cut a label from Real Red Cardstock using the Seasonal Labels dies.
I stamped the sentiment from Sweet Little Stockings stamp set with Tuxedo Black Ink.
I cut the label down to 2 3/4", punched a hole in the end and tied it with White Baker's Twine around the bow.
For the final touch I added a small Opal Round to the pompom on the Santa hat.
Supplies:
Sweet Little Stockings stamp set
Stocking dies
Seasonal Labels dies
Sweet Stockings Designer Series Paper
Scalloped Contours dies
Glittered Organdy Ribbon
Light and Dark Soft Suede Stampin' Blends
Dark Real Red Stampin' Blends
Real Red Cardstock
Evening Evergreen Cardstock
Basic White Cardstock
Opal Rounds
White Bakers Twine
Liquid Glue
Tear and Tape
Simply Scored Tool
Take Your Pick Tool
1/8" hole punch
Thank you for visiting my Blog today. I hope you enjoyed my tutorial today!
See you next time!
Love and Hugs,
Cathryn


No comments:
Post a Comment