Friday, October 28, 2022

NORTH POLE MISCHIEF INSIDE WINDOW BOX - Stampin' Up!


Hi Friends!
My project today is an Gift Box with the Window inside the front flap.  It measures  4 x  2 1/2  x  1".  I used North Pole Mischief stamp set, Rectangle Stitched dies, Lights Aglow Designer Series Paper and Gold Shimmer Ribbon.


I started with a piece of Evening Evergreen Cardstock sized
9 1/2  x  6".
I scored the  9 1/2" side at:
2 1/2,  3 1/2  6  and  7"
I scored the  6" at:
1  and  5"
To cut and put the box together you can watch my Video Tutorial Here.
Below is a picture of how your Cardstock should look after scoring and cutting.
To cut the window ( in opposite panel from the Flap) I used a
2 3/4  x  1 3/8" die from the Rectangle Stitched dies.


I attached a piece of Window Sheet inside the cut opening sized
3 1/2  x  2".
I attached 8 piece of Lights Aglow Designer Series Paper to the box.
(4)  3 3/4  x  2 1/4   front, back, inside flap and inside front.
(2)  3 3/4  x  2 1/4"  long sides.
(2)  3/4  x  2 1/4"  short sides.
I attached the DSP to the box with Liquid Glue.


I stamped the image, from North Pole Mischief stamp set, onto Basic White Cardstock with Tuxedo Black Ink.
I colored the image with Stampin' Blends.
Light and Dark Smokey Slate  -  Cat
Light Flirty Flamingo & Light Petal Pink  -  Inside Cats's Ears
Light Pumpkin Pie  -  Fish
Light So Saffron  -  Sand
Light and Dark Cherry Cobbler  -  Bow and Pedestal
Light Mossy Meadow  -  Mistletoe  and  Mini Tree
Light Pool Party  -  Water in Fish Bowl
I cut the image out with a  3 1/8  x  1 3/4"  die from the Rectangle Stitched dies.


I stamped the sentiment onto Basic White Cardstock with Tuxedo Black Ink.
I cut it out using a  2 7/8  x  7/8" die from the Rectangle Stitched dies.
I attached the sentiment rectangle to the inside of the front flap with Liquid Glue.


I tied 3/8" Gold Shimmer Ribbon around the long side of the box and tied a bow on the left.
I attached the Image Rectangle over the Ribbon with Dimensionals.
For the final touch I added a Red Festive Pearl to the Bow.


Supplies:
North Pole Mischief stamp set
Rectangle Stitched dies
Lights Aglow Designer Series Paper
Evening Evergreen Cardstock
Basic White Cardstock
Tuxedo Black Ink
Window Sheets
Stampin' Blends
3/8" Gold Shimmer Ribbon
Festive Pearls
Liquid Glue
Dimensionals
Simply Scored
Take Your Pick Tool

Thank you for visiting my Blog today.  I hope you enjoyed my Christmas Gift Box.
See you next time.

Love and Hugs,
Cathryn

Wednesday, October 26, 2022

ALL BUNDLED UP TRIANGLE TREAT BOX with SANTA'S EXPRESS DSP - Stampin' Up!


Hi Friends!
My project today is a Triangle Treat/Gift Box that measures  5  x  5  x  2 1/2".  You can get 2 of these boxes from 1 sheet of 12 x 12 Designer Series Paper.  I used All Bundled Up stamp set, Santa's Express Designer Series Paper, Deckled Rectangle dies and Stampin' Blends.


I started with a piece of Santa's Express Designer Series Paper sized
10  x  5".
I scored the 10" side at:
5".
I made a small pencil mark on both 5" sides at:
2 1/2".
I scored from the 2 1/2" mark on the top to each side at the 5" scoreline.
I did this to the other side of the 5" also.
The finished scoreline make a Diamond shape inside the paper.
To score and put the box together you can watch my Video Tutorial Here.
Below is a picture of how your DSP should look after scoring.


Next I put the box sides together and punched a 1/4" hole in each side.
(You can put your Treat, Gift or GiftCard in the box before tying the ribbon around)
I ran Glittered Organdy Ribbon through the holes and tied a bow at the top of the box.
I also did a version of this box with a Polished Pink piece of DSP from the Celebrate Everything Host Designer Series Paper.


I stamped the Moose image, from All Bundled Up stamp set, onto Basic White Cardstock with Tuxedo Black Ink.
I colored the image with Stampin' Blends.
Light and Dark Old Olive   -   Hat and every other piece of the Scarf
Dark Real Red   -   Pompom and the rest of the Scarf
Light and Dark Soft Suede   -   Moose
Light and Dark Crumb Cake   -   Antlers
Light Flirty Flamingo and Dark Petal Pink together   -   Tongue
I fussy cut the image out by hand.


I stamped the sentiment onto Basic White Cardstock with Tuxedo Black Ink.
I cut the sentiment out, on the right side, of a rectangle die from the Deckled Rectangle dies.  The Rectangle is about 2 3/8  x  1".
I attached the sentiment to the bottom right side of the front of the box with Liquid Glue.


I attached the Moose right next to the sentiment with Mini Dimensionals and Dimensionals.
I added 3 Red Adhesive Backed Pearls around the sentiment.
For the final touch I added 3 Iridescent Rhinestone Basic Jewels around the Moose.


Supplies:
All Bundled Up stamp set
Santa's Express Designer Series Paper
Alternative DSP  -  Celebrate Everything Host Designer Series Paper
Deckled Rectangle dies
Basic White Cardstock
Tuxedo Black Ink
Stampin' Blends
Glittered Organdy Ribbon
Red & Green Adhesive Backed Pearls
Iridescent Rhinestone Basic Jewels
Liquid Glue
Mini Dimensionals
Dimensionals
Simply Scored
Take Your Pick Tool
1/4" Hole Punch

Thank you for visiting my Blog today.  I hope you enjoyed my Triangle Box.
See you next time!

Love and Hugs,
Cathryn

Tuesday, October 25, 2022

SWEET CANDY CANES WINDOW GIFT BOX with SWEETEST CHRISTMAS - Stampin' Up!


Hi Friends!
My project today is a Slider Window Box that measures 4  x  2  x  1 1/4".  The box will fit 3 Lindor Truffles or 4 Ghirardelli Squares.  I used Sweet Candy Canes stamp set, Candy Cane dies, Sweetest Christmas Designer Series Paper, Snowflake Specialty Vellum and Rectangle Stitched dies.


I started with a piece of Real Red Cardstock sized
6 1/2  x  4 1/2".
I scored the  6 1/2" side at:
1 1/4  and  5 1/4".
I scored the  4 1/2" side at:
1 1/4  and  3 1/4".
To cut and put the inside of the box together you can watch my Video Tutorial Here.
Below is a picture of how your Cardstock should look after scoring and cutting.


I wrapped a piece of Sweetest Christmas Designer Series Paper around the Cardstock sized
7 1/2  x  4 1/16".
I made sure to crease 2 sides at a time.
After the first 2 creases take your Cardstock off the box and reinforce the creases with your Bone Folder.
Do the same for the next two sides.
I cut the window in the front part of the DSP strip with a  1 1/4  x  3 1/4" Rectangle die from the Stitched Rectangle dies.
I attached a piece of Snowflake Specialty Vellum to the inside of the DSP sized
1 7/8  x  3 7/8" with Liquid glue on the edges.
I wrapped the DSP around the box again and attached the overlapping ends with Liquid Glue.


I used my Stamparatus to stamp the Candy Cane image from Sweet Candy Canes stamp set onto Basic White Cardstock with Real Red Ink.
I cut the Candy Cane out using the Candy Cane dies.
I attached it to the front of the box, diagonally over the Vellum window with Dimensionals.


I wrapped Real Red Ribbon around the short side of the box and tied a bow at the top.
I cut 2 branches from Garden Green Cardstock using a die from the Mini pocket dies.
I attached the branches under the bow with Liquid Glue.
I stamped the sentiment, from Sweet Candy Canes stamp set, onto Basic White Cardstock with Tuxedo Black Ink.
I cut the sentiment out with a small die from the Tailor Made Tags dies.
I cut the top off the tag and attached it under the bow with Liquid Glue.
I secured the bow down with a Glue Dot under the knot.


I punched a 1/4" circle in the side of the inner box with a small hole punch.
I attached a piece of Real Red Cardstock inside, covering the hole, sized  1 7/8  x  1 1/8" and repunched the hole again.
I tied a knot in the end of a 6 1/2" piece of Iridescent Trim and poked the loop part from the inside of the box to the outside.
I added 3 Red Rhinestone Basic Jewels to the end of the tag and for the final touch I added a Rhinestone Basic Jewel to each Branch.


Supplies:
Sweet Candy Canes stamp set
Candy Cane dies
Sweetest Christmas Designer Series Paper
Snowflake Specialty Vellum
Mini Pocket dies
Tailor Made Tag dies
Rectangle Stitched dies
Real Red Cardstock
Basic White Cardstock
Garden Green Cardstock
Real Red Ink
Tuxedo Black Ink
Real Red & Garden Green Ribbon Combo Pack
Iridescent Trim
Dimensionals
Liquid Glue
Glue Dots
Red Rhinestone Basic Jewels
Rhinestone Basic Jewels
Stamparatus
Simply Scored
Take Your Pick Tool
1/4" Hole Punch

Thank you for visiting my Blog today.  I hope you enjoyed my Candy Cane Gift box.
See you next time!

Love and Hugs,
Cathryn

Friday, October 21, 2022

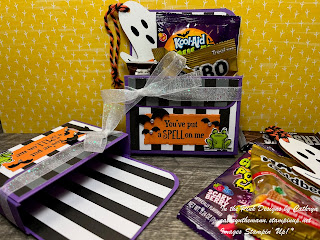
LOADED HALLOWEEN TREAT POCKET with BEST WITCHES - Stampin' Up!


Hi Friends!
My project today is a Pocket Treat Box that holds some Halloween Treats.  It measures  4 1/2  x  3 1/2  x  3/4".  I used Best Witches stamp set, Scary Silhouettes dies, Deckled Rectangle dies, Black & White Designs Designer Series Paper and a Wood Tag from the Target Dollar Spot.


I started with a piece of Gorgeous Grape Cardstock sized
8 3/4  x  5".
I scored the  8 3/4" side at:
1,  3 1/2  and  4 1/4".
I scored the  5" side at:
3/4  and  4 1/4".
I turned the Cardstock back to the original 8 3/4" side and scored:
TO THE FIRST SCORELINE ONLY AT:
6 3/4".
I turned the Cardstock to the other  8 3/4" side  and scored:
TO THE FIRST SCORELINE ONLY AT:
2".
To cut and put the box together you can watch my Video Tutorial Here.
Below is a picture of how your Cardstock should look after scoring, cutting and rounding the corners of both ends.


I attached 3 pieces of Black & White Designs Designer Series Paper to the box.
(1)  3 1/4  x  4"  for the inside back of the box.
(1)  3 1/4  x  2 1/4"  for the front of the box.
(1)  3 1/4  x  3/4"  for the front flap (opposite side of the same DSP)
I attached the DSP to the box with Liquid Glue.
When the DSP dried I glued down the front flap with Liquid Glue.


I stamped the sentiment, from Best Witches stamp set, onto Pumpkin Pie Cardstock with Tuxedo Black Ink.
I cut the sentiment out with a  2 3/8  x  1"  die from the Deckled Rectangle dies.
I attached the Rectangle to the bottom front of the Pocket with Liquid Glue.


I stamped the Frog image onto Basic White Cardstock with Tuxedo Black Ink.
I colored the Frog with Dark and Light Granny Apple Green Stampin' Blends.
I fussy cut the image out by hand and attached it to the lower right side of the Rectangle with Liquid Glue.


I cut one large and two small Bats from Basic Black Cardstock using the Scary Silhouettes dies.
I attached the large Bat to the upper right side of the Rectangle with Black Stampin' Dimensionals.
I attached the 2 small Bats with Liquid Glue.


I tied Glittered Organdy Ribbon around the middle of the box and tied a bow on the left side.
I added a Glue Dot to the back of the knot to keep it in place.
For the final touch I added a Rhinestone Basic Jewel to the middle of each Bat.


Supplies:
Best Witches stamp set
Scary Silhouettes dies
Deckled Rectangle dies
Black & White Designs Designer Series Paper
Gorgeous Grape Cardstock
Pumpkin Pie Cardstock
Basic Black Cardstock
Basic White Cardstock
Tuxedo Black Ink
Glittered Organdy Ribbon
Rhinestone Basic Jewels
Liquid Glue
Black Stampin' Dimensionals
Glue Dots
Simply Scored
Take Your Pick Tool
Wooden Ghost Tag - Target Dollar Spot
Kool Aid Pop Rocks  -  Dollar Tree
Gummy Bears  -  Dollar Tree

Thank you for visiting my Blog today.  I hope you enjoyed my Loaded Halloween Treat Pocket.
See you next time.

Love and Hugs,
Cathryn

Wednesday, October 19, 2022

MARVIN the MUMMY HALLOWEEN TREAT BOX with SCARY CUTE - Stampin' Up!


Hi Friends!
My project today is a Mummy Treat Box that measures  3 1/2  x  2 3/4  x  1".  I used the Stylish Shapes dies, Scary Silhouettes dies, Scary Cute stamp set, Celebrate Everything Host Designer Series Paper and Very Vanilla Cardstock.  The box will hold 4 fun sized KitKat bars.


I started with a piece of Basic Black Cardstock sized
9  x  8".
I scored the  9" side at:
1,  4 1/2  and  5 1/2".
I scored the  8" side at:
1/2,  3 1/4,  4 1/4  and  7".
To cut and put the box together you can watch my Video Tutorial Here.
Below is a picture of how your Cardstock should look after scoring and cutting.


I attached 2 pieces of Celebrate Everything Host Designer Series Paper to the inside of the box.
(2)  2 1/2  x  3 1/4"
I attached the DSP to the box with Liquid Glue.


To make the Mummy I started with a piece of Basic Black Cardstock sized
3 1/2  x  2 3/4".
I cut 5 pieces of Very Vanilla Cardstock to:
(5)  3/4  x  3 1/4"
I sponged the edges of all 5 pieces with Crumb Cake Ink.
I attached the pieces from top to bottom, at different angles and overlapping slightly, with Liquid Glue.
After the pieces dried I turned the Cardstock over and cut the excess off the edges.


I cut two 7/8" circles from Basic White Cardstock using the Stylish Shapes dies.
I sponged the edges with Crumb Cake Ink.
I attached them to the upper strips of Very Vanilla, the right one a bit higher, with Liquid Glue.
I cut a moon from Basic Black Cardstock using the Scary Silhouettes dies.
I cut a small square out of the bottom left side for a tooth.
I attached the mouth to the Very Vanilla Cardstock with Liquid Glue.
I attached the entire piece to the front of the box with Liquid Glue.


I added 2 Matte Black Dots to the circles for pupils.
I stamped the sentiment, from Scary Cute stamp set, onto Very Vanilla Cardstock with Tuxedo Black Ink.
I cut it out with the label die from the Scary Silhouettes dies.
I sponged the edges with Crumb Cake Ink and attached it to the inside of the box with Liquid glue.


I added some dots all around the strips of Very Vanilla Cardstock with a Dark Soft Suede Stampin' Blend.
For the final touch I tied a small bow with Old Olive Twill Ribbon.
I attached the bow to the front of the box with 2 Glue Dots and Liquid Glue.


Supplies:
Stylish Shapes dies
Scary Silhouettes dies
Scary Cute stamp set
Celebrate Everything Host Designer Series Paper
Very Vanilla Cardstock
Basic Black Cardstock
Basic White Cardstock
Tuxedo Black Ink
Crumb Cake Ink
Dark Soft Suede Stampin' Blend
Matte Black Dots
Old Olive & Sahara Sand Twill Ribbon Combo Pack
Tear and Tape
Liquid Glue
Glue Dots
Simply Scored
Take Your Pick Tool
Sponge

Thank you for visiting my Blog today.  I hope you liked my Marvin the Mummy treat box.
See you next time!

Love and Hugs,
Cathryn

Tuesday, October 18, 2022

FOLD OVER HALLOWEEN TREAT HOLDER with SCARY CUTE - Stampin' Up!


Hi Friends!
My project today is a Fold Over Halloween Treat Holder that measures  2 1/2  x  3 1/4  x  1/2".  You can get 3 of these boxes from one sheet of Cardstock.  It will hold a fun sized bar of candy.  I used Scary Cute stamp set, Stylish Stitched dies, Layering Circles dies, Fabulous Frames dies and Black & White Designs Designer Series Paper.


I started with a piece of Gorgeous Grape Cardstock sized
9  x  2 1/2".
I scored the  9" side only at:
2 1/2,  3,  6 1/4  and  6 3/4".
To put the box together you can watch my Video Tutorial Here.
Below is a picture of how your Cardstock should look after scoring and cutting the hole for the treat.


I attached a piece of Black & White Designs DSP to the 2 1/2" side of the Cardstock sized:
 2 1/4  x  2 1/4" with Stampin' Seal.
I cut a hole for the treat to slip in 1/2" down from the top of the Cardstock with a label die from the Fabulous Frames dies.
I attached the top of the strip ONLY (with the DSP attached) to the inside of the box with Liquid Glue.


I attached 3 more pieces of the Black & White Designs DSP to the box.
(2)  2 1/4  x  2"  the inside and outside flaps.
(1)  2 1/4  x  3  the back.
I attached the DSP to the box with Liquid Glue.


I stamped the Princess image, from Scary Cute stamp set, onto Basic White Cardstock with Gorgeous Grape Ink.
I cut the image out with a 1 5/8" circle die from the Stylish Shapes dies.
I stamped the sentiment onto Pumpkin Pie Cardstock with Tuxedo Black Ink.
I cut the sentiment out using the same label die I used to cut the hole for the treat to slip into.


I cut 3 circles from Cardstock using the Layering Circles dies.
(2)  2"  Scalloped Circles.  One Pumpkin Pie Cardstock and one Gorgeous Grape Cardstock.
(1)  1 7/8"  Circle from Granny Apple Green Cardstock.
I attached the top 3/4 of the Gorgeous Grape Circle to the top flap with Liquid Glue.


I attached the Pumpkin Pie, Granny Apple Green and Basic White Circles together with Liquid Glue.
I attached them all on top of the Gorgeous Grape circle with Dimensionals.
I attached a 3/8" Adhesive Velcro Dot to the bottom of the circles and body of the box for the closure.


I tied a bow with Glittered Organdy Ribbon and attached it to the front of the box with 2 Glue Dots and a dab of Liquid Glue on the back of the knot.
For the final touch I added 3 Fresh Freesia 2021-2023 In Color Opal Rounds to the box.


Supplies:
Scary Cute stamp set
Stylish Shapes dies
Layering Circle dies
Fabulous Frames dies
Black & White Designs Designer Series Paper
Gorgeous Grape Cardstock
Pumpkin Pie Cardstock
Granny Apple Green Cardstock
Basic White Cardstock
Tuxedo Black Ink
Glittered Organdy Ribbon
2021-2023 In Color Opal Rounds
Stampin' Seal
Liquid Glue
Dimensionals
Glue Dots
Simply Scored
Take Your Pick Tool
3/8" Adhesive Velcro Dots

Thank you for visiting my Blog today.  I hope you enjoyed my Halloween Treat Holder.
See you next time!

Love and Hugs,
Cathryn