Wednesday, December 30, 2020

Oval Occasions Baby Gift Box


Shop Stampin' Up! Here

Hi Friends!
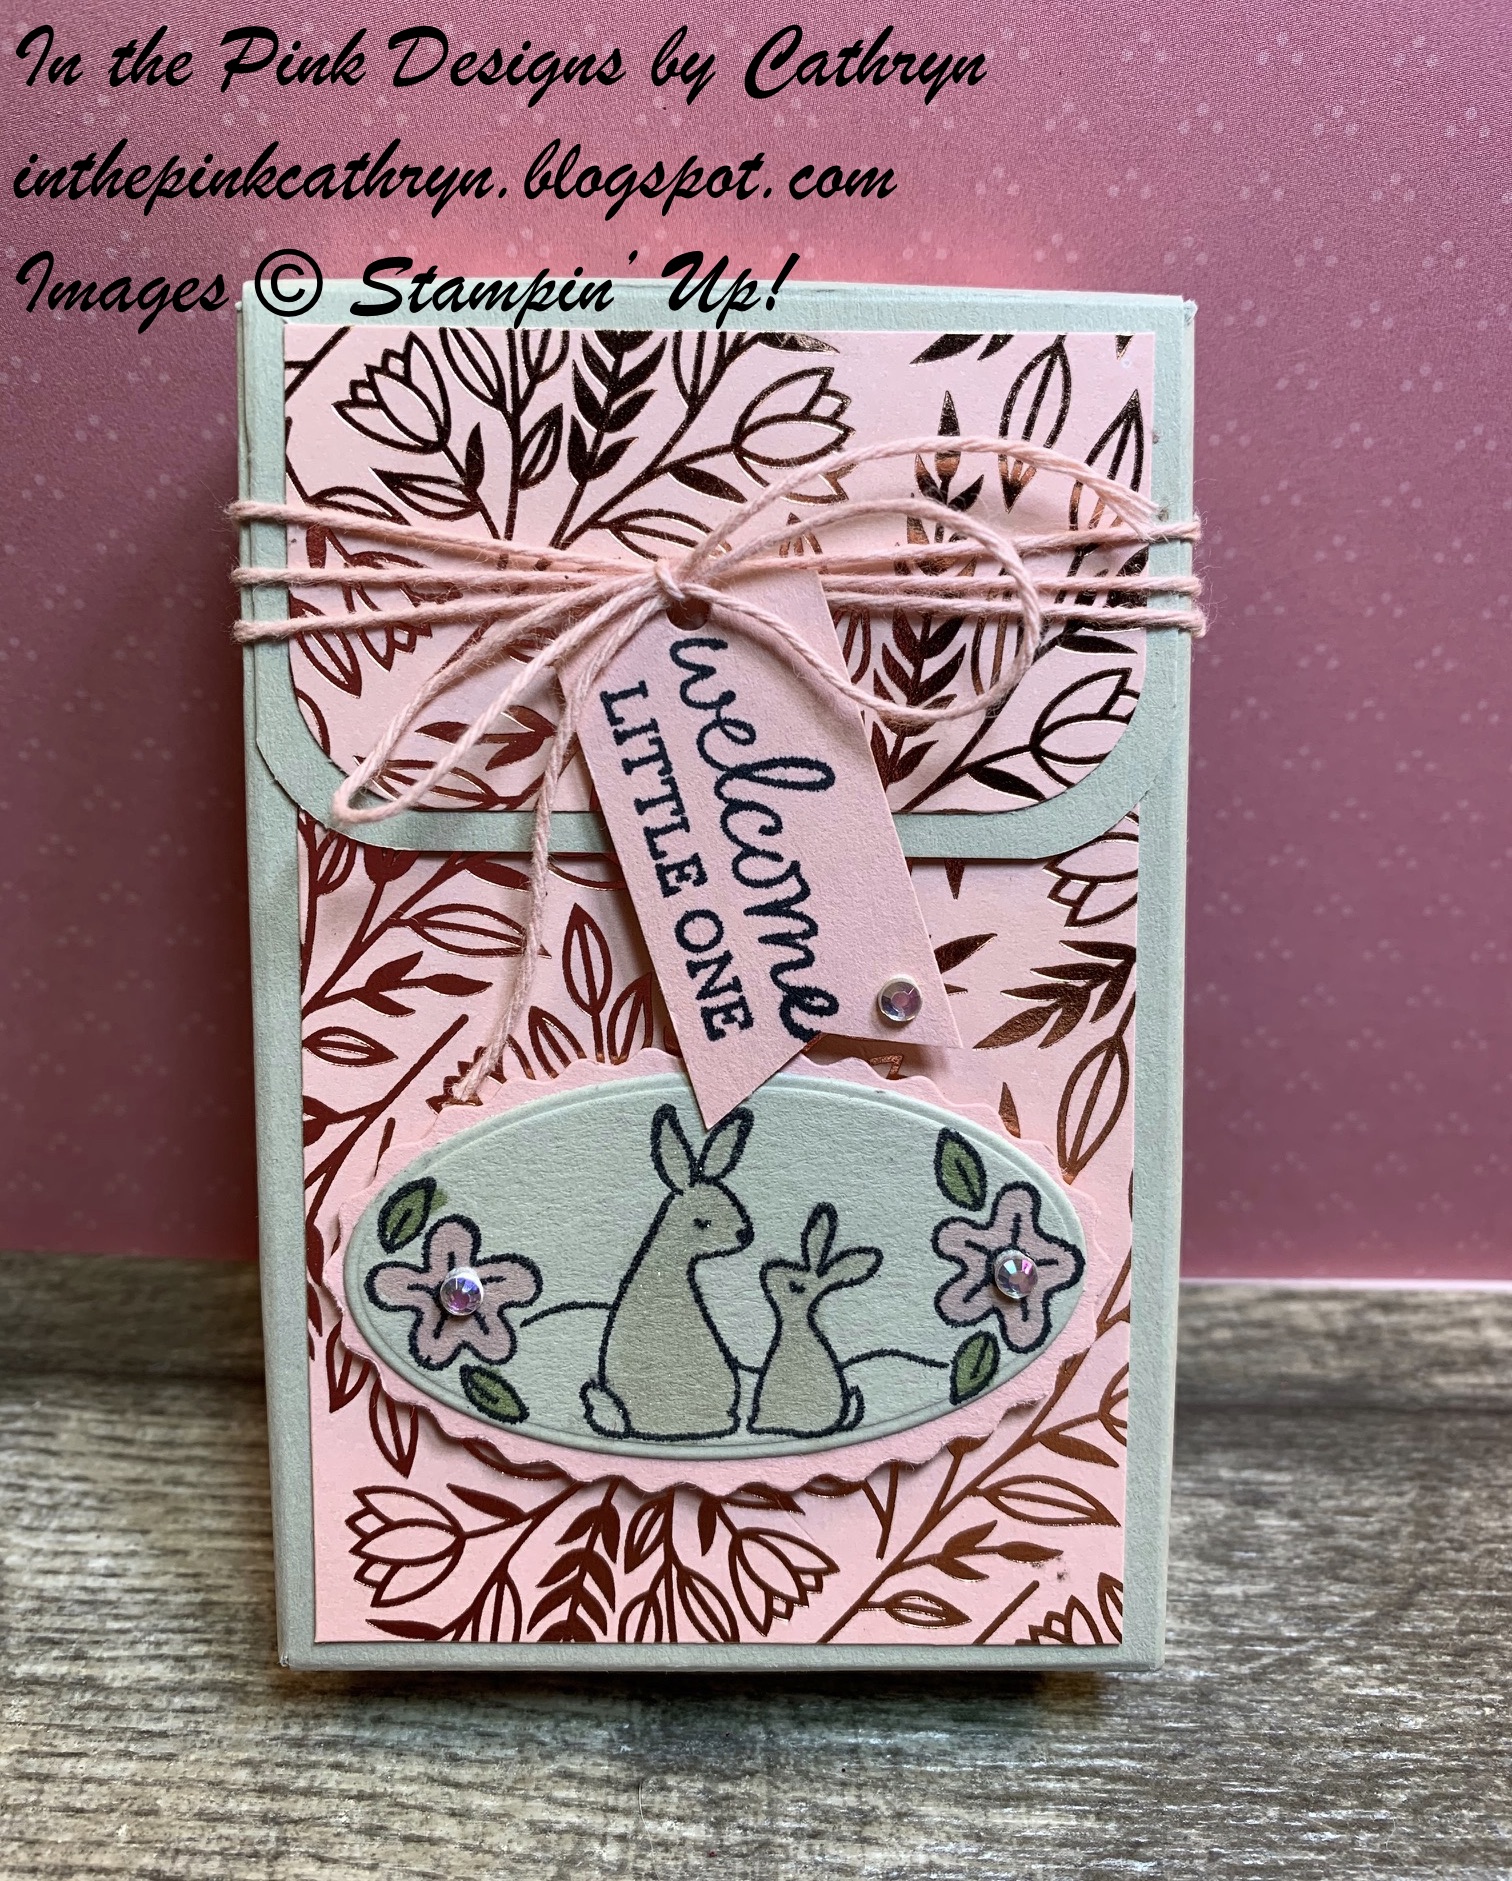
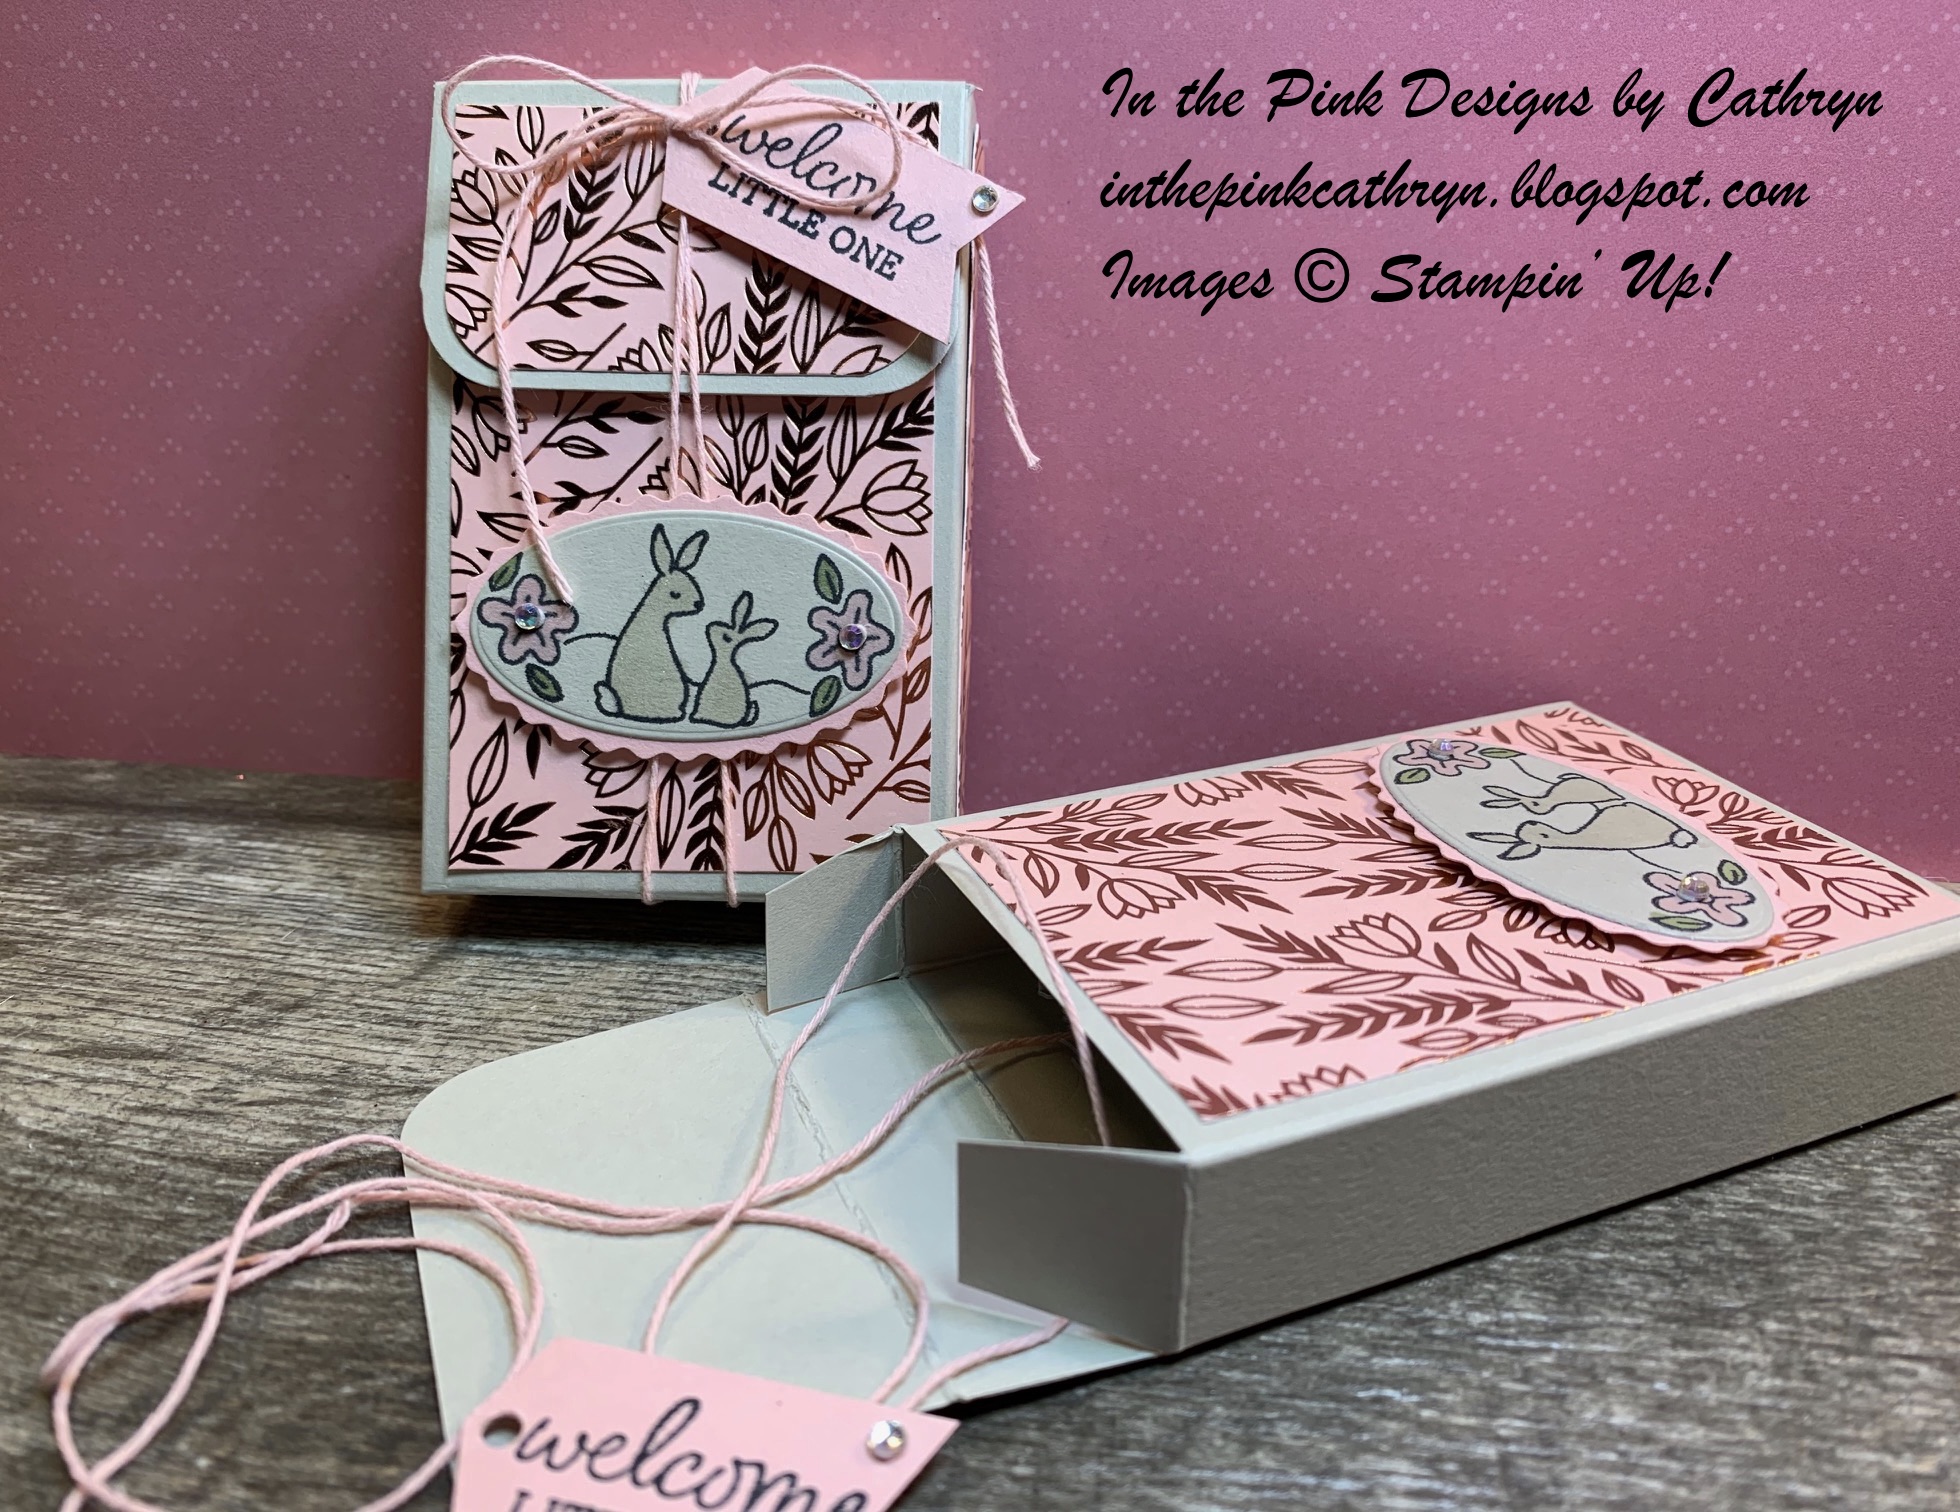
My project today is a Welcome Baby Gift Box.  I used the NEW Oval Occasions stamp set, Double Oval Punch, Love You Always Specialty Designer Series Paper and Snail Mail Twine Combo Pack.  These products from the January - June Mini Catalog are available to purchase on January 5!
I also used the Banners Pick a Punch and Detail Trio Punch.


I started with a piece of Sahara Sand Cardstock sized  7  x  6 3/4".
I scored the 7" side at:
3/4,  3 1/4,  4  and  6 1/2"
I scored the 6 3/4" side at:
3/4,  4 1/2  and 5 1/4"

To cut and put the box together you can watch my Video Tutorial Here.


I used Love You Always Specialty Designer Series Paper on the box in sizes:
(2)  3 1/2  x  2 1/4"
(1)  1 1/4  x  2 1/4"
(1)  1/2  x  2 1/4"
Optional sides  (2)  3 1/2  x  1/2"
I used the Detail Trio Punch on the bottom of the lid piece (1 1/4  x  2 1/4").
I attached the DSP to the box with Stampin' Seal.


I stamped the bunny image with Tuxedo Black ink onto Sahara Sand Cardstock.
I colored the image with Stampin' Blends:
Light Crumb Cake
Light Flirty Flamingo
Light Mossy Meadow
I cut the image out with the 2nd Smallest smooth oval from the Layering Oval dies.
I used the Double Oval Punch to cut the Scallop out of Blushing Bride Cardstock.
I attached the image to the scallop piece with Liquid Glue.
I attached it to the box (over the twine if wanted) with Dimensionals.


I stamped the sentiment onto a  3/4"  piece of Blushing Bride Cardstock and punched both ends with the Banners Pick a Punch.
I punched a hole in one end and tied it to the box using the Snail Mail Twine Combo Pack.
You can tie the twine longways under the image or sideways around the top only.
I added some Wink of Stella to the bunnies and attached some Rhinestone Basic Jewels to the flowers and sentiment.


Supplies:
Oval Occasions stamp set
Double Oval Punch
Layering Oval dies
Love You Always Specialty Designer Series Paper
Snail Mail Twine Combo Pack
Stampin' Blends:

Thank you for stopping by my Blog today.  I hope you enjoyed my project.
See you next time!

Wednesday, December 23, 2020

EASY CHRISTMAS TREAT BOX with EVERYTHING ESSENTIAL


Shop Stampin' Up! Here

Hi Friends,
My project today is an Easy Christmas Treat box.  It doesn't take much time to make and it is not very complicated.  I used Everything Essential stamp set, the Essential Tag Punch and Plaid Tidings Designer Series Paper.


I started with a piece of Cherry Cobbler Cardstock sized
7  x  5 1/2".
I scored the 7 " side at:
1,  3 1/4,  4 1/4  and  6 1/2".
I scored the 5 1/2" side at:
1,  4,  and  5".

To cut and put the box together you can watch my video tutorial Here.


I attached Plaid Tidings DSP to the box with Stampin' Seal in sizes:
(2)  2  x  2 3/4"
(2)  3/4  x  2 3/4"
(1)  2  x  3/4"

I wrapped Shaded Spruce Ribbon from Wonder of the Season Ribbon Combo Pack around the long side of the box and tied it at the top with Linen Thread.


I stamped the image from Everything Essential stamp set onto Crumb Cake Cardstock using Early Espresso Ink.
I cut out the image with the Essential Tag Punch.
I inked the edges with Cherry Cobbler Ink and part of a Stamping Sponge.
I tied it to the box with the ends of the Linen Thread
For the final touch I added some Holiday Rhinestone Basic Jewels to the tag.


Supplies:
Wonder of the Season Ribbon Combo Pack
Small Circle Punch
1/8" hole punch
Chocolate Balls from Dollar Tree

Thank you for visiting my blog today.  I hope you enjoyed my project.
See you next time!

Monday, December 21, 2020

Mini Stationery Box with Have a Hoot


Shop Stampin' Up! Here


Hi Friends!
My project today is a little fold over box that holds mini sticky notes, clips and a little pen.  I used Have a Hoot stamp set, Plaid Tidings Designer Series Paper, Metallic Mesh Ribbon, Layering Oval dies and the Delightful Tag Topper Punch.  I used Tis' the Season DSP and Sheer Red Ribbon for the original box.


I started with a piece of Balmy Blue Cardstock sized  9 3/4  x  3 1/2".
I scored the 9 3/4" side at:
3/4,  4 1/2,  5 1/4  and  9".
I scored the 3 1/2" side at:
3/4  and  2 3/4".

To cut and put the box together you can watch my Video Tutorial Here.


I added some Plaid Tidings DSP, (for the original project I used Tis' the Season DSP) in sizes:
(1)  3 5/8  x  1 7/8"
(2)  3 5/8  x  5/8"
(2)  1 7/8  x  5/8"
I attached the DSP to the box using Stampin' Seal.


I stamped the image from Have a Hoot stamp set onto Whisper White Cardstock with Tuxedo Black Ink.
I colored the image with Stampin' Blends:
Light and Dark Soft Suede
Light and Dark Smokey Slate
Dark Balmy Blue (for the original I used Dark Real Red for the hats)


I cut out the image with an Oval die from the Layering Oval dies.
I also used the same dies to cut a Scallop Oval out of Balmy Blue.
I attached the image to the Scallop with Liquid Glue and the Scallop to the box with Dimensionals.
I tied Metallic Mesh Ribbon around the box as shown in the picture.


To make the Sticky Note cover I started with a piece of Coordinating DSP that was sized
Just over 2" x  4 3/4".
I punched one end with the Delightful Tag Topper Punch.
I folded the paper around the sticky note pad (from Dollar Tree) starting with the front flap.  I made a mark with a pencil at the point where I wanted to trim the paper and cut it off with my Paper Trimmer.
I took the paper off the notes and sharpened the folds with my bone folder.
I attached the notes to the DSP with Stampin' Seal+ on the back of the pad.
I added Slim Velcro dots for the closure and added a Blue Adhesive Backed Gem over the hole.
I covered some clips with scraps of DSP and added them to the box with the notes and a pen from the Dollar Tree.


Supplies:
'Tis the Season Designer Series Paper
Stampin' Blends:
Sticky Notes - Dollar Tree
Small Pens - Dollar Tree

Thank you for stopping by today.  I hope you enjoyed my project.
See you next time!

Friday, December 18, 2020

COOL YULE BAKERY BOX with WARM and TOASTY


Shop Stampin' Up! Here

Hi Friends!
My post today is a Bakery Box I made to fit a Hostess Holiday Cupcake.  It is  3  x  3  x  1 1/2" and can fit many different treats and gifts inside.  I used Warm and Toasty stamp set, Heartwarming Hugs Designer Series Paper and Banners Pick a Punch.


I started with a piece of Mossy Meadow Cardstock sized
10 1/2  x  6".
I scored the 10 1/2" side at:
1 1/2,  4 1/2,  6  and  9".
I scored the 6" side at:
1 1/2  and  4 1/2".

To cut and put the box together you can watch my Video Tutorial Here.


I added Heartwarming Hugs Designer Series Paper in sizes:
(1)  2 3/4  x  2 3/4"
(4)  2 3/4  x  1 1/4"
I cut a small finger hole in the front lid with a small circle punch.
Then I tied Real Red Sheer Ribbon around the sides of the box and tied a bow in the front.


I stamped the Polar Bear image from Warm and Toasty stamp set onto Whisper White Cardstock with Tuxedo Black Ink.
I colored the shaded areas with a Light Balmy Blue Stampin' Blend and soften the blue edges with the  Color Lifter.
I colored the hat and scarf with a Light Mossy Meadow Blend.
I attached the Bear to the top of the box with Dimensionals.
I added Wink of Stella to the hat and skates of the bear.


I stamped the sentiment of a 5/8" wide piece of Mossy Meadow Cardstock with Versamark Ink.  I sprinkled it with White Stampin' Emboss Powder and Heated it up with my Heat Gun.
I cut the ends with the Banners Pick a Punch and added it to the top of the box with Liquid Glue.
For the final touch I added some Adhesive Backed Snowflakes to the hat and scarf.


You can shop for your Stampin' Up! Supplies with Me here.

Supplies:

I hope you enjoyed my project today!
See you next time.

Wednesday, December 16, 2020

STACKABLE CRAYON GIFT BOX with FREEZIN' FUN


Shop Stampin' Up! Here

Hi Friends!
My project today is a cute box to give away a multi-color crayon, pencil or pen.  You can choose the back measurement to fit whatever the length your gift is.  I sized mine to fit these Snowman Crayons that stack different colors.  I used Freezin' Fun stamp set, Freezin' Friends dies, Heartwarming Hugs Designer Series Paper and the Delightful Tag Topper Punch.


I started with Garden Green Cardstock sized  8 1/2  x  2 1/4".  You can add length to the 8 1/2" side for a longer pen or pencil too!  The scoring will stay the same.
I scored the 8 1/2" side at:
2  and  2 1/2".
I scored the 2 1/4" side at:
1/2  and  1 3/4".
I turned back to the 8 1/2" side and scored at 4 1/2" to the FIRST SCORLINE, skipped the middle, then scored the rest.

To cut and put the box together you can watch my Video Tutorial Here.


I attached Heartwarming Hugs DSP in sizes:
(1)  5 3/4  x  1"
(1)  1 3/4  x  1"

For the long pencil with tree topper I sized my Cardstock  11 x 2 1/4".
The back DSP at  8 1/2  x  1".
I attached the DSP with Stampin' Seal.
I punched the top with the Delightful Tag Topper Punch.
I tied Real Red Sheer Ribbon through the hole.


I punched two holes with a 1/8" hole punch on either side of where the pencil sits.  I ran ribbon from All the Trimmings Ribbon Combo Pack through the holes and tied it in a bow around the crayon.
I added a Glue Dot behind the pencil a bit lower than the ribbon to make it stable.

I stamped 3 images from Freezin' Fun stamp set, the Tree, Seal and Ice with Tuxedo Black Ink.
I used Stampin' Blends to color the images.
I colored the Tree with Dark Shaded Spruce,
the Ice with Light Balmy Blue,
the Seal body with Light and Dark Smokey Slate and
the Hat with Dark Real Red.


I attached the Tree to the box, as shown, with Liquid Glue.
I attached the Seal to the Ice with Liquid Glue also.
I attached the Seal and Ice to the box with 2 Dimensionals.

For the final touch I added Wink of Stella to the Tree, Ice and Seal's hat.


You can shop for your Stampin' Up! Supplies with Me here!

Supplies:
Stampin' Blends:

I hope you enjoyed my project today.
See you next time!

Monday, December 14, 2020

Merry Moose Gift Box with Heartwarming Hugs


Shop Stampin' Up! Here

Hi Friends!
My project today is a gift box that measures  5  x  2 3/4".  It holds a Marshmallow Chocolate Santa.   I used Merry Moose stamps set, the Moose Punch, Heartwarming Hugs Designer Series Paper and the Stitched Shape dies.


I started with a piece of Real Red Cardstock sized  8  x  6 1/2".
I scored the 8" side at:
1/2,  3 1/4,  4 1/4  and  7".
I scored the 6 1/2" at:
1,  5  and  6".

To cut and put the box together you can watch my Video Tutorial Here.


I attached Heartwarming Hugs DSP to the box with Stampin' Seal in sizes:
(2)  2 1/2  x  3 3/4"
(2)  2 1/2  x  3/4"
(2)  3/4  x  3 3//4"


I stamped the tree from Merry Moose stamp set on to Whisper White Cardstock with Mossy Meadow Ink.
I cut the image out with the 2nd largest oval die from Stitched Shape dies.
I used the largest oval die to cut a piece of Red Foil Paper.
I attached the image piece to the Red Foil oval with Dimensionals.
I attached the Red Foil oval to the front of the box with Liquid Glue.


I stamped the Moose image from Merry Moose stamp set with Early Espresso Ink onto Crumb Cake Paper.
I color the Antlers Only with a Dark Crumb Cake Stampin' Blend.
I stamped the scarf image with Real Red ink onto Whisper White Cardstock.  I fussy cut the scarf out and glued it to the neck of the Moose.
I attached the moose to the box with Liquid Glue on the head and a Dimensional on the back.


I put a Marshmallow Santa into the box and closed the top with a Bulldog Clip.
I tied a bow with Mossy Meadow Diagonally Striped Ribbon and attached it to the top of the box with Glue Dots.


For the final touches I added some Wink of Stella to the scarf and some Red Rhinestone Basic Jewels to the tree.


Supplies:
Merry Moose stamp set

I hope you enjoyed my project today!
See you next time.

Friday, December 11, 2020

Snowman Ghirardelli Gift Box Tutorial with Snowand Season


Shop Stampin' Up! Here


Hi Friends!
My project today is a  1 1/2  x  4  x  3/4"  box to hold two small Ghirardelli Snowman.  This is the perfect project to use up your small 6x6 paper or scraps.  It is a quick craft this is great for classroom or office gifts.  I used Snowman Season stamp set, Snowflake Splendor Designer Series Paper, North Pole Wonder dies and the Snowman Builder Punch.


I started with a piece of Snowflake Splendor DSP sized  5  x  5".
I scored the first side at:
3/4,  2 1/4,  3  and  4 1/2".
I turned the paper 1/4 turn and scored at:
1/2  and  4 1/2".

to cut and put the box together you can watch my Video Tutorial Here.


After I put the box together and put 2 snowmen inside the pouch I punched 2 holes, with a 1/8" hole punch, in the top of the bag.
I pulled Snowflake Splendor Ribbon through the holes and tied a bow in the front.
I attached 3 Blue Adhesive Backed Gems to the bottom of the bag.


I stamped the snowman body, arms and hat, from Snowman Season stamp set,  on Whisper White Cardstock with Tuxedo Black Ink.
I spaced all the parts of the snowman out and cut them separately with the Snowman Builder Punch.
I shaded the body with a Light Balmy Blue Stampin' Blend and softened it with the Color Lifter.  I colored the nose with a Dark Pumpkin Pie Stampin' Blend.
I colored the hat with Light Basic BlackDark Shaded Spruce, Dark Real Red and Balmy Blue Stampin' Blend.


I cut the Silver Foil Scallop circle and Balmy Blue Glimmer Paper circle using the North Pole Wonder dies.
I glued the glimmer paper to the Foil Paper with Liquid Glue and then attached it to the middle of the box also with Liquid Glue.
I attached the snowman body and arms to the Glimmer Paper with Liquid Glue also.
I stacked two Dimensionals on the back-top of the hat and a small line of Liquid Glue on the bottom, then attached the hat to the top of the Snowman's head.
For the Final touch I added Wink of Stella to the buttons.


Supplies:
Stampin' Blends:
1/8" or similar size Hole Punch

I hope you enjoyed my project today!
See you next time.