Friday, April 29, 2022

SLENDER TULIP NAIL FILE GIFT BOX with FLOWERING TULIPS - Stampin' Up!


Hi Friends!
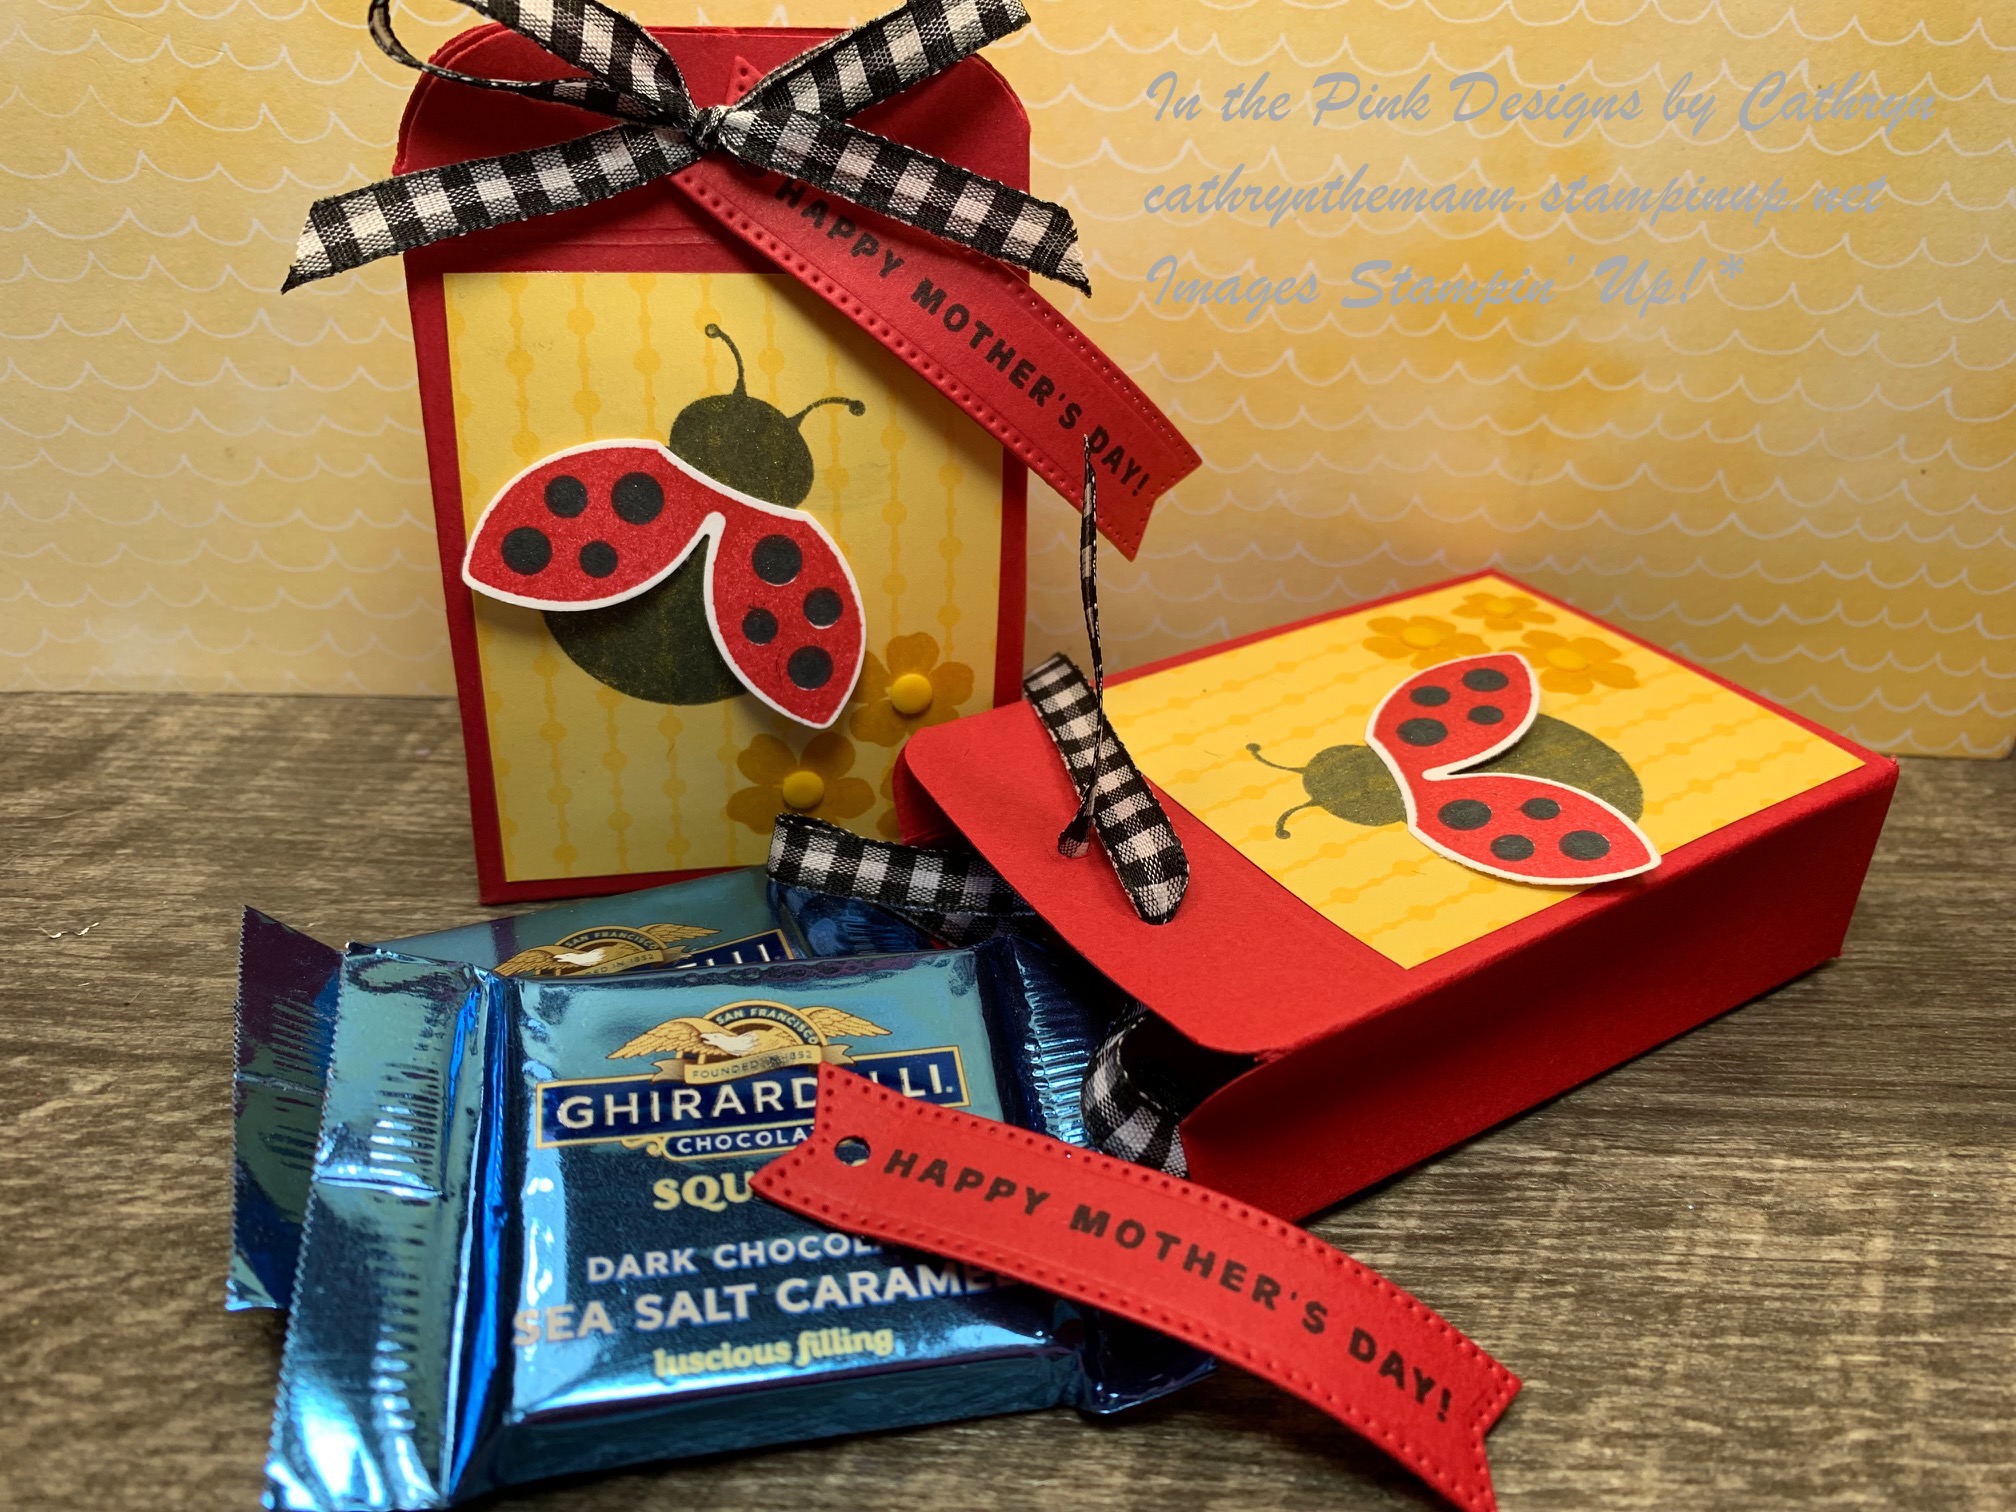
My project today is a long skinny gift box that holes nail files inside.  You could also put a pretty pen or some kisses inside too.  It measures  7 1/4  x  1  x  3/4".  I used Flowering Tulips stamp set, the Tulips dies, All That dies and the Gingham Embossing Folder.


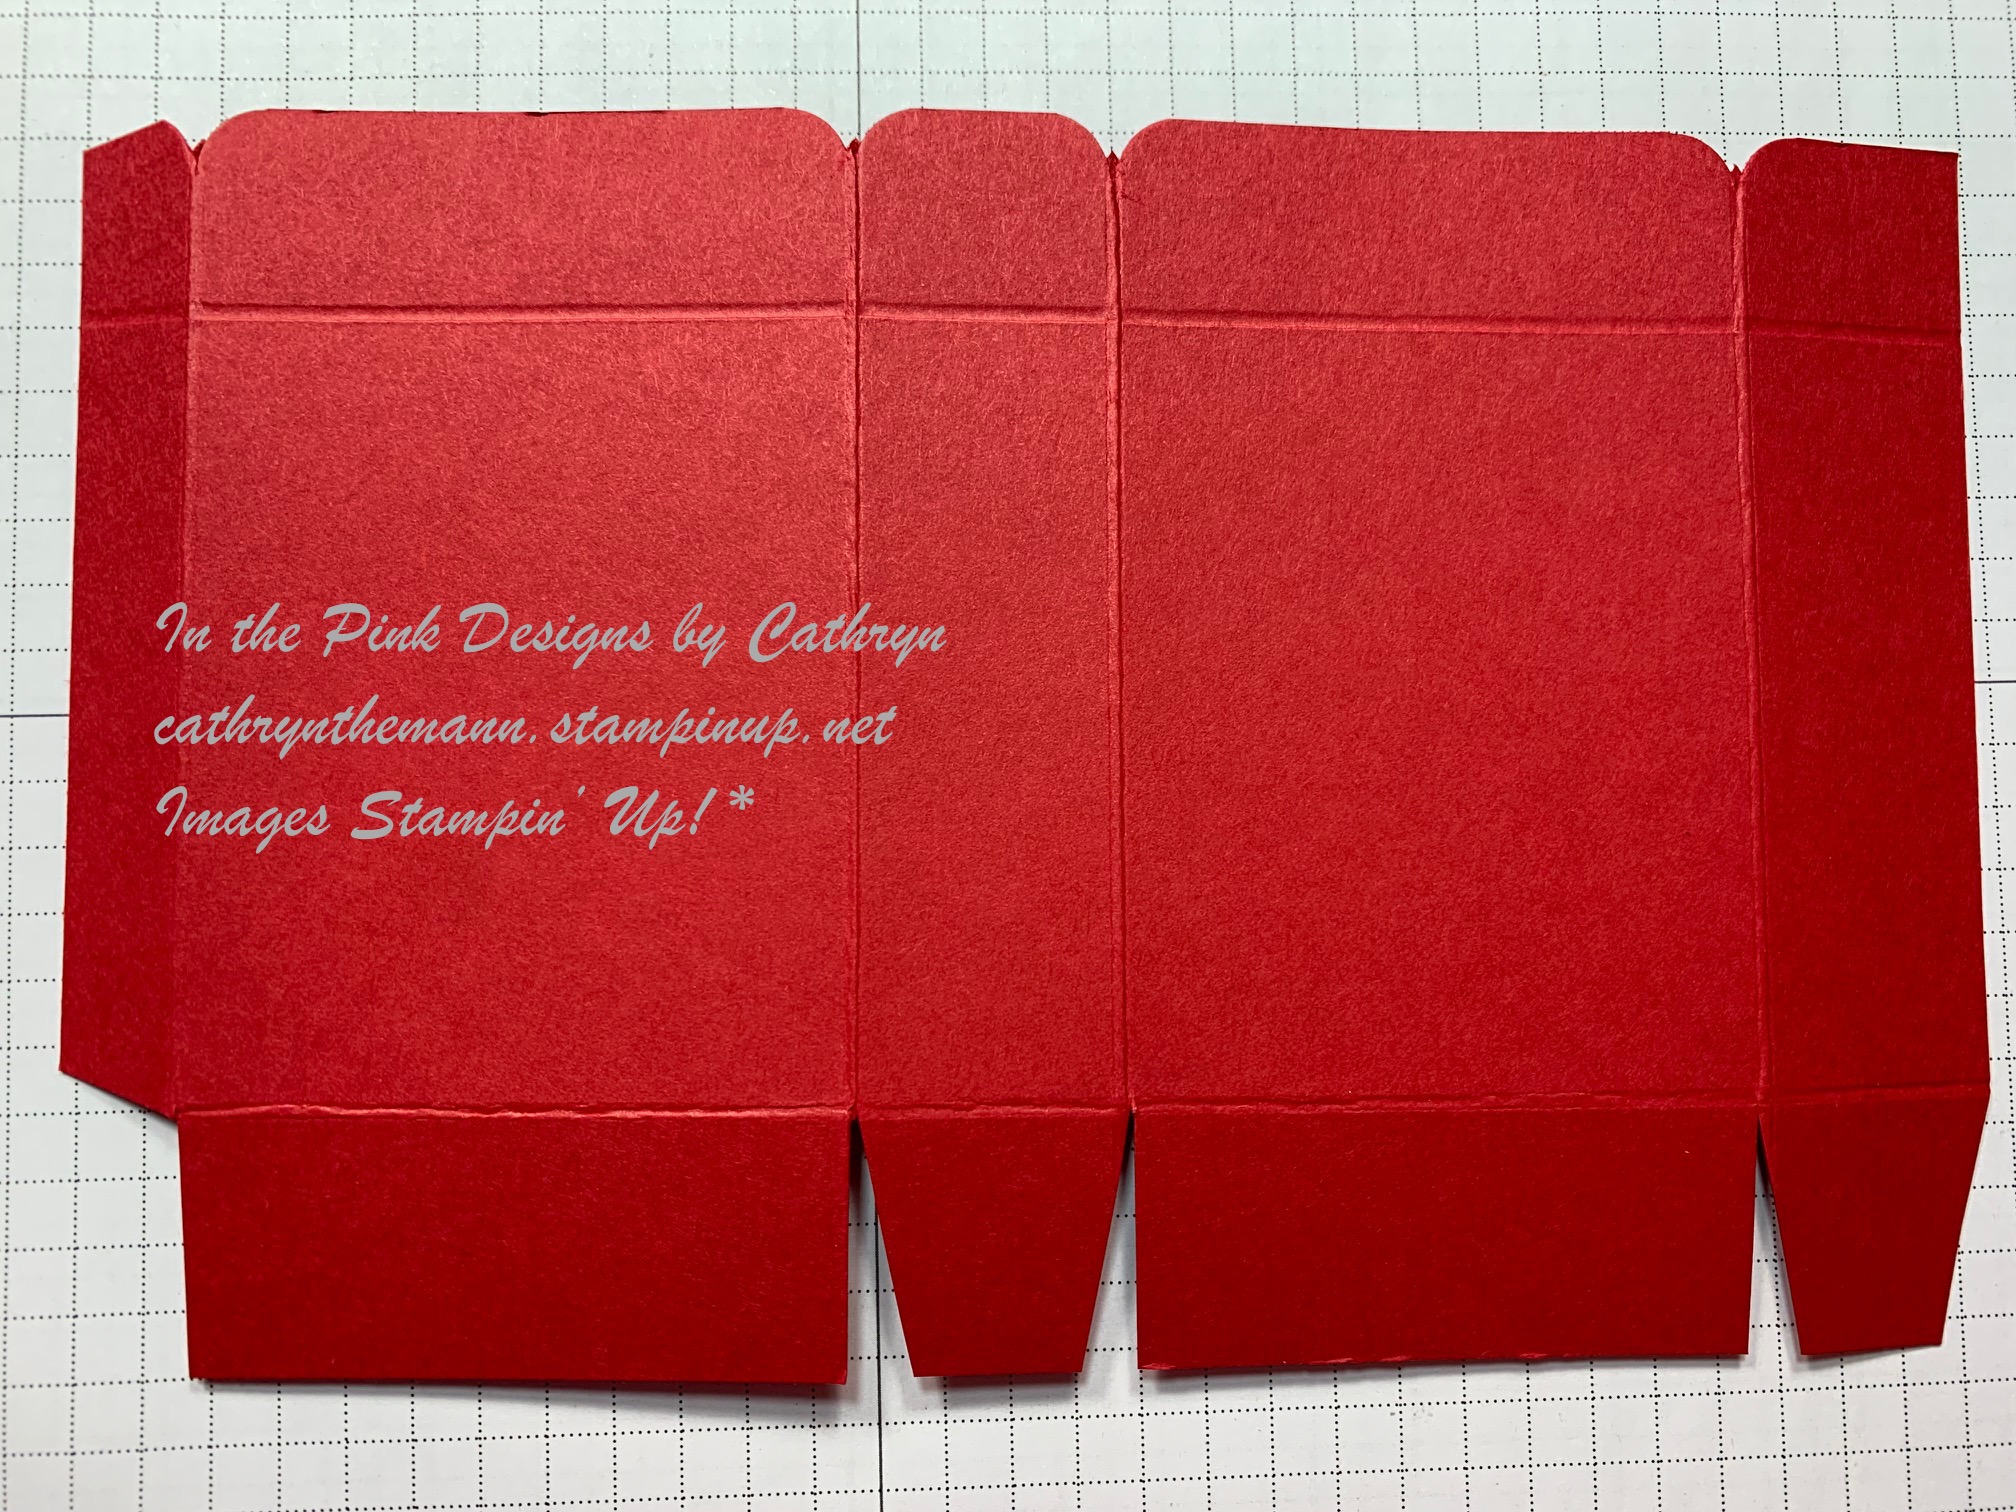
I started with a piece of Soft Seafoam Cardstock sized
9 3/4  x  4".
I scored the  9 3/4" side at:
1/2,  1 1/4,  8 1/2  and  9 1/4".
I scored the  4" side at:
1/2,  1 1/2,  2 1/4  and  3 1/4".
I rounded the corners of the flaps with a corner rounder.
To cut and put the box together you can watch my Video Tutorial Here.


I cut a piece of Soft Saffron Cardstock to  7/8  x  7 1/8".
I put the Cardstock into the Gingham Embossing Folder on a diagonal in order to fit it completely inside.
I attached the embossed Cardstock to the top of the box with Liquid Glue.


I cut 3 Tulips from Very Vanilla Cardstock, 4 leaves from Soft Seafoam Cardstock and 2 of the thin stems from Soft Seafoam Cardstock using the Tulips dies.
I inked the top edges of the Tulips with Polished Pink Ink.
I inked all around the edges of the leaves with Soft Seafoam Ink.


I cut each stem into 2 equal lengths.
I attached the top Tulip first, then stuck a stem piece under the edge with Liquid Glue.
Next I attached the leaves and continued this process down the box adding 2 stems below the bottom Tulip.
I tied a double bow with Crinkled Seam Binding Ribbon and attached it to the bottom of the lowest Tulip with Liquid Glue.


I cut an Oval Label from Very Vanilla Cardstock using the All That dies.
I stamped the sentiment, from Flowering Tulips stamp set, onto the label with Tuxedo Black Ink.
I punched a small hole in the left side of the Oval and looped some White Baker's Twine through.
I tied the label around the Crinkled Seam Binding and tied a bow at the top.
For the final touch I added an Iridescent Rhinestone Basic Jewel to each Tulip.


Supplies:
Flowering Tulips stamp set
Tulips dies
All That dies
Gingham Embossing Folder
Soft Seafoam Cardstock
Very Vanilla Cardstock
Polished Pink Ink
Soft Seafoam Ink
Tuxedo Black Ink
Crinkled Seam Binding Ribbon
White Baker's Twine
Iridescent Rhinestone Basic Jewels
Tear and Tape
Liquid Glue
Simply Scored
Take Your Pick Tool
Corner Rounder
3/8" Adhesive Velcro Dots

Thank you for visiting my Blog today!  I hope you enjoyed my Tulip Box.
See you next time.

Love and Hugs,
Cathryn

Wednesday, April 27, 2022

MOTHER'S DAY GIFT BOX with STAMPING ON PATTERNED PAPER - Stampin' Up!


Hi Friends!
My project today is a simple gift box for two Ghirardelli Squares that measures  3 3/4  x  2 1/2  x  1".  I stamped the Ladybug body and the flowers directly onto the Designer Series Paper.  I used Hello Ladybug stamp set, the Ladybug Builder Punch, Flowering Tulips stamp set and Stylish Shapes dies.


I started with a piece of Real Red Cardstock sized
7 1/2  x  4 3/4".
I scored the  7 1/2" side at:
1/2,  3,  4  and  6 1/2".
I scored the  4 3/4" side at:
1 and 4".
To cut and put the box together you can watch my Video Tutorial Here.  I folded each scoreline and rounded the corners of the top with a corner rounder.  Below is a picture of how your Cardstock should look after scoring and cutting.


Next I did some stamping onto the Daffodil Delight Designer Series Paper sized  2 1/4  x  2 3/4".
I stamped the three flowers image, from Hello Ladybug stamp set,  onto the lower right side of the DSP with Crushed Curry Ink.
I stamped the body of the Ladybug on the upper left hand side of the DSP with Tuxedo Black Ink.


I stamped the wings onto Basic White Cardstock with Real Red Ink.
I stamped the spots on the wings with Tuxedo Black Ink.
I put a Mini Dimensional on the inside of the wing on each side and a small amount of Liquid Glue on the neck and attached the wings to the Ladybug on the DSP.


I attached the stamped DSP to the front of the box with Liquid Glue.  I attached another piece, the same size, to the back of the box.
I cut a label from Real Red Cardstock using the Stylish Shapes dies.  I stamped the sentiment, from Flowering Tulips stamp set, onto the label with Tuxedo Black Ink.


I punched two holes in the top of the box with a small hole punch.
I put Black and White Gingham Ribbon through the holes.
I punched a small hole in the edge of the label and added it to the left side of the ribbon, then tied a bow.
I added some Wink of Stella Glitter to the Ladybug's body and spots.
For the final touch I added Playing with Patterns Resin Dots to the middle of the flowers.


Supplies:
Hello Ladybug stamp set
Ladybug Builder Punch
Flowered Tulips stamp set
Stylish Shapes dies
Brights Designer Series Paper
Real Red Cardstock
Basic White Cardstock
Tuxedo Black Ink
Crushed Curry Ink
Real Red Ink
Black and White Gingham Ribbon
Playing with Patterns Resin Dots
Mini Dimensionals
Tear and Tape
Liquid Glue
Stampin' Pierce Mat
Simply Scored
Take Your Pick Tool
Small Hole Punch
Corner Rounder

Thank you for visiting my Blog today!  I hope you enjoyed my project.
See you next time.

Love and Hugs,
Cathryn

Tuesday, April 26, 2022

SWEET SONGBIRDS BELLY BAND HAIR TIE GIFT BOX with STYLISH SHAPES DIES - Stampin' Up!


Hi Friends!
My project today is a Belly Band box that holds some hair ties.  The box measures  3 3/4  x  2 1/2  x  1".  I used Sweet Songbirds stamp set, the Songbird Builder Punch, Stylish Shapes dies, Layering Circle dies and 2022-2024 In Color Designer Series Paper.


I started with a piece of Tahitian Tide Cardstock sized
9 1/2  x  5 3/4".
I scored the  9 1/2" side at:
2 1/2,  3 1/2,  6  and  7".
I scored the  5 3/4" side at:
1  and  4 3/4".
To cut and put the box together you can watch my Video Tutorial Here.


I attached pieces of Tahitian Tide Designer Series Paper to the box.
(3)  3 1/2  x  2 1/4"  for the front flap, the back of the front flap and the back.
(2)  3 1/2  x  3/4"  for the long sides.
(2)  3/4  x  2 1/4"  for the short sides.
I attached the DSP to the box with Liquid Glue.


I stamped the large bird from Sweet Songbirds stamp set, for the front of the box, onto Basic White Cardstock with Daffodil Delight Ink.
I stamped 2 wings, one for each bird, with Daffodil Delight Ink.
I cut the Bird and Wings out using the Songbird Builder Punch.
I stamped the nest onto Crumb Cake Cardstock with Crumb Cake Ink.  I fussy cut the nest out by hand.
I cut a circle from Basic White Cardstock using the Stylish Shapes dies.
I cut a scalloped circle from Tahitian Tide Cardstock using the Layering Circle dies.
I attached the circles together with Liquid Glue.
I attached the nest to the circles first with Liquid Glue on the bottom half only.  I quickly added the Large Bird behind the nest with Liquid Glue also.


I stamped the fence post tops onto a  3 1/2  x  2 1/4" piece of Basic White Cardstock with Crumb Cake Ink.
Next I stamped the small Bird to the right side about 1/2" above the fence with Daffodil Delight Ink.
Then I stamped the Legs with Tuxedo Black Ink.
I stamped the Sentiment onto the upper left side with Polished Pink Ink.
I stamped the music notes next to the Bird with Tuxedo Black Ink.
I cut 2 beaks from Mango Melody Cardstock using the Songbird Builder Punch.
I attached a beak to each Bird with Liquid Glue.
I attached the stamped scene on the inside body of the box with Liquid Glue.


I wrapped a 1 x 8 1/4" piece of Tahitian Tide Cardstock around the closed box making marks at the corners.
I straightened and reinforced the corners with a Bone Folder.
I wrapped it around the short side of the box and glued the ends together in the front making sure it will not slip off or squeeze the box too tightly.
I attached the Scalloped circle to the band, covering the ends, with Liquid Glue.


I doubled a piece of Linen Thread and tied a small bow.  I put a small dot of Liquid Glue on the back of the box and attached it to the middle of the nest.
For the final touch I added a Polished Pink Loose Flourishing Flower, with a Glue Dot, to the side of the Large Bird's head.


Supplies:
Sweet Songbirds stamp set
Songbird Builder Punch
Stylish Shapes dies
Layering Circle dies
2022-2024 In Color Designer Series Paper
Tahitian Tide Cardstock
Melon Mambo Cardstock
Crumb Cake Cardstock
Basic White Cardstock
Daffodil Delight Ink
Crumb Cake Ink
Tuxedo Black Ink
Polished Pink Ink
Loose Flower Flourishes
Linen Thread
Tear and Tape
Liquid Glue
Glue Dots
Simply Scored
Take Your Pick Tool
Hair Bobbles - Marshalls

Thank you for visiting my Blog today!  I hope you enjoyed my Songbird box.
See you next time.

Love and Hugs,
Cathryn

Friday, April 22, 2022

BOTTLED HAPPINESS BOUQUET GIFT BOX with TEA BOUTIQUE - Stampin' Up!


Hi Friends!
My project today is a Gift Box that measures  5 1/2  x  4 1/2  x  1".  I put some beauty items inside (eye cream, makeup remover cloth, eye pads and lip balm).  I used Bottled Happiness stamp set, the Vintage Bottle Punch, Rectangle Stitched dies and Tea Boutique Designer Series Paper.


I started with a piece of Fresh Freesia Cardstock
sized  10 1/2  x  7 1/2".
I scored the  10 1/2" side at:
4,  5,  9  and  10".
I scored the  7 1/2" side at:
1  and  6 1/2".
To cut and put the box together you can watch my Video Tutorial Here.
Below is a picture of how your Cardstock should look after scoring, cutting and rounding the corners of the flap.


I attached pieces of Tea Boutique Designer Series Paper to the box.
(2)  3 3/4  x  5 1/4"  for the front and back.
(2)  3/4  x  5 1/4"  for the long sides.
(2)  3/4  x  5 1/4"  for the short sides.
I attached the DSP to the box with Liquid Glue.


I cut a rectangle,  3  x  4 3/8", from Basic White Cardstock using the Rectangle Stitched dies.
First I stamped the Flowers, from Bottled Happiness stamp set, onto the Rectangle with Fresh Freesia Ink.
Next I stamped the leaves around the flowers with Garden Green Ink.
I stamped the Bottle on a separate piece of Basic White Cardstock with Pool Party Ink.
I cut out the Bottle with the Vintage Bottle Punch.
I attached the Bottle under the flowers with a Mini Dimensional and a Dimensional.


I closed the box with the flap on the outside of the back.  I wrapped Fresh Freesia Open Weave Ribbon and Crinkled Seam Binding Ribbon together round the side of the box and tied a bow at the side.
I attached the Stitched Rectangle to a piece of Fresh Freesia Cardstock, sized  3 1/8  x  4 1/2", with Liquid Glue.
I attached the entire piece on the front of the box, over the ribbon, with Dimensionals.


I cut another stitched rectangle,  2 7/8  x  7/8", from Fresh Freesia Cardstock using the Rectangle Stitched dies.
I stamped the sentiment onto the smaller rectangle with Tuxedo Black Ink.
I attached the sentiment over the bottom of the Bottle with Dimentionals.
I tied two pieces of White Baker's Twine in a small bow and attached it to the neck of the Bottle with a Dot of Liquid Glue.
For the final touch I added 3 Rhinestone Basic Jewels to the bottom left of the sentiment.


Supplies:
Bottled Happiness stamp set
Vintage Bottle Punch
Stitched Rectangle dies
Tea Boutique Designer Series Paper
Fresh Freesia Cardstock
Basic White Cardstock
Fresh Freesia Ink
Garden Green Ink
Pool Party Ink
Fresh Freesia Open Weave Ribbon
Crinkled Seam Binding Ribbon
White Baker's Twine
Rhinestone Basic Jewels
Tear and Tape
Liquid Glue
Mini Dimensionals
Dimensionals
Simply Scored
Take Your Pick Tool

Thank you for visiting my Blog Today.  I hope you enjoyed my Bouquet Box tutorial.
See you next time.

Love and Hugs,
Cathryn

Wednesday, April 20, 2022

CACTUS CUTIES HAND LOTION GIFT BOX with STYLISH SHAPES DIES - Stampin' Up!


Hi Friends!
My project today is a Gift Box for a tube of Hand Lotion and a bottle of nail polish.  The box measures  5 1/2  x  3 1/4  x  1 1/2".  I used Cactus Cuties stamp set, Stylish Shapes dies, Layering Circle dies and Flowering Fields Designer Series Paper.  It is a very roomy box and can accommodate lots of gifts.


I started with a piece of Flowering Fields Designer Series Paper sized
10  x  8 1/2".
I scored the  10" side at:
1/2,  3 3/4,  5 1/4  and  8 1/2"
I scored the  8 1/2" side at:
1 1/2,  5 1/2  and  7".
To cut and put the box together you can watch my Video Tutorial Here.
Below is a picture of how your DSP should look after scoring and cutting.


I attached a piece of Calypso Coral Cardstock (or Mango Melody depending on which sheet of DSP you use) sized  3 1/4  x  1/2" to the edge of the front flap with Liquid Glue.
I punched two holes in the flap, above the strip of Cardstock with a 1/8" hole punch.
I ran Glittered Organdy Ribbon through the holes and tied a bow at the front.
I attached 2 - 5/8" Adhesive Velcro Dots inside the flaps for the closure.


I stamped two cacti, two pots and two flowers from Cactus Cuties stamp set onto Basic White Cardstock.
I stamped the two Cacti with Granny Apple Green Ink.
I stamped the larger Planter with Mango Melody Ink.
I stamped the smaller Planter and the flowers with Calypso Coral Ink.
I fussy cut the images out by hand.


I cut a 3" Stitched Circle from Basic White Cardstock using the Stylish Shapes dies.
I attached the images to the Circle with Liquid Glue.
I cut a  3 1/8" Scalloped Circle from Calypso Coral (or Mango Melody) Cardstock using the Layering Circle dies.
I attached the two circles together with Liquid Glue.
I attached the entire piece to the front of the box with Dimensionals.


I stamped the sentiment, from Cactus Cuties stamp set, onto Granny Apple Green Cardstock with Tuxedo Black Ink.
I cut the Cardstock down close to the sentiment and attached it, with a Dimensional and Liquid Glue, to the lower right side of the circles.
For the final touch I added 3 Matte Black Dots around the circle.


Supplies:
Cactus Cuties stamp set
Flowering Fields Designer Series Paper
Stylish Shapes dies (available May 4)
Layering Circle dies
Granny Apple Green Cardstock
Calypso Coral Cardstock
Mango Melody Cardstock
Basic White Cardstock
Granny Apple Green Ink
Calypso Coral Ink
Mandy Melody Ink
Tuxedo Black Ink
Glittered Organdy Ribbon
Matte Black Dots
Tear and Tape
Liquid Glue
Dimensionals
Simply Scored
Take Your Pick Tool
Small Hole Punch
5/8" Low Profile Adhesive Velcro Dots

Thank you for visiting my Blog today!  I hope you enjoyed my Cactus boxes.
See you next time.

Love and Hugs,
Cathryn

Tuesday, April 19, 2022

SIT STAY RELAX PINCH BOX with TEA BOUTIQUE - Stampin' Up!


Hi Friends!
My project today I made a Pinch Box (pinch to close the top) that measures  4 1/4  x  3 1/4  x  1 1/4".  I used one of the New 2022-2024 In Colors, Parakeet Party!  It is a lovely Bright Green color.  I used the new Host set, available on May 4 with a purchase/party of $150 or more, called Sit Stay Relax.  I also used Tea Boutique Designer Series Paper, Stylish Shapes dies and Glittered Organdy Ribbon.


I started with a piece of Parakeet Party Cardstock sized
9 1/2  x  6 1/2"
I scored the  9 1/2" side at:
1/2,  3 3/4,  5  and  8 1/4".
I scored the  6 1/2" side at:
1 1/4  and  5 1/2".
To cut and put the box together you can watch my Video Tutorial Here.
Below is a picture of how your Cardstock should look after scoring, cutting and rounding the corners of the top flap.


I attached Tea Boutique Designer Series Paper to the box.
(2)  3 x 4"  for the front and back
(1)  3  x  3/4"  for the top flap.
Make sure to round the corners of one of the long sides to match the Cardstock flap.
I attached the DSP to the box with Liquid Glue.


I stamped the chair image from Sit Stay Relax stamp set onto Basic White Cardstock with Pear Pizzazz Ink.
I cut the image out with a stitched square, sized 2 3/8  x  2 3/8", from the Stylish Shape dies.
I stamped the image again onto Basic White Cardstock with Tuxedo Black Ink.
I colored the Cat only with Stampin' Blends.
First I drew a line of Light Smokey Slate line along the left side of the cat.
Then I softened the line with the Color Lifter dragging the color a little to the right.
I fussy cut just the Cat out by hand.


I attached the cat over the cat in the Pear Pizzazz image with Liquid Glue.
I cut a piece of Parakeet Party Cardstock, sized  2 1/2  x  2 1/2", and attached the stitched square on top with Liquid Glue.
I attached the entire piece to the front of the box with Dimensionals.


I punched holes in the flap and body of the box with a small hole punch.
I ran about 13" of Glittered Organdy Ribbon through the holes and tied the box with a bow in the front.
I stamped the sentiment, from Sit Stay Relax stamp set, onto a scrap of Parakeet Party Cardstock.
I cut the sentiment out with a tag die from the Stylish Shapes dies.
I attached the tag with a Mini Dimensional on the right side and a dab of Liquid Glue on the left.
For the final touch I added 3 Metallic Pearls around the chair.


Supplies:
Sit Stay Relax stamp set (Host Set available May 4)
Tea Boutique 6x6 Designer Series Paper (available May 4)
Stylish Shapes dies (available May 4)
Detail Trio Punch
Parakeet Party Cardstock ( available May 4)
Basic White Cardstock
Pear Pizzazz Ink
Tuxedo Black Ink
Light Smokey Slate Stampin' Blend
Light Pool Party Stampin' Blend
Color Lifter Stampin' Blend
Glittered Organdy Ribbon
Metallic Pearls
Simply Scored
Take Your Pick Tool
Tear and Tape
Liquid Glue
Small Hole Punch

Thank you for visiting my Blog today.  I hope you enjoyed the sneak peek of some new products available May, 4, 2022!
See you next time.

Love and Hugs,
Cathryn

Friday, April 15, 2022

BOTTLED HAPPINESS BOX of CHEER with FLOWERING FIELDS - Stampin' Up!


Hi Friends!
My project today is a two piece Box for 2 Mini Liquor Bottles.  It measures  4 1/4  x  3 1/2  x  1 1/2".  I used the Bottled Happiness Bundle (Bottled Happiness stamp set and Vintage Bottle Punch) which is in the New Annual Catalog and will be available on May 4th.
I also used Flowering Fields Designer Series Paper, Old World Paper Embossing Folder and Fine Art Ribbon.


I started on the Bottom of the Box first with a piece of So Saffron Cardstock sized
8 1/2  x  7 1/4".
I scored the  8 1/2" side at:
3 1/2  and  5".
I scored the  7 1/4" side at:
1 1/2  and  5 3/4".
Next I worked on the top of the box with a piece of Flowering Fields Designer Series Paper
sized  7 1/2  x  7 1/4".
I scored the  7 1/2" side at:
3  and  4 1/2".
I scored the  7 1/4" side at:
1 1/2  and  5 3/4".
To cut and put the box pieces together you can watch my Video Tutorial Here.
Below are pictures of how your Cardstock and DSP should look after scoring and cutting.


I cut a  4 x 2 5/8" Rectangle from Pear Pizzazz Cardstock using the Rectangle Stitched dies.
I embossed the Rectangle with the Old World Paper 3D Embossing Folder.
I cut another of the same Rectangle die from Crumb Cake Cardstock.
I cut 3/4" off the bottom of the Crumb Cake Stitched Rectangle and attached it to the bottom of the Pear Pizzazz Rectangle with Liquid Glue.


I stamped the outline of the bottle, from Bottled Happiness stamp set, onto Basic White Cardstock with Crushed Curry Ink.
I stamped the rest of the bottle with So Saffron Ink.
I repeated stamping until I had 3 bottles done.
I stamped the label on one of the Bottles with Crushed Curry Ink.
I stamped the sentiment, "Sending Cheer", onto the label with Tuxedo Black Ink.


I cut all three Bottles out with the Vintage Bottle Punch.
I glued the two plain Bottles to the Stitched Rectangles with Liquid Glue.
I attached the Bottle with the Label to the middle with Dimensionals.


I wrapped Fine Art Ribbon around the long side of the box and tied a bow on the left side.
I attached the Rectangles over the ribbon with Dimensionals.
I tied a small bow with Linen Thread and attached it to the neck of the middle Bottle with a small dot of Liquid glue.
For the final touch I added an Iridescent Rhinestone Basic Jewel to each bottle.


Supplies:
Bottled Happiness Bundle
Bottled Happiness stamp set
Vintage Bottle Punch
Flowering Fields Designer Series Paper
Rectangle Stitched dies
Old World Paper 3D Embossing Folder
Fine Art Ribbon
Iridescent Rhinestone Basic Jewels
So Saffron Cardstock
Crumb Cake Cardstock
Pear Pizzazz Cardstock
Basic White Cardstock
Crushed Curry Ink
So Saffron Ink
Tuxedo Black Ink
Linen Thread
Liquid Glue
Dimensionals
Simply Scored
Take Your Pick Tool

Thank you for visiting my Blog today.  I hope you enjoyed this Sneak Peek from the new Annual Catalog which goes live on May 4, 2022.
See you next time!

Love and Hugs,
Cathryn