Hi Friends!
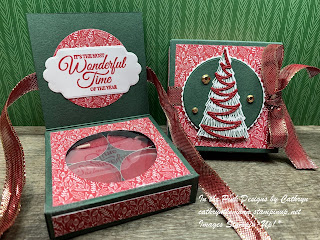
My project today is a gift box that fits 4 tea lights. It has a window on the inside so you can see the tea lights without opening the package. The box measures 3 x 3 x 3/4". I used Whimsical Trees stamp set, Holly Jolly Wishes, Christmas Tree dies, Seasonal Labels dies, Layering Circle dies and Tidings of Christmas Designer Series Paper.
I started with a piece of Evening Evergreen Cardstock sized 8 x 5".
I scored the 8" side at:
3/4, 3 3/4, 4 1/2 and 7 1/2".
I scored the 5" side at:
3/4, 3 3/4 and 4 1/2".
I used a second piece of Evening Evergreen Cardstock sized
3 3/4 x 3".
I scored the 3 3/4" side ONLY at 3/4".
Below is a picture of what your Cardstock should look like after scoring, cutting and rounded the corners of the flap with the Detail Trio Punch.
To cut and put the box together you can watch my Video Tutorial Here.
Before putting the box together I attached a 2 3/4 x 2 3/4" piece of Tidings of Christmas Designer Series Paper, to the side of the box that has the flap, with Stampin' Seal.
I cut a hole in that side using the Layering Circle dies.
I attached a piece Window Sheet to the inside of the circle hole sized 2 1/2 x 2 1/2" with Glue Dots.
I attached the second piece of Evening Evergreen Cardstock to the side of the box with Liquid Glue. Make sure you do not put the extra Cardstock over the box flap.
I attached the rest of the Tidings of Christmas Designer Series Paper to the box with Liquid Glue.
(1) 2 3/4 x 2 3/4" for the top of the box.
(4) 2 3/4 x 1/2" for the sides of the box
.
I stamped the sentiment from Holly Jolly Wishes stamp set onto Basic White Cardstock with Cherry Cobbler Ink. I cut the sentiment out with a label from the Seasonal Labels dies.
I attached the piece of Cardstock and DSP that I cut out of the box, to the inside of the extra piece of Cardstock that is now the top flap.
I attached the sentiment label onto of the circle with Liquid Glue.
I stamped the Christmas tree image from Whimsical Trees stamp set onto Basic White Cardstock with Evening Evergreen Ink. I cut it out using the Christmas Tree dies.
I cut the garland from Cherry Cobbler Cardstock using the same dies.
I cut the bottom two layers off the tree and attached the garland that would fit, then clipped the extra off.
I cut a circle from Evening Evergreen Cardstock and a scalloped circle form Basic White Cardstock using the Layering Circle dies. I attached the circles together with Liquid Glue.
I attached the tree to the circles with Liquid Glue also.
I tied Cherry Cobbler and Gold Ribbon around the box and tied a bow at the side where the flap is.
I attached the Tree and circles on top of the ribbon with Dimensionals.
For the final touch I added 3 Gilded Gems around the tree.
Supplies:
Whimsical Trees stamp set
Christmas Tree dies
Holly Jolly Wishes stamp set
Seasonal Labels dies
Layering Circle dies
Tidings of Christmas Designer Series Paper
Evening Evergreen Cardstock
Cherry Cobbler Cardstock
Basic White Cardstock
Cherry Cobbler and Gold Ribbon
Gilded Gems
Tear and Tape
Liquid Glue
Glue Dots
Stampin' Seal
Dimensionals
Simply Scored
Take Your Pick Tool
Thank you for visiting my Blog today! I hope you enjoyed my Tea Light box.
See you soon.
Love and Hugs,
Cathryn


1 comment:
Very pretty!
Post a Comment