Friday, November 22, 2024

2 from 1 sheet CHRISTMAS CRAYONS TREAT BOX with REINDEER DAYS - Stampin' Up!


Shop Stampin' Up! Here

Hi Friends!
My project today is a treat box that measures  3 3/4  x  3  x  3/4".  I used the Reindeer Fun stamp set & dies Bundle, Nested Essentials dies, Reindeer Days Designer Series Paper and Red & White Peppermints.

You can watch my Video Tutorial Here!


I started with a piece of Real Red Cardstock sized
8  x  5 1/4"
I scored the  8" side at:
1/2,  3 1/2,  4 1/4  and  7 1/4"
I scored the  5 1/4" side at:
3/4  and  4 1/2"
To cut and put the box together you can watch my Video Tutorial here.
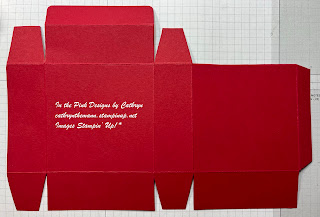
Below is a picture of how your Cardstock should look after scoring and cutting.


I attached 2 pieces of Reindeer Days Designer Series Paper to the box.
(2)  3 1/2  x  2 3/4"  front and back


I stamped the Reindeer onto Basic White Cardstock with Tuxedo Black Ink.
I stamped the spots on the baby's fur with Pecan Pie Ink.
I cut the image out using the matching dies.
I colored the Reindeer with Stampin' Blends.
Light Bubble Bath  -  Inner Ears
Light & Dark Pecan Pie  -  Fur


I cut a  3  x  2 3/8" rectangle from Basic White Cardstock using the Nested Essentials dies.
I stamped the Snowflakes all over the rectangle with Pool Party Ink.


I tied White & Silver Sheer Ribbon around the long side of the box and tied a bow on the left side.
I attached the Rectangle to the front of the box, over the ribbon, with Dimensionals.


I attached the Reindeer to the rectangle with Dimensionals.
I tied a small bow with Red & White Baker's Twine and attached it to the large Reindeer's Neck with Liquid Glue.
For the final touch I added 3 Red & White Peppermints around the front.


Supplies:
Reindeer Fun stamp set & dies Bundle
Nested Essentials dies
Reindeer Days Designer Series Paper
Rel Red Cardstock
Basic White Cardstock
Tuxedo Black Ink
Pecan Pie Ink
Pool Party Ink
Stampin' Blends
White & Silver Sheer Ribbon
Red & White Peppermints
Red & White Baker's Twine
Tear & Tape
Liquid Glue
Dimensionals
Tools:
Simply Scored
Take Your Pick Tool

Thank you for visiting my Blog today.  I hope you enjoyed my box.
See you next time!

Love & Hugs,
Cathryn

Wednesday, November 20, 2024

REINDEER POSTAGE TREAT BOX with REINDEER FUN - Stampin' Up!


Hi Friends!
My project today is a treat box for a Snowman Duck Toy.  It measures  2 1/2  x  2  x  2 1/2".  I used the Reindeer Fun stamp set & dies Bundle, Reindeer Days Designer Series Paper and Perennial Postage dies.

You can watch My Video Tutorial Here!


I started with a piece of Garden Green Cardstock sized
9 1/2  x  7 1/4"
I scored the  9 1/2" side at:
1/2,  2 1/2,  5  and  7"
I scored the 7 1/4" side at:
2,  4 1/2  and  6 1/2"
To cut and put the box together you can watch my Video Tutorial Here!
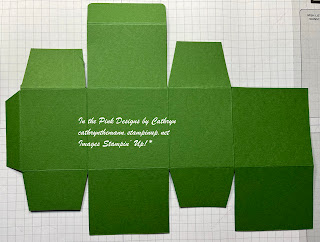
Below is a picture of how your Cardstock should look after scoring and cutting.


I attached 5 pieces of Reindeer Days Designer Series Paper to the box.
(2)  2 1/4  x  2 1/4"  front and back
(3)  1 3/4  x  2 1/4"  sides and top flap


I cut out the pieces of the Reindeer and Wreath using the Reindeer Fun dies.
Back Layer  -  Early Espresso Cardstock
Middle Layer  -  Basic White Cardstock
Top Layer  -  Pecan Pie Cardstock
Wreath  -  Garden Green Cardstock
Bow  -  Real Red Cardstock


I attached the Reindeer pieces together first with Liquid Glue.
Then I added the Wreath and Bow to the Reindeer with a little Liquid Glue behind the Head.


I cut a  1 7/8  x  1 7/8" square from Real Red Cardstock using the Perennial Postage dies.
I attached a  1 1/2  x  1 1/2" Basic White Square on top of the Real Red Square with Liquid Glue.
I attached the Reindeer to the squares with Dimensionals.


I opened the top of the box and wound Red Ribbon, from my stash, around the flap tying a bow on the top.


For the final touch I added a Rhinestone Basic Jewel to the middle of the bow.


Supplies:
Reindeer Fun stamp set & dies Bundle
Perennial Postage dies
Reindeer Days Designer Series Paper
Garden Green Cardstock
Early Espresso Cardstock
Basic White Cardstock
Pecan Pie Cardstock
Real Red Cardstock
Red Ribbon from my stash
Rhinestone Basic Jewels
Tear & Tape
Liquid Glue
Dimensionals
Tools:
Simply Scored
Take Your Pick Tool

Thank you for visiting my Blog today.  I hope you enjoyed my Reindeer Treat Box,.
See you next time!

Love & Hugs,
Cathryn

Tuesday, November 19, 2024

SANTA ENVELOPE TREAT BOX with REINDEER FUN - Stampin' Up!


Shop Stampin' Up! Here

Hi Friends!
My project today is a treat box that measures  4 3/4  x  3 1/4  x  1".  I used the Reindeer Fun Bundle, Deckled Rectangle dies and Reindeer Days Desginer Series Paper.

You can watch my Video Tutorial Here!


I started with a piece of Real Red Cardstock sized
9  x  7 3/4"
I scored the  9" side at:
1/2,  3 3/4,  4 3/4  and  8"
I scored the  7 3/4" side at:
1,  5 3/4  and  6 3/4"
To cut and put the box together you can watch my Video Tutorial Here.
Below is a picture of how your Cardstock should look when you are done.


I attached 6 pieces of Reindeer Days Designer Series Paper to the box.
(2)  3  x  4 1/2"  front and back
(2)  3/4  x  4 1/2"  long sides
(2)  3  x  3/4"  short sides


I stamped the Reindeer, from Reindeer Fun stamp set, onto Basic White Cardstock with Tuxedo Black Ink.
I stamped the Reins onto the Reindeer with Real Red Ink.
I stamped the Tree with Garden Green Ink.
I cut the images out using the matching dies.


I colored the Reindeer with Stampin' Blends.
Light Bubble Bath  -  inner ear
Light and Dark Pecan Pie  -  Reindeer


I cut a 3 1/2  x  2 1/8" rectangle from Snowy Scenes Designer Series Paper using the Deckled Rectangle dies.
I attached it to a piece of Real Red Cardstock, sized  3 3/4  x  2 3/8" , with Liquid Glue.


I attached the Tree and Reindeer to the rectangles with Dimensionals.
Next I attached the entire piece to the front of the box with Dimensionals.


I stamped the "Merry" from the Merry Christmas sentiment two times onto Basic White Cardstock with Real Red Ink.
I cut the sentiments out by hand and attached them behind the Reindeer's Antlers with Liquid Glue.


I tied a bow, with Red Ribbon from my stash, and attached it to the lower right of the box with a Glue Dot and Liquid Glue.


For the final touch I added a Rhinestone Basic Jewel to the top of the Tree.


Supplies:
Reindeer Fun stamp set & dies Bundle
Deckled Rectangle dies
Reindeer Days Designer Series Paper
Snowy Season Designer Series Paper
Real Red Cardstock
Basic White Cardstock
Tuxedo Black Ink
Real Red Ink
Stampin' Blends
Red Ribbon from my Stash
Rhinestone Basic Jewels
Tear & Tape
Liquid Glue
Glue Dot
Dimensionals
Tools:
Simply Scored
Take Your Pick Tool
Corner Rounder
Small Circle Punch

Thank you for visiting my Blog today.  I hope you enjoyed my Treat Box.
See you next time!

Love & Hugs,
Cathryn

Friday, November 8, 2024

MERRY CHRISTMAS TREE TREAT BOX with DECORATIVE TREES - Stampin' Up!


Shop Stampin' Up! Here

Hi Friends!
My project today is a treat box that measures  3  x  4 1/2  x  1".  Like my last box It will hold a Little Debbie Christmas Tree Cake.  This time I put some Red Bird Mints inside.  I used the Decorative Trees stamp set & dies Bundle (expected in by Dec 2), Deckled Rectangle dies and Sentimental Christmas Designer Series Paper.

You can watch my Video Tutorial Here!


I started with a piece of Poppy Parade Cardstock sized
9  x  8 3/8"
I scored the  9" side at:
1,  4,  5  and  8"
I scored the  8 3/8" side at:
1,  2,  6 3/8  and  7 3/8"
To cut and put the box together you can watch my Video Tutorial Here.
Below is a picture of how your Cardstock should look when you are done.


I attached 6 pieces of Sentiment Christmas Designer Series Paper to the box.
(2)  2 3/4  x  4 1/8"  front and back of flap
(2)  3/4  x  4 1/8"  long sides
(2)  2 3/4  x  3/4"  short sides


I stamped the inside of the Tree onto Garden Green Cardstock with Shaded Spruce Ink.
Next I stamped the outline and cut the Tree out using the matching die.
I stamped the sentiment onto the middle of the Tree with Versamark Ink.
I sprinkled White Embossing Powder on it, poured off the excess, and heated It with my Heat Tool.


I cut a  2 1/8  x  3 1/2" rectangle from County Woods Designer Series Paper using the Deckled Rectangle dies.
I cut a  2 3/8  x  3 3/4" rectangle from Garden Green Cardstock.
I attached the 2 rectangles together with Liquid Glue.
I tied Sweet Sorbet Bordered Ribbon around the short side of the rectangles and tied a bow on the left.


I attached the Tree to the rectangles, over the ribbon, with Dimensionals.
I attached the entire piece to the front of the box with Dimensionals.
I tied a bow with Gold Trim and attached it to the top of the Tree with Liquid Glue.


For the final touch I added 5 Gold Blooming Pearls onto the Tree.


Supplies:
Decorative Trees stamp set & dies Bundle
Deckled Rectangle dies
Sentimental Christmas Designer Series Paper
Country Woods Designer Series Paper
Poppy Parade Cardstock
Versamark Ink
White Embossing Powder
Sweet Sorbet Bordered Ribbon
Gold Trim
Blooming Pearls
Liquid Glue
Dimensionals
Tools
Simply Scored
Take Your Pick Tool
Heat Tool
Corner Rounder
Small Circle Punch

Thank you for visiting my Blog today.  I hope you enjoyed my Christmas Tree Box.
See you next time!

Love & Hugs,
Cathryn

Wednesday, November 6, 2024

2 FROM 1 SHEET LINDT CHOCOLATE SNOWMAN TREAT BOX with CHRISTMAS FRIENDS - Stampin' Up!


Shop Stampin' Up! Here

Hi Friends!
My project today is a treat box that measures  1 3/4  x  2 1/2  x  1".  You can get 2 of these boxes from 1 sheet of Cardstock.  I used the Christmas Friends stamp set & dies Bundle, Humble Home stamp set, Nested Essentials dies and Take a Bow Designer Series Paper.

You can watch My Video Tutorial Here!


I started with a piece of Old Olive Cardstock sized
6 1/2  x  5 1/2"
I scored the  6 1/2" side at:
1,  2 3/4,  3 3/4  and  5 1/2"
I scored the  5 1/2" side at:
1/2,  2 1/2  and  1".
To cut and put the box together you can watch my Video Tutorial Here.
Below is a picture of how your Cardstock should look after scoring and cutting.


I attached 6 pieces of Take a Bow Designer Series Paper to the box.
(1)  1 5/8  x  2 1/4"  front of box
(1)  1 1/2  x  2 1/4"  back of box
(2)  3/4  x  2 1/4"  long sides
(2)  1 1/2  x  3/4"  short sides


I cut out (2)  1 1/2  x  2 1/8" rectangles using the Nested Essentials dies.  One from Basic White Cardstock and one from Take a Bow DSP.
I stamped the sentiment, from Humble Home stamp set, onto the bottom of the Basic White rectangle with Real Red Ink.
I cut the sentiment off the rectangle and attached it to the bottom of the DSP rectangle with Liquid Glue.


I stamped the Mouse, from Christmas Friends stamp set, onto Basic White Cardstock with Tuxedo Black Ink and cut it out using the matching dies.
I colored the image with Stampin' Blends.
Light & Dark Smokey Slate - Mouse
Light Bubble Bath - Cheeks and Nose
Dark Daffodil Delight  -  Bell
Dark Old Olive  -  Book
Dark Real Red  -  Bow


I attached the mouse to the rectangle with Dimensionals.
I wound Red & White Baker's Twine around the short side of the rectangle, right above the sentiment, and tied a bow on the left.
I attached the entire rectangle to the box with Dimensionals.


For the final touch I added 3 Iridescent Faceted Gems to the front of the box.


Supplies:
Christmas Friends stamp set & dies Bundle
Humble Home stamp set
Nested Essentials dies
Take a Bow Designer Series Paper
Old Olive Cardstock
Basic White Cardstock
Tuxedo Black Ink
Real Red Ink
Stampin' Blends
Real Red and White Baker's Twine
Iridescent Faceted Gems
3/8" Adhesive Velcro Dots
Tear & Tape
Liquid Glue
Dimensionals
Tools
Simply Scored
Take Your Pick Tool

Thank you for visiting my Blog Today.  I hope you enjoyed my Treat Holder.
See you next time!

Love & Hugs,
Cathryn

Tuesday, November 5, 2024

LITTLE DEBBIE CHRISTMAS TREE CAKE with CHRISTMAS FRIENDS - Stampin' Up!


Shop Stampin' Up! Here

Hi Friends!
My project today is a treat box that measures  3 1/2  x  3 1/2  x  1 1/4".  I used the Christmas Friends stamp set & dies Bundle, Country Woods Designer Series Paper and Seasons of Green and Gold Designer Series Paper.

You can watch my Video Tutorial Here!


I started with a piece of Real Red Cardstock sized
10  x  6 3/4"
I scored the  10" side at:
1 1/4,  4 3/4,  6  and  9 1/2"
I scored the  6 3/4" side at:
1 1/4,  4 3/4  and  6"
To cut and put the box together you can watch my Video Tutorial Here.
Below is a picture of how your Cardstock should look after scoring and cutting.


I attached 6 pieces of Season of Green and Gold DSP to the box.
(2)  3 1/4  x  3 1/4"  front and back
(4)  1  x  3 1/4"  sides


I cut 2 circles out using the Christmas Friends dies.  One from Real Red Cardstock and one from Country Woods DSP.
I stamped the sentiment onto the bottom of the Real Red Cardstock with Versamark Ink.
I sprinkled it with Black Embossing Powder and spilled off the excess.
I heated the sentiment up with my Heat Tool.
I cut the Real Red Circle, just above the sentiment, and attached it to the bottom of the Country Woods DSP circle.


I stamped the Owl and Tree images onto Basic White Cardstock with Tuxedo Black Ink and cut them out with the matching dies.
I colored the images with Stampin' Blends.
Light & Dark Smokey Slate  -  Owl's Feathers
Dark Pumpkin Pie  -  Owl's Beak
Dark Real Red  -  Hat
Dark Old Olive  -  Tree Branches
Dark Pecan Pie  -  Tree Trunk


I cut the back greenery from Mossy Meadow Cardstock and the front from Old Olive Cardstock.
I attached them to the top of the circle with Liquid Glue.
I cut the bow from Real Red Cardstock and attached it to the middle of the Greenery with Liquid Glue.


I attached the Owl and Tree, including a Star cut from Gold Foil Paper, to the circles with Dimensionals.


I tied Vanilla & Pecan Pie Stitched Ribbon around the middle of the box and tied a bow on the left side.
I attached the circle to the front of the box, over the ribbon, with Dimensionals.
I colored 3 Rhinestone Basic Jewels with a Dark Real Red Cardstock and attached them to the Tree for the final touch.


Supplies:
Christmas Friends stamp set & dies Bundle
Country Woods Designer Series Paper
Season of Green & Gold Designer Series Paper
Real Red Cardstock
Mossy Meadow Cardstock
Old Olive Cardstock
Gold Foil Paper
Tuxedo Black Ink
Versamark Ink
Black Embossing Powder
Stampin' Blends
Vanilla & Pecan Pie Stitched Ribbon
Rhinestone Basic Jewels
Tear & Tape
Liquid Glue
Dimensionals
Tools
Simply Scored
Take Your Pick Tool
Corner Rounder Small Circle Punch

Thank you for visiting my Blog today.  I hope you enjoyed my Little Debbie Cake Box.
See you next time!

Love & Hugs,
Cathryn

Friday, November 1, 2024

ADORABLE MOOSE TREAT BOX with CHRISTMAS FRIENDS - Stampin' Up!


Shop Stampin' Up! Here

Hi Friends!
My project today is a Treat Box that measures  3 1/2  x  3  x  1 1/4".  I used the Christmas Friends stamp set & dies Bundle, Nested Essentials dies and Take a Bow Designer Series Paper.

You can watch my Video Tutorial Here!


I started with a piece of Old Olive Cardstock sized
11  x  7"
I scored the  11" side at:
1 1/2,  2 3/4,  6 1/4  and  7 1/2"
I scored the  7" side at:
3/4,  2,  5  and  6 1/4"
To cut and put the box together you can watch my Video Tutorial Here.
Below is a picture of how your Cardstock should look when you are done.


I attached several pieces of Take a Bow Designer Series Paper to the box.
(1)  3 1/4  x  2 3/4"  front flap of the box
(2)  1 1/4  x  2 3/4"  front and back of small flap
(2)  3 1/4  x  1"  long sides
(2)  1  x  2 3/4" short sides


I cut a piece of Basic White Cardstock sized  3 1/4  x  2 3/4".
I stamped the Tree, from Christmas Friends stamp set onto the Basic White Cardstock with Tuxedo Black Ink.
I cut a  3  x  2 3/8" rectangle from Basic White Cardstock using the Nested Essentials dies.
I stamped the Tree again to the top left of this rectangle with Tuxedo Black Ink.
I stamped the Moose and Tree one more time onto Basic White Cardstock with Tuxedo Black Ink and cut them out with the matching dies.


I colored the images, including the 3 Trees, with Stampin' Blends.
Light and Dark Pecan Pie  -  Tree Trunk and Moose's Fur
Dark Old Olive  -  Pine Branches, Scarf and Socks
Dark Real Red  -  Boots and Scarf
Light & Dark Crumb Cake  -  Antlers and Muzzle
Dark Smokey Slate  -  Blades


I attached the Basic White Cardstock inside the front flap with Liquid Glue.
I attached   3/8" Adhesive Velcro Dots to the flaps for the closure.
I stamped the sentiment, from Humble Home stamp set onto Real Red Cardstock with Versamark Ink.
I sprinkled the sentiment with White Stampin' Emboss Powder and heated it up with my Heat Tool.
I attached the sentiment to the inside of the flap with Liquid Glue.


I cut a Star from Daffodil Delight Cardstock using the Christmas Friends dies.
I attached the Star to the top of the Tree with Liquid Glue.
I attached the Moose and Tree to the Nested Essentials Rectangle with Dimensionals.


I attached the entire piece to the front of the box with Dimensionals.
I took a double strand of Linen Thread and wound it around the flap on the left side.
I tied a bow at the top and secured it with a Glue Dot behind the knot.


I added some Wink of Stella Glitter to the star and for the final touch I added 3 Cherry Cobbler Berries to the Tree on the front flap.


Supplies:
Christmas Friends stamp set & dies Bundle
Nested Essentials dies
Humble Home stamp set
Old Olive Cardstock
Basic White Cardstock
Daffodil Delight Cardstock
Real Red Cardstock
Tuxedo Black Ink
Versamark Ink
White Stampin' Emboss Powder
Stampin' Blends
Linen Thread
Cherry Cobbler Berries
Liquid Glue
Dimensionals
Glue Dots
Tools
Simply Scored
Take Your Pick Tool
Heat Tool

Thank you for visiting my Blog today.  I hope you enjoyed my Treat Box.
See you next time!

Love & Hugs,
Cathryn