Sunday, March 31, 2013

Cheese Doodle Carrots - Happy Easter!!!

Hello!  Happy Easter!  Today I have some "Carrots" I made for some of the kiddos in my family!  What I did was use some icing bags from the cake section of my craft store.  I got about 3 carrots from a bag of crunchy cheese doodles.


First I filled the icing bags, leaving a little room at the top to gather and twist tie them closed.
Next, I cut a piece of green paper 12" by 4", scored it along the top (12") at 1" down.
Then I cut fringe about 3" almost to the score line.
I ran ATG tape along the 1" below the score line and wound the "grass" paper around the top of the carrot, covering the twist tie.  I secured the beginning and end with a large glue dot for extra security.
Finally I curled the fringe with a pencil and added my cute tag.
 
My Tag was made with Just Tags die set, Scallop and Stitched Circle die set and Happy Hunting stamp set, all from My Creative  Time.
 
Additional Supplies I Used:
Icing Bags  -  Wilton
6 ounce bag of Crunchy Cheese Doodles
Flower Power 12x12 Stack  -  DCWV
Sheer Ribbon, Celebrate It  -  Michaels
Honeydew Twine  -  The Twinery
Glossy Accents and Green Stickles
 
That's it for my today! I hope you enjoyed my project. Have a wonderful Easter Sunday with your loved ones!

Thursday, March 28, 2013

Butterfly Cards - Thoughtful Thursday

Hi my friends!  Today is Thoughtful Thursday with My Creative Time.  I made 2 cards today using two different sayings from the Vintage Stitched Label Sentiments stamp set.  I also used My Creative Time's Chunky Jar Accessories and Vintage Label Dies.
 
 
I got the shape for the layer pieces from the Elegant Edges Cricut Cartridge.  I used my Gypsy to create the exact height and length I wanted.
 
 
The butterfly Embossing folder is from the "Once Upon A Princess" pack from Provocraft.  I was very tempted to curl up the label before attaching it, but I will be mailing this card so I kept it flat.
 
This is another version of the same design.  When I use my Cricut I like to do a bunch of cuts at a time and fill up my stash of cards.  This card worked well because it is suitable for a bunch of different occasions!
 

Additional Supplies I Used:
Aqua Mist Card Stock and Vintage Buttons  -  Papertrey Ink
For the Record 2 6x6 Paper Pad  -  Echo Park
Watercolor Garden 12 x12 Paper Pad  -  K&Company
Evergreen Bough Distress Ink
White Hemp  -  Crafters Square
 
That is it for me today!  There are plenty more "Thoughtful Thursday" projects over at My Creative Time!
I hope you have a great day!

Wednesday, March 27, 2013

Altered Nail File Packages - 3D Wednesday


Hello!   It is 3D Wednesday at My Creative Time and I have a quick, thrifty project today!  I just cannot resist a bargain.  You can often find me in the 90% off isle of my favorite store after a holiday.  I found these adorable "matchbook" style nail file packages at Target after Valentine's Day. They were $.39 for a package of 12.  The covers said "Happy Valentine's Day" but I knew I could fix them up very easily.
 
I used Emma's All Around Everything, All Around Everything Accesories and All Around Goodies Stamp Sets for the front.  I used the scraps from a bunch of my 6x6 pads to cover over the holiday theme.  The result is cute little favors for about $.04 each!


I hope you enjoyed my project for today!  Go here to see more 3D projects!  Have a great day and remember you can make wonderful things with left overs and scraps!!!


Thursday, March 21, 2013

Bunny Tag - My Creative Time Designer Challenge, Kim!


Good Morning!  Welcome to a new Designers Challenge at My Creative Time.  This time it's Kim's turn.  Her challenge is called a tic-tac-toe challenge. Choose a row from the chart below (vertical, horizontal or diagonal) and incorporate those three items on your project! You are free to use anything in addition, just be sure the three items are included.


I chose to use the vertical center tic-tac-toe for my project.  Embossing (I used UTEE on my bunny), Ribbon/Hemp and Burlap.
 
 
I used Emma's Tag die to cut patterned paper and also a piece of blue burlap.  I pulled a few pieces off the edges of the burlap to give it a frayed appearance.  I glued the burlap to the paper and then added some green to the bottom for "grass".  The picket fence is hot glued on for a little extra security.
 
 
I embossed the bunny with UTEE to give him a nice shiny appearance.  The flower buttons are from the Stitched Button Dies.  I tied them with some of the burlap pieces I pulled from the grass.

 
I cut the cloud out of Stiffened Felt with a die from the   Fly Away With Me Die Set.
 
 
This is the back of the tag.  I used the label from Chunky Jar Accessories and the sentiments are from To My Best Peep Stamp Set.
 
Other Supplies:
True Friends 6x6 Paper Pad  -  Carta Bella
Stiffened Sparkle Felt, pompom,  and Green and Blue Burlap  -  Michaels
White Picket Fence  -  Lara's Crafts
UTEE  -  Ultra Thick Embossing Enamel
Green and White Striped Ribbon  -  Liz's Paper Loft Boutique
 
We would love to see what "tic-tac-toe" you come up with for the challenge.  Please link up over at My Creative Time.  While you are there take a peek and the fab projects the DT have for your inspiration!
Thank you for stopping by.  I have the best followers ever!!!  Thank you for all the lovely compliments on my new blog design.  I appreciate all your comments.  Have a Wonderful day!

Wednesday, March 20, 2013

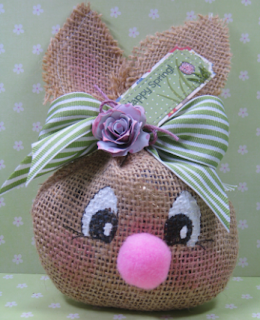
Burlap Bunny Treat Bags - 3-D Wednesday with My Creative Time

Hello There!  Is everyone ready for spring?  I AM!  Happy 1st day of Spring.  I can't wait for the flowers to bloom!  It is a new 3-D Wednesday at My Creative Time.
Today I have some burlap bunnies I made that where inspired by a few different posts on Pinterest.  I have made some for my children to bring their friends before Spring Break begins next week!


I made a pattern out of cardstock and cut them out of burlap.  This was extremely messy.  Oh my goodness, it felt like I had a haircut without any cape on.  The little fuzzies of the material get everywhere!  If it was warmer I definately would have done the cutting outside!
 
I used my PKS-490-3 Peachy Keen Everyday Charachter Faces 4" stamps on these with Stazon ink (masking off the mouth).
 
I needed a few more bunnies so I went back to Joann Fabrics.  This time they had the most beautiful pink, blue, purple and green burlap!  I wish I had seen these colors first!!!  I tried to keep the bags for the boys a little less frilly so I tied them closed with some hemp from Liz's Paper Loft Boutique.
 
 
After I made the pattern and cut the shape out, I sewed just the head part from lower part of ear to the other lower part of ear.
Next, I turned the bunny right side out and sewed along the outside of each ear.
Then I used the PKS face stamp with Stazon Ink and centered the eyes on the burlap.
Next, I used some Chalk Ink on the cheeks and inside of ears and Fabric Paint on the whites of the eyes.
Last I hot glued the pompom nose on.
 
Now all that was left was the decorating, my favorite part!  The tags are made from My Creative Time's Stitched Fun Ticket Dies.  The grass is from PKS-286 Easter Patch . The "Happy Spring" and tulip are from PK-264 Easter Egg Words and Bunnies.  The little blue bunny is from My Creative Time's Hello Spring Stamp Set.
 
Other Supplies I Used:
Burlap by the yard  -  Joann Fabric and Crafts
Stazon Jet Black Ink
Sewing Machine
Dew Drop Chalk Ink
Slick Dimensional Fabric Paint  -  Tulip
Stickles
Eyelets and Crop-A-Dial
Pink Ribbon  -  Recollections
Green Striped Ribbon  -  Liz's Paper Loft Boutique
Rolled Flower Die  -  My Creative Time
Paper Scraps
 
I hope you enjoyed my project for today.  I am entering it in the Peachy Keen "Anything Goes" challenge going on here.
Also don't forget there is a new 3-D Wednesday up over at My Creative Time.  Please go on over and see the beautiful projects the Design Team has for you!
If you would like to follow In The Pink on facebook please "friend" me here!
Enjoy your day!
 

Friday, March 15, 2013

Me and You Card

Happy Friday!  I am looking forward to the weekend!  There are a few St. Patty's Day Parades and Corn Beef Dinners in my future!!!  Today I have a card that I made for my hubby.  I tried to keep it as masculine as I could!


Supplies I Used:
 
from
 
Scarlett Jewel Card Stock and Ink  -  Papertrey Ink
Devoted 6x6 paper pad  -  Carta Bella
Charms  -  Recollections
Distresser, Tiny Attacher and Cards   -  Idea-ology
Black Soot Distress Ink
 
I want to thank Veronica of vkdesign company for my wonderful new blog look.  I LOVE it!!!!
 
Don't forget the Designer Challenge is still going on here!  The challenge is to make a spring project including a die cut!
I hope you enjoyed my post.  Have a Happy St. Patrick's Day and enjoy your weekend!


Monday, March 11, 2013

Easter Layout #1 - Scrapping The Little Things

Today is a new Scrapping the Little Things at My Creative Time.  Emma and the Design Team are making Spring projects for this Monday.  I made a 12 x 12 layout of Easter 2012 for my son's Album.  I LOVE it when Easter Sunday is beautiful weather!  Last year we were lucky and it was gorgeous outside!!!
My Creative Time Products:
Lowercase Fun Dies  -  "easter"
Hello Spring  -  Egg dies
To My Best Peep  -   bunny die and "Happy Easter"
Just Simply Live  -  writing on egg
I mounted the pictures on cuts from the Spring Holiday Cards Cricut Cartridge.  The grass cuts were from Gypsy Wanderings and Zoo Balloo Carts.

The Easter layouts for my daughters are in progress. I will be posting them for you to see soon! 
Others Supplies:
Cotton Bloom Stack  -  DCWV
Corner Chomper
Black Tuxedo Ink  -  Memento
Pompom

Thank you for stopping by my blog!  There are more projects for you to see here!  I hope you have a wonderful day!


Thursday, March 7, 2013

My Creative Time Designer's Challenge - Spring Theme with a Die Cut


Welcome to a new My Creative Time's Designer Challenge.   I am thrilled that it is my turn to host!  My Challenge is to make something Spring Related and be sure to have a Die cut  on it somewhere!
I decided this would be my challenge because I NEED the warm weather to get started.  When the end of winter drags on I start to be inneed of some serious outside time!  I thrive on sunshine, green grass and flowers!  I think I can see some of my plants starting to poke up through the soil so I'm sure spring is just about here!
 I used quite a few of Emma's dies on my two projects.  They all go so nicely together!


I layered the "Scallop and Stitched Circle dies" on top of the "Vintage Stitched Label Die".  These made a nice backround for the flower which is from Emma's "Rolled Flower Dies".  Inside the package are Chocolate Covered Sunflower Seeds.  I got them at a local shop and they are delicious!  The packaging was not very pretty so I tore it off and made my own.


I attached the flower with a glue gun so it was sure to stay on securely.  The cute little bunny is a charm attached with some pretty hemp. The bunny die is in "To My Best Peep" stamp and die set. I embossed it with some UTEE for extra durability and shine. 
 
 
The flower is sprinkled with some Diamond Dust to give it some sparkle.
 
 
I used the banner die from "Chocolate Greetings" to put "Thanks" on the top and the Thanks is from "Chunky Jar Accessories".  The bottom banner is from "Vintage  Stitched Label Dies" and the Sentiment is from "More of My Favorite Sayings".
I used my sewing machine to zigzag stitch aroung the entire card and also to straight stitch the burlap in place.
 
List of Supplies:
All Stamp and Die sets are available at My Creative Time
True Friends 6x6 paper pad, Carta Bella and Hemp  -  Liz's Paper Loft Boutique
Lavendar Moon and White Card Stock  -  Papertrey Ink
Rose Leaf Punch  -  MS Crafts
UTEE (Ultra Thick Embossing Enamel)
Burlap and Sparkly Pompom  -  Michaels
Heart Pins  -  Dritz
White Crinkle Ribbon and Bazzill Button
Fresh Picked Raspberry Distress Ink

Please go over to My Creative Time to see all the wonderful projects for today's challenge from the MCT Design Team!!  Don't forget to link up your project when you are over there!  We are looking forward to seeing them!!! 
 
Have a Great Day!
Love and Hugs,
Cathryn :)


Wednesday, March 6, 2013

St. Patrick's Day Envie - 3D Wednesday with My Creative Time

Good Morning!  Today I have an envelope I made by hand with cardstock and Emma's XL Label dies.  It is another 3D Wednesday with My Creative Time!
 I made a pattern for the bottom of the envelope out of a basic rectangle and layered the XL Label dies on the top to make the flap.
I am making about 60 of these for my children's classmates.  I'm class mom for one of my children this year and I like to send in at least a little something for every holiday. "AND" if I do for one I just have to do for the other, hehehe!!!  I can't send in any edible treats so I picked up a bunch of "Lucky" money coins.  The little ones usually love these little "treasures".


I embossed the Shamrock with UTEE to make it nice and shiny.  Sometimes I like UTEE better than Glossy Accents because you can dry the UTEE very quickly.  Also any bubbles that show up can be fixed by reheating them out!


I found some extra-thin adhesive hook and loop tape to close the back of the envies. They don't add much bulk and keep the flap closed nicely.
 
List of Supplies:
UTEE Powder, Versamark Watermark Stamp Pad and Heat Gun
Vintage ream Card Stock  -  Papertrey Ink
For the Record 2 6x6 pad  -  Echo Park
Peeled Paint Distress Ink
Hook and Look Adhesive Strips  -  Tombo
 
Well I'm glad you stopped by to see me today!  I hope the children will enjoy their little "treasure".
Please stop by My Creative Time to see some more 3D projects.  Enjoy your day!
Love and Hugs,
Cathryn :)