Tuesday, July 25, 2023

HORSE & SLEIGH TREAT BOX with ONE HORSE OPEN SLEIGH - Stampin' Up!


Shop Stampin' Up! Here

Hi Friends!
My project today is a treat box that measures  5  x  4  x  1".  I use the Horse & Sleigh stamp set & dies Bundle, One Horse Open Sleigh Designer Series Paper and Adhesive Backed Snowflakes Assortment.

You can watch my Video Tutorial Here!


I started with a piece of Cherry Cobbler Cardstock sized
8 3/4  x  7"
I scored the  8 3/4" side at:
3/4,  1 3/4,  4 3/4  and  5 3/4".
I scored the  7" side at:
1  and  6".
To cut and put the box together you can watch my Video Tutorial Here.
Below is a picture of how your Cardstock should look after scoring, cutting and rounding the corners of the flap.


I attached several pieces of One Horse Open Sleigh Designer Series Paper to the box.
(2)  4 3/4  x  2 3/4"  front and back
(2)  3/4  x  4 3/4"  long sides
(2)  3/4  x  2 3/4"  short sides
I attached the DSP to the box with Liquid Glue.


I stamped the Horse & Sleigh image onto Basic White Cardstock with Tuxedo Black Ink.
I colored the images with Stampin' Blends.
Light and Dark Cherry Cobbler  -  Sleigh,  Woman's Clothes and Bridle & Harness
Dark Mossy Meadow  -  Men's Clothes
Dark Smokey Slate  -  Hoove, Snow Shoes and Bottom of Sleigh
Light & Dark Pecan Pie  -  Horse
SU1000  -  Faces
I cut the image out using the Horse & Sleigh dies.


I cut the 2 Snowdrifts out of Basic White Cardstock using the Horse and Sleigh dies.
I attached the Snow Drifts to the bottom front of the box with Liquid Glue.
I attached the image on top of the Snow Drifts with Mini Dimensionals and Dimensionals.


I added 3 Red Festive Pearls to the Horses's Harness and for the final touch I added 3 Adhesive Backed Snowflakes above the image.


Supplies:
Horse & Sleigh stamp set and dies Bundle
One Horse Open Sleigh Designer Series Paper
Cherry Cobbler Cardstock
Basic White Cardstock
Tuxedo Black Ink
Stampin' Blends
Festive Pearls
Snowflake Assortment
Simply Scored
Take Your Pick Tool
Liquid Glue
Dimensionals
Mini Dimensionals
Corner Rounder
Small Circle Punch

Thank you for visiting my Blog today.  I hope you enjoyed my Treat Box.
See you next time!

Love and Hugs,
 Cathryn

Friday, July 21, 2023

TRUCKING ALONG CHRISTMAS TREAT BOX with LET'S GO FISHING - Stampin' Up!


Hi Friends!
My project today is a Christmas Treat Box that measures  3 1/2  x  2 1/2  x  1 1/4".  I used the Trucking Along stamp set & the Trucking Along Builder Punch Bundle, Stylish Shapes dies and Let's Go Fishing Designer Series Paper.


I started with a piece of Real Red Cardstock sized
10 3/4  x  5"
I scored the  10 3/4" side at:
1 1/4,  4 3/4,  6  and  9 1/2".
I scored the  5" side at:
1 1/4  and  3 3/4".
To cut and put the box together you can watch my Video Tutorial Here.
Below is a picture of how your Cardstock should look after scoring and cutting.


I attached several pieces of Let's Go Fishing Designer Series Paper to the box.
(2)  3 1/4  x  2 1/4"  top and inside top
(2)  1 x  3 1/4"  long sides
(2)  1  x  2 1/4"  short sides
I attached the DSP to the box with Liquid Glue.


I stamped the Truck, from Tucking Along stamp set, onto Very Vanilla Cardstock with Real Red Ink.
I stamped the outline of the Truck with Cherry Cobbler Ink.
I stamped the "Farm Fresh" on the Door with Tuxedo Black Ink and I stamped the Tree with Old Olive Ink.


I cut the Truck out with the Trucking Along Builder Punch.
I cut the Tree out by hand.
I stamped the sentiment onto Very Vanilla Cardstock with Old Olive Ink.
I cut the sentiment out using a label die from the Stylish Shapes dies.


I tied Real Red Dotted Ribbon around the left short side of the box and tied a bow at the top.
I attached the tree to the back of the truck with Liquid Glue.
I attached the sentiment label first, then the Truck with Dimensionals and Mini Dimensionals.


For the final touch I added 3 Gold Festive Pearls to the Christmas Tree.


Supplies:
Trucking Along stamp set & Trucking Along Builder Punch Bundle
Stylish Shapes dies
Let's Go Fishing Designer Series Paper
Real Red Cardstock
Very Vanilla Cardstock
Real Red Ink
Cherry Cobbler Ink
Old Olive Ink
Tuxedo Black Ink
Real Red Dotted Ribbon
Festive Pearls
Simply Scored
Take Your Pick Tool
Liquid Glue
Dimensionals
Mini Dimensionals
Small Circle Punch

Thank you for visiting my Blog today.  I hope you enjoyed my Christmas Treat Box.
See you next time!

Love and Hugs,
Cathryn

Wednesday, July 19, 2023

MASCULINE GOODY BOX with GONE FISHING - Stampin' Up!


Shop Stampin' Up! Here

Hi Friends!
My project today is a Masculine Treat Box.  It measures  4 x 3 x 1".  I used the Gone Fishing stamp set & dies Bundle, Something Fancy dies and Let's Go Fishing Designer Series Paper.

You can watch my Video Tutorial Here!


I started with a piece of Very Vanilla Cardstock sized
11  x  6 1/2"
I scored the  11" side at:
1,  5,  6  and  10".
I scored the  6 1/2" side at:
3/4,  1 3/4,  4 3/4  and  5 3/4".
To cut and put the box together you can watch my Video Tutorial Here.
Below is a picture of how your Cardstock should look after scoring, cutting and rounding the corners of the flaps.


I attached several pieces of Let's Go Fishing Designer Series Paper to the box.
(2)  2 3/4  x  3 3/4"  front and back of flap
(2)  3 3/4  x  3/4"  long sides
(2)  2 3/4  x  3/4"  short sides
(2)  1/2  x  3 3/4"  inside flaps
I attached the DSP to the box with Liquid Glue.
I attached a 3/8" Low Profile Adhesive Backed Velcro Dot to the front flap for the closure.


I stamped 3 of the Lures, from Gone Fishing stamp set, onto Very Vanilla Cardstock with Mossy Meadow and Crumb Cake Inks.
I cut the images out using the Gone Fishing dies.


I stamped the sentiment onto Very Vanilla Cardstock with Mossy Meadow Ink.
I cut the sentiment out with the second largest square die from Something Fancy dies.
I cut a larger of the same shape die from Mossy Meadow Cardstock.
I attached them together with Liquid Glue.
I attached the entire piece to the front of the box with Dimensionals.


I attached the Lures to the upper right and lower left of the sentiment with Mini Dimensionals and Liquid Glue.
For the final touch I tied a knot to make a top loop in a small piece of Linen Thread and attached the knot to the top Lure with Liquid Glue.


Supplies:
Gone Fishing stamp set & dies Bundle
Let's Go Fishing Designer Series Paper
Something Fancy dies
Very Vanilla Cardstock
Mossy Meadow Ink
Crumb Cake Ink
Linen Thread
Simply Scored
Mini Dimensionals
Dimensionals
3/8" Low Profile Adhesive Velcro Dots
Corner Rounder
Grinds Coffee Pods

Thank you for visiting my Blog today.  I hope you enjoyed my Masculine Treat Box.
See you next time!

Love and Hugs,
Cathryn

Tuesday, July 18, 2023

EMBROIDERY HOOP GIFT BOX with CRAFTING WITH YOU - Stampin' Up!


Shop Stampin' Up! Here

Hi Friends!
My project is an Embroidery Hoop gift box that measures  3 1/2  x  3 1/2  x  1 1/4".  I used the Crafting with You stamp set & dies Bundle, Stylish Shapes dies, Mini Pocket Envelope dies, and Delightfully Eclectic Designer Series Paper.

You can watch my Video Tutorial Here!


I started with a piece of Bubble Bath Cardstock sized
10  x  6 3/4"
I scored the  10" side at:
1/2,  4,  5 1/4  and  8 3/4".
I scored the  6 3/4" side at:
1 1/4,  4 3/4  and  6".
To cut and put the box together you can watch my Video Tutorial Here.
Below is a picture of how your Cardstock should look after scoring, cutting and rounding the corners of the top flap.


I attached several pieces of Delightfully Eclectic Designer Series Paper to the box.
(2)  3 1/4  x  3 1/4"  front and back
(4)  1  x  3 1/4"  sides
I attached the DSP to the box with Liquid Glue.


I cut a 2 1/2" Circle from Bubble Bath Cardstock using the Stylish Shapes dies.
I cut the Embroidery Hoop pieces from Basic White Cardstock with the Crafting with You dies.
I stamped the Flowers, from Crafting with You stamp set, onto Basic White Cardstock with Bubble Bath Ink.
I cut the image out using the Crafting with You dies.


I attached the 2 Hoop pieces onto the Bubble Bath Circle with Liquid Glue.
I attached the Flowers to the middle with Dimensionals.
I attached the entire piece to the front of the box with Dimensionals.


I stamped the sentiment onto Basic Black Cardstock with Versamark Ink.
I sprinkled the image with White Stampin' Emboss Powder.
I heated the image up with the Heat Gun.
I cut the image out with a small oval die from the Mini Pocket Envelope dies.
I attached the Oval to the bottom right side of the box.


I tied a bow with Black & White Gingham Ribbon and attached it at the top of the Hoop with a Glue Dot and Liquid Glue.
For the final touch I added 3 Black Classic Matte Dots to the Flowers.


Supplies:
Crafting with You stamp set & dies Bundle
Stylish Shapes dies
Mini Pocket Envelope dies
Delightfully Eclectic Designer Series Paper
Bubble Bath Cardstock
Basic Black Cardstock
Bubble Bath Ink
Versamark Ink
White Stampin' Emboss Powder
Black & White Gingham Ribbon
Classic Matte Dots
Simply Scored
Take Your Pick Tool
Tear & Tape
Liquid Glue
Dimensionals
Heat Gun
Small Circle Punch
Corner Rounder

Thank you for visiting my Blog today.  I hope you enjoyed my Box today.
See you next time!

Love and Hugs,
Cathryn

Wednesday, July 12, 2023

CHEERFUL DAISIES BANDED BOX with DELIGHTFULLY ECLECTIC - Stampin' Up!


Shop Stampin' Up! Here

Hi Friends!
My project today is a banded box that measures  4 1/2  x  3 1/2  x  1 1/4".  I used the Cheerful Daisies stamp set & dies Bundle, Delightfully Eclectic Designer Series Paper and Iridescent Rhinestone Basic Jewels.

You can watch My Video Tutorial Here!


I started with a piece of Thick Basic White Cardstock sized
10  x  7 3/4"
I scored the  10" side at:
1 1/4,  4 3/4,  6  and  9 1/2".
I scored the  7 3/4" side at:
1 1/4,  5 3/4  and  7".
To cut and put the box together you can watch my Video Tutorial Here.
Below is a picture of how your Cardstock should look after scoring, cutting and rounding the corners of the top flap.


I cut a piece of Delightfully Eclectic Designer Series Paper to
(1)  3 1/2  x  12"
You can adjust the height to 4"  if you like the DSP to cover more of the box.
I creased the DSP around the box with my fingers and attached the front first, then the sides and overlapped the back with Liquid Glue.


I stamped the outlines of the 2 Daisies, from Cheerful Daisies stamp set, onto Basic White Cardstock with Daffodil Delight Ink.
I stamped the centers with Daffodil Delight also.
I stamped 3 Leaves with Old Olive Ink.
I cut the images out using the Cheerful Daisies dies.


I cut the Label from Basic White Cardstock using the Cheerful Daisies dies.
I stamped the sentiment, from Cheerful Daisies stamp set, onto the label with Old Olive Ink.


I attached the Large Daisy first with Dimensionals.
Then I attached the Label with Dimensionals and Liquid Glue.  Next I attached the Small Daisy with Dimensionals and finally the Leaves with Liquid Glue.


For the final touch I added Iridescent Rhinestone Basic Jewels to the side of the Daisy Centers and the bottom right of the box.


Supplies:
Cheerful Daisies stamp set & dies Bundle
Delightfully Eclectic Designer Series Paper
Thick Basic White Cardstock
Basic White Cardstock
Daffodil Delight Ink
Old Olive Ink
Iridescent Rhinestone Basic Jewels
Simply Scored
Take Your Pick Tool
Tear & Tape
Liquid Glue
Dimensionals
Corner Rounder
Small Circle Punch

Thank you for visiting my Blog today.  I hope you enjoyed my Daisy Box.
See you next time!

Love and Hugs,
Cathryn

Tuesday, July 11, 2023

TREAT BOX USING BACKGROUND MADE FROM SCRAPS with ZANY ZOO - Stampin' Up!


Hi Friends!
My project today is a treat box that measures 4 x 4 x 1".  I made the background using scraps of Designer Series Paper.  I used the Zany Zoo stamp set & dies Bundle, Stylish Shapes dies, Bright & Beautiful Designer Series Paper and Bright Designer Series Paper.


I started with a piece of Boho Blue Cardstock sized
10 1/2  x  6 3/4"
I scored the  10 1/2" side at:
1,  5,  6  and  10".
I scored the  6 3/4" side at:
1,  5  and  6".
To cut and put the box together you can watch my Video Tutorial Here.
Below is a picture of how your Cardstock should look after scoring, cutting and rounding the corners of the top flap.


I made the Background with 4 pieces of Bright & Beautiful and the Bright's Designer Series Papers sized
(4)  3/4  x  6".
I cut a piece of Thick Basic White Cardstock to:
3 3/4  x  3 3/4"
I attached the middle piece first diagonally in the middle of the square.
Then I attached 2 pieces on each side of the middle all with Liquid Glue.
I attached the entire piece to the top of the box with Dimensionals.
I attached 4 pieces of the solid Green DSP to the sides sized:
3/4  x  3 3/4"
with Liquid Glue.


I stamped the Skunk image, from Zany Zoo stamp set, onto Basic White Cardstock with Tuxedo Black Ink.
I cut the image out using the Zany Zoo dies.
I colored the image with Stampin' Blends.
Light and Dark Smokey Slate  -  Skunk except for Stripe
Light Bubble Bath  -  Nose and inner Ear
Light Boho Blue  -  Bird and Binoculars
Light Lemon Lolly  -  Beak


I cut a 2 circles out using the Stylish Shapes dies.
(1)  2 1/8"  from Basic White Cardstock
(1)  1 1/4"  from Boho Blue Cardstock
I cut out 1 Large Tree and 2 Small Trees from Granny Apple Green Cardstock using the Zany Zoo dies.
I attached the Skunk in the middle of the Basic White Circle with Dimensionals.
I stamped the sentiment, from Zany Zoo stamp set, onto the Boho Blue Circle with Tuxedo Black Ink.


I attached the Trees around the Skunk with Liquid Glue.
I attached the entire piece to the lower right side of the box with Dimensionals.
I attached the sentiment circle partially under the left side of the Large circle with Liquid Glue.
I tied a small bow with Linen Thread and attached it to the upper left side of the sentiment with Liquid Glue.
For the final touch I added 3 Boho Blue Solid Gems to the top area of the box.


Supplies:
Zany Zoo stamp set & dies Bundle
Stylish Shapes dies
Bright & Beautiful Designer Series Paper
Brights Designer Series Paper
Boho Blue Cardstock
Thick Basic White Cardstock
Granny Apple Green Cardstock
Basic White Cardstock
Tuxedo Black Ink
Stampin' Blends
Solid Gems
Linen Thread
Simply Scored
Tear & Tape
Liquid Glue
Dimensionals
Corner Rounder
Small Circle Punch

Thank you for visiting my Blog today.  I hope you enjoyed my Scraps Background.
See you next time!

Love and Hugs,
Cathryn

Friday, July 7, 2023

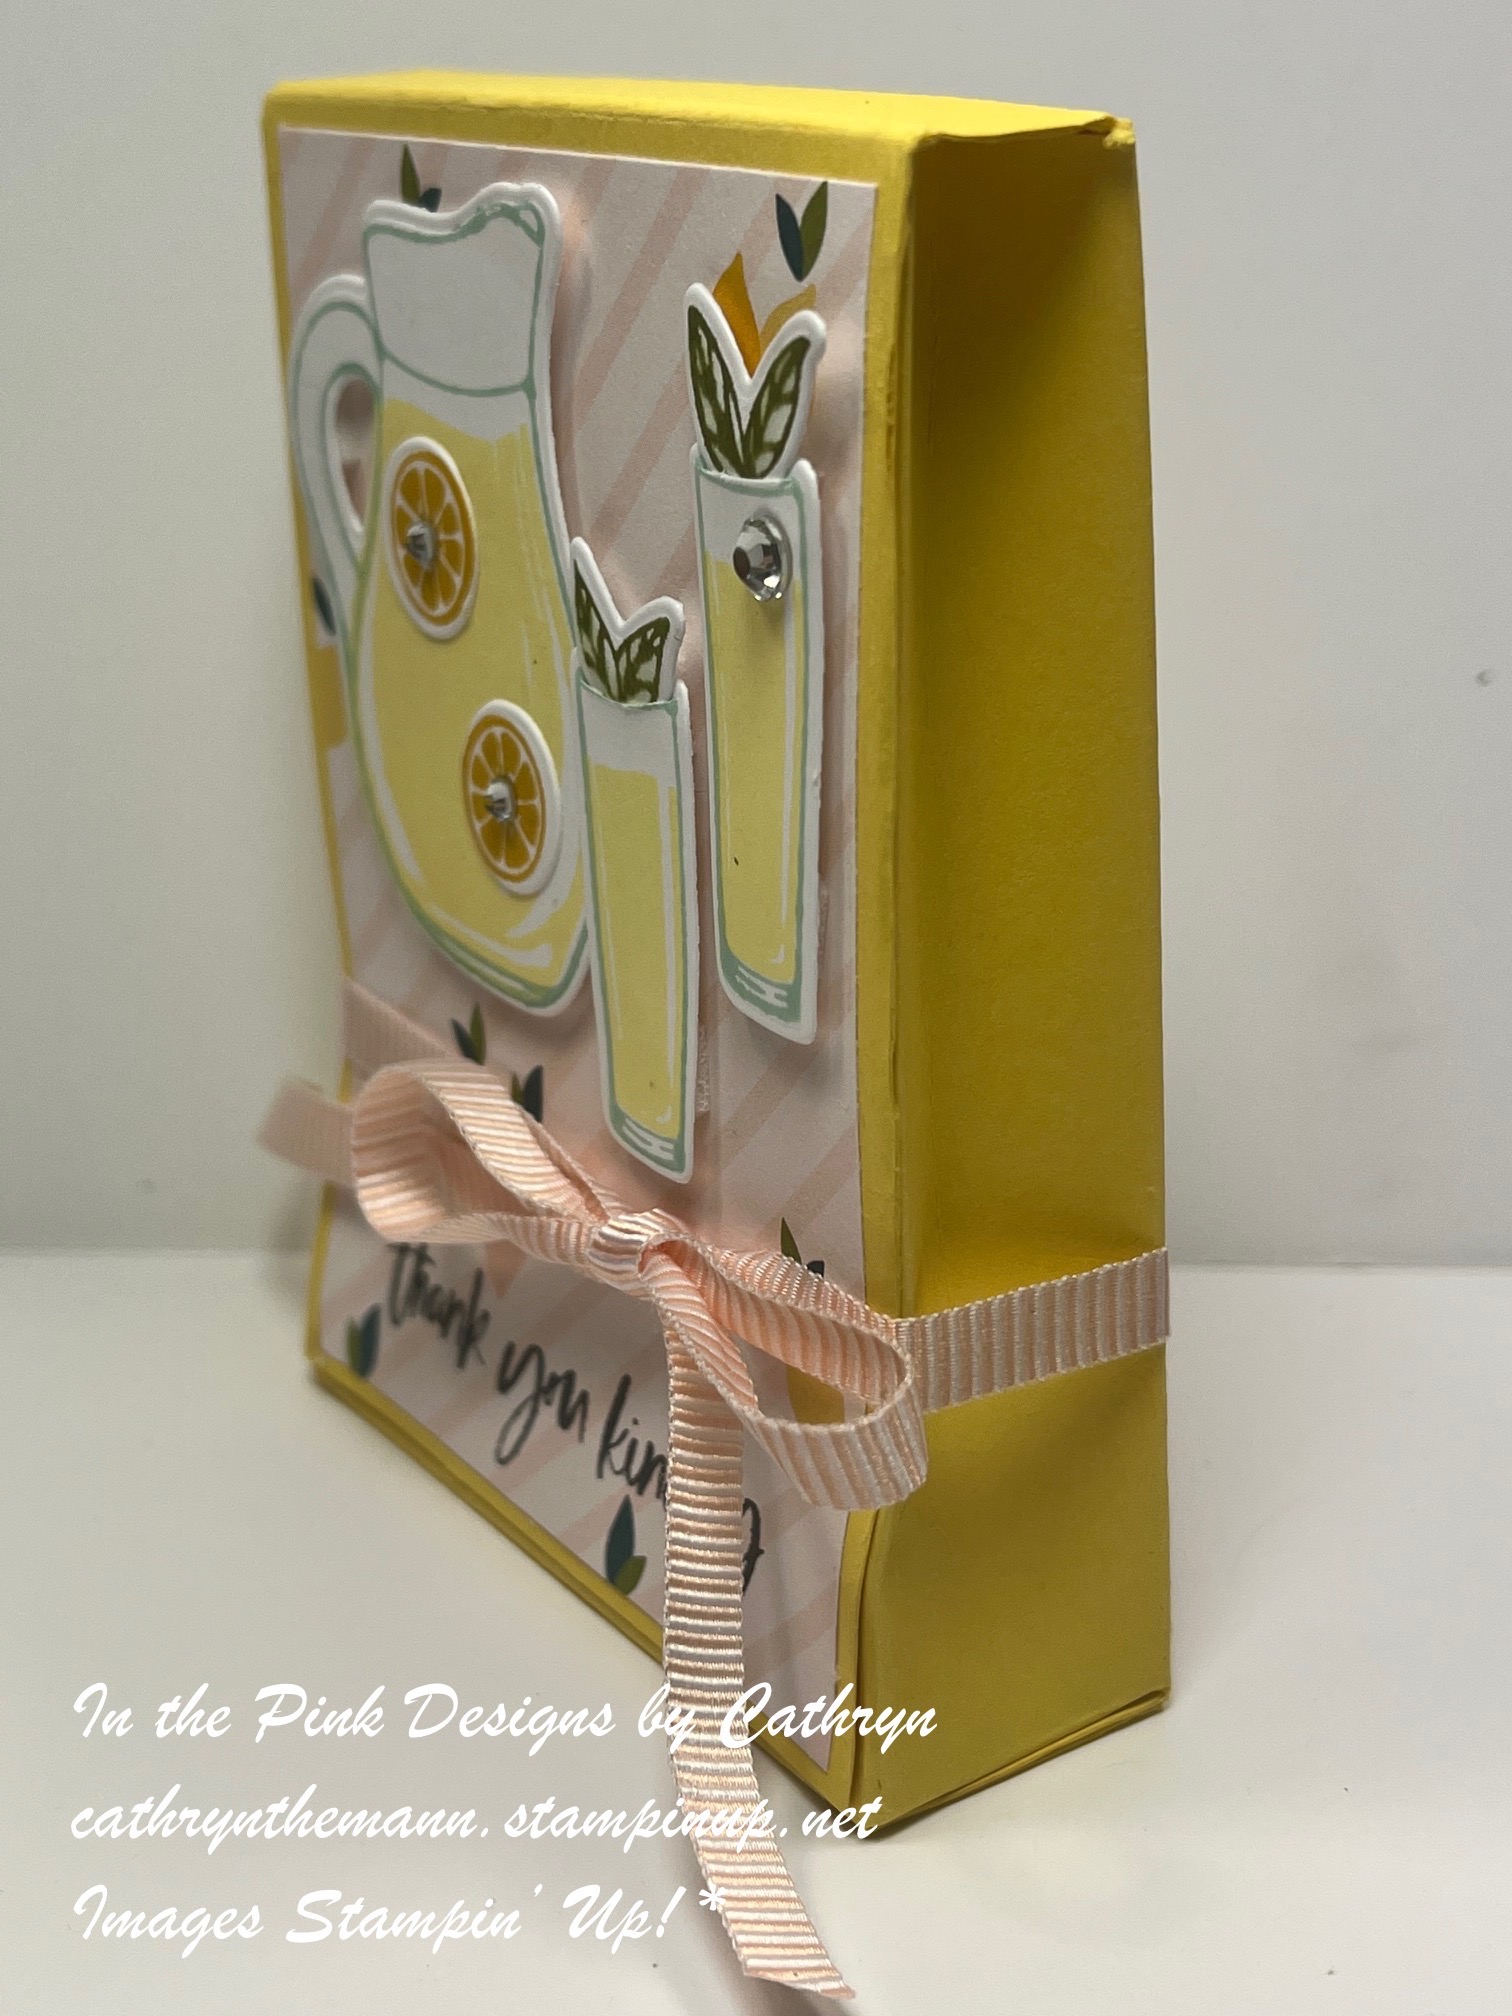
SO REFRESHING TREAT BOX with DELIGHTFULLY ECLECTIC - Stampin' Up!


Hi Friends!
My project today is a Treat Box that measures  3  x  4  x  1".  I used the So Refreshing stamp set and dies Bundle, Delightfully Eclectic Designer Series Paper, Petal Pink & Lemon Lime Twist Ribbon Combo Pack and Rhinestone Basic Jewels.


I started with a piece of Daffodil Delight Cardstock sized
9 1/2  x  8 1/2"
I scored the  9 1/2" side at:
1,  5  and  5 1/2".
I scored the  8 1/2" side at:
1/2,  3 1/2,  4 1/2  and  7 1/2".
To cut and put the box together you can watch my Video Tutorial Here.
Below is a picture of how your Cardstock should look after scoring and cutting.


I attached 4 pieces of Delightfully Eclectic Designer Series Paper to the box.
(4)  2 3/4  x  3 3/4"  for the front and back of flap and box.
Before attached the front flap piece I stamped the sentiment, from So Refreshing stamp set, onto the bottom with Tuxedo Black Ink.
I attached the DSP to the box with Liquid Glue.


I stamped the outline of the Pitcher and 2 Glasses onto Basic White Cardstock with Pool Party Ink.
I stamped the inside of the Pitcher and Glasses with Lemon Lolly Ink.
I stamped 2 Lemon Slices with Crushed Curry Ink.
I stamped the Mint Leaves with Old Olive Ink and added some Wink of Stella to Bleed the color around.
I cut the images out using the So Refreshing dies.


I tied Petal Pink Ribbon, from the Petal Pink & Lemon Lime Twist Ribbon Combo Pack, around the bottom of the box and tied a bow on the front.
I attached the Pitcher to the upper left side with Dimensionals.


I cut a slit in the top of each Glass with a knife and slipped mint leaves in each one.
I attached the Glasses with Dimensionals.
I attached the Lemon Slices to the Pitcher with Liquid Glue.


For the final touch I added Rhinestone Basic Jewels to the middle of the Lemon Slices and at the top of the higher Glass.


Supplies:
So Refreshing stamp set & dies Bundle
Delightfully Eclectic Designer Series Paper
Daffodil Delight Cardstock
Basic White Cardstock
Pool Party Ink
Lemon Lolly Ink
Crushed Curry Ink
Old Olive Ink
Tuxedo Black Ink
Petal Pink & Lemon Lime Twist Ribbon Combo Pack
Wink of Stella
Rhinestone Basic Jewels
Simply Scored
Take Your Pick Tool
Tear and Tape
Liquid Glue
Stampin' Dimensionals
Knife

Thank you for visiting my Blog today.  I hope you enjoyed my Treat Box.
See you next time!

Love and Hugs,
Cathryn