Monday, January 10, 2022

NUTS and BOLTS VALENTINE WINDOW BOX with SWEET HEARTS DIES - Stampin' Up!


Hi Friends!
My project today is a Valentine's Window Box that measures
4 1/2  x  3 1/2  x  1/2".  I used Nuts and Bolts stamp set, Sweet Heart dies,  Sweet Talk Designer Series Paper, Tailor Made Tags, Scalloped Contours dies and Beautiful Shapes dies.


I started with a piece of Sweet Talk Designer Series Paper sized
8 1/2  x  6".
I scored the  8 1/2"  side at:
1/2,  4,  4 1/2  and  8"
I scored the  6 " side at:
1/2  and  5".
To cut and put the box together you can watch my Video Tutorial Here.
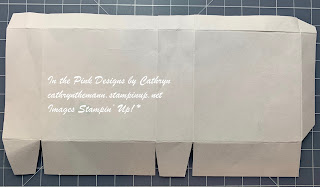
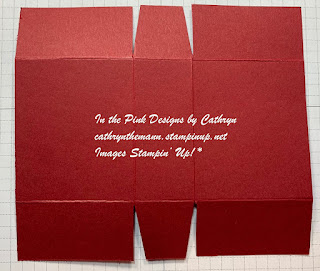
Below is a picture of my Template.  Your DSP should look like this after scoring and cutting.


I cut the edge of the flap with the Scallop die from the Scalloped Contours dies.
I cut a Hexagon Window in the side with out the top flap using the larges Hexagon die from Beautiful Shapes dies.
I attached a  3 x 3" pice of Window Sheet inside the Hexagon cut out with Glue Dots.


I cut a tag from Real Red Cardstock using the Tailor Made Tags dies.  (I used the second largest of the above shape)
I stamped the sentiment, from Nuts and Bolts stamp set, onto the bottom of the tag with Tuxedo Black Ink.
I stamped the Robot image onto Basic White Cardstock with Tuxedo Black Ink also.
I colored the Robot with Stampin' Blends.
Light and Dark Smokey Slate for the Robot body.
Dark Real Red for the dot at the top of the antenna.
Dark and Light Real Red for the Heart.


I put 6 Hershey's Chocolate Hearts inside the box and then I punched holes in the top flap of the box with a 1/4" hole punch (going through all layers).
I ran Double Stitched Real Red Satin Ribbon through the holes and added the tag to the right side before tying the bow.


I cut a large heart and 2 small hearts from Real Red Cardstock using the Sweet Heart dies.
I attached the large one to the box with a Dimensional.
I attached both little hearts with Liquid Glue.
I added 2 Red Matte Decorative Dots to the box above the hearts.
For the final touch I added Wink of Stella Glitter to the heart on the Robot.


Supplies:
Nuts and Bolts stamp set
Sweet Heart dies
Sweet Talk Designer Series Paper
Tailor Made Tags dies
Scalloped Contours dies
Beautiful Shapes dies
Real Red Cardstock
Basic White Cardstock
Tuxedo Black Ink
Light and Dark Smokey Slate Stampin' Blends
Light and Dark Real Red Stampin' Blends
Real Red Double Stitched Satin Ribbon
Wink of Stella
Matte Decorative Dots
Window Sheets
Tear and Tape
Dimensionals
Liquid Glue
Glut Dots
Simply Scored
Take Your Pick Tool

Thank you for visiting my Blog today!  I hope you enjoyed my Tutorial and Video.
See you next time.

Love and Hugs,
Cathryn

Friday, January 7, 2022

CACTUS CUTIES DOUBLE TOPPED BOX with CACTUS BUILDER PUNCH - Stampin' Up!


Shop Stampin' Up! Here

Hi Friends!
My project today is a Square box that measures  3 1/4  x  3 1/4  x  1 1/4".  It has a double flap top secured with a big bow made of White 3/4" Frayed Ribbon.  I also used. Cactus Cuties stamp set, the Cactus Builder Punch, Beautiful Shapes dies and Sunshine and Rainbows Designer Series Paper.


I started with a piece of Bermuda Bay Cardstock sized
9 1/2  x  5 3/4".
I scored the  9 1/2"  side at:
1 1/4,  4 1/2,  5 3/4  and  9".
I scored the  5 3/4"  side at:
1 1/4   x  4 1/2"
To cut and out the boxes together you can watch my Video Tutorial Here.
Below is a picture of what your Cardstock should look like after scoring, cutting and rounding the corners of one of the flaps with the Detail Trio Punch.


I attached 6 pieces of Sunshine and Rainbows Designer Series Paper (free with $50 purchase from Saleabration Catalog) to the box.
(2)  3 x 3"  for the front and back.
(4)  3 x 1"  for the sides, top and bottom.
Round the corners on one of these for the top flap.
I attached the DSP to the box with Liquid Glue.


I punched two holes in the top flap and the flap underneath with a 1/4" hole punch.
I ran White  3/4"  Frayed Ribbon through both sets of holes and tied a bow at the top.
I cut out 2 Hexagons using the Beautiful Shapes dies.
The largest Hexagon from Sunshine and Rainbows DSP.
The smallest Hexagon from Mango Melody Cardstock.


I stamped the Cactus from Cactus Cutes stamp set on Basic Whire Cardstock using Granny Apple Green Ink.
I stamped the pot onto Basic White Cardstock with Bermuda Bay Ink.
I cut out the Cactus pieces and pot using the Cactus Builder Punch.
I cut 3 flowers from Mango Melody Cardstock using the Cactus Builder Punch.
I stamped the sentiment onto the small hexagon with Tuxedo Black Ink.


I put the Pot and Cactus pieces together with Liquid Glue and a Silicone Mat.
I attached them to the Large Hexagon with Dimensionals.
I attached the Large Hexagon to the middle/front of the box with Dimensionals.
I attached the small hexagon to the bottom left of the front with 2 Dimensionals stacked.
For the final touch I added 3 yellow Matte Decorative Dots to the Flowers.


Supplies:
Cactus Cuties stamp set
Cactus Builder Punch
Beautiful Shapes dies
Sunshine and Rainbows Designer Series Paper
Detail Trio Punch
White 3/4" Frayed Ribbon
Bermuda Bay Cardstock
Basic White Cardstock
Granny Apple Green Ink
Bermuda Bay Ink
Tuxedo Black Ink
Matte Decorative Dots
Silicone Mat
Stamp and Pierce Mat
Tear and Tape
Dimensionals
Liquid Glue
Simply Scored
Take Your Pick Tool
1/4" Hole Punch

Thank you for visiting my Blog today!  I hope you liked my Cactus Gift Box.
See you next time.

Love and Hugs,
Cathryn


Wednesday, January 5, 2022

HELLO LADYBUG TREAT BOX with LAYERING CIRCLES DIES - Stampin' Up! *


Hi Friends!
My project today is a Ladybug Treat box that measures 3 x 3 x 1 1/2".  The new January to June Catalog is now live!  From the Catalog I used the new stamp set Hello Ladybug.  I also used the Layering Circle dies, Black and White Gingham Ribbon and the Brights Designer Series Paper.


I started with a piece of Real Red Cardstock sized  9 1/2  x  5 1/2".
I scored the  9 1/2" side at:
1/2,  3 1/2,  5  and  8".
I scored the  5 1/2" side at:
1 1/2  and  4 1/2".
To cut and put the box together you can watch my Video Tutorial Here.
Below is a picture of how your Cardstock should look after scoring and cutting.


I attached 3 pieces of Brights Designer Series Paper to the box.
(2)  2 3/4 x  2 3/4"  for the front and back.
(1)  2 3/4  x  7/8"  for the front flap.
I attached the front flap piece flush to the bottom of the flap.
I attached the DSP to the box with Liquid Glue.


I cut a 2 3/8" circle from Basic White Cardstock using the Layering Circle dies.
I cut a slightly larger scalloped circle from Real Red Cardstock.
I stamped the leaf, from Hello Ladybug stamp set, onto the Basic White Circle with Pear Pizzazz Ink.
I stamped the outside of the ladybug onto Basic White Cardstock using Tuxedo Black Ink.
I stamped the inside of the lady bug TWICE with Real Red Ink.
I stamped the sentiment onto a 1/2" piece of Daffodil Delight Cardstock with Tuxedo Black Ink.


I attached the Basic White circle on top of the Real Red circle with Liquid Glue.
I cut the sentiment by hand slant cutting the sides.
I attached the sentiment on the bottom of the leaf with Liquid Glue.
I fussy cut the ladybug out by hand and attached it to the leaf with the feet just above the sentiment.
I attached the entire piece to the front of the box with Dimensionals on the BOTTOM ONLY.
This is so the front flap can slip in behind it to close the box.
I punched two holes in the left side of the flap with a 1/8" hole punch and tied Black & White Gingham Ribbon through them in a bow.
For the final touch I added 3 yellow Matte Decorative Dots  around the Ladybug.


Supplies:
Hello Ladybug stamp set
Layering Circle dies
Brights Designer Series Paper
Black and White Gingham Ribbon
Real Red Cardstock
Basic White Cardstock
Daffodil Delight Cardstock
Tuxedo Black Ink
Real Red Ink
Pear Pizzazz Ink
Matte Decorative Dots
Dimensionals
Liquid Glue
Tear and Tape
Stamp and Pierce Mat
Simply Scored Tool
Take Your Pick Tool

Thank you for visiting my Blog Today!  I hope you enjoyed my Ladybug treat box.
See you next time.

Love and Hugs,
Cathryn

Friday, December 24, 2021

AWESOME OTTERS HEXAGON GIFT BAG with BEAUTIFUL SHAPES DIES - Stampin' Up! *


Hi Friends!
I wish you all a Merry Christmas!!!
My project today is a  3 x 3 x 1"  Gift Bag.  I used Awesome Otters stamp set and Sunshine and Rainbows Designer Series Paper.  Both are SALEABRATION items free with a $50 purchase.  I also used the Beautiful Shapes dies which are in the new Mini Catalog.


I started with a piece of Pool Party Cardstock sized  8 1/2  x  4 1/2".
I scored the  8 1/2" side at:
1, 4, 5 and 8".
I scored the  4 1/2" side at:
1 and 4".
To cut and put the box together you can watch my Video Tutorial Here.
Below is a picture of my template.  Your cardstock should look like this after scoring and cutting.


I attached 2 pieces of Sunshine and Rainbows Saleabration Designer Series Paper to the box.
(2)  2 3/4  x  2 3/4"
I attached the DSP to the box with Liquid Glue.
I stamped the image, from Awesome Otters stamp set, onto Basic White Cardstock with Tuxedo Black Ink.

I colored the image with Stampin' Blends.
Light and Dark Pool Party for the Water.
Light and Dark Crumb Cake for the Otter.
Light Smokey Slate for the Nose.
I cut the image out with a Hexagon die from Beautiful Shapes dies.


I cut a larger Hexagon from striped paper in the same DSP pack.
I attached the stamped image on top of the striped Hexagon with Dimensionals.
I attached both Hexagons to the front of the box with Dimensionals also.
I puched 2 holes in the front and back of the top of the box with a 1/8" hole punch.
I ran Pool Party Striped Ribbon through the holes and tied a bow at the front.
I added some Wink of Stella Glitter to the Otters nose and eyes.
For the final touch I added 3 Classic Matte dots to the water.


Supplies:
Awesome Otters stamp set - Saleabration Catalog
Sunshine and Rainbows Designer Series Paper - Saleabration Catalog
Beautiful Shapes dies
Striped Pool Party Ribbon
Pool Party Cardstock
Basic White Cardstock
Tuxedo Black Ink
Classic Matte Dots
Light and Dark Pool Party Stampin' Blends
Light and Dark Crumb Cake Stampin' Blends
Light Smokey Slate Stampin' Blend
Wink of Stella
Liquid Glue
Tear and Tape
Dimensionals
Simply Scored
Take Your Pick Tool
Small Hole Punch

Thank you for visiting my Blog today!  I hope you enjoyed my Saleabration project.
See you next time.

Love and Hugs,
Cathryn

Wednesday, December 22, 2021

CHRISTMAS PURSE GIFT BOX with SEASONAL LABELS DIES - Stampin' Up!


Hi Friends!
My project today is a little Purse Gift Box that I made using the Seasonal Labels dies.  It measures  3  x  3 3/4  x  1 1/4".  I used Little Delights stamp set, Seasonal Labels dies, Layering Circle dies and Sweet Stockings Designer Series Paper.


I started with a piece of Cherry Cobbler Cardstock sized
6 1/4  x  5 1/2".
I scored the  6 1/4" side at:
2 1/2  and  3 3/4".
I scored the  5 1/2" side at:
1 1/4  and  4 1/4".
To cut and put the bottom of the box together you can watch my Video Tutorial Here.
Below is a picture of how your Cardstock should look after scoring and cutting.


I attached two pieces of Sweet Stockings Designer Series Paper to the box.
(2)  2 3/4  x  2 1/4".
I attached the DSP to the front and back of the box with Liquid Glue.


I cut a large label from Cherry Cobbler Cardstock using the Seasonal Labels dies.  I cut the label in half at  1 15/16"  (close to 2" is good).  I put glue on about 1/2" of the bottom of each side of the label and attached the them to the inside of the front and back of the base box.  I punched a hole in each handle using a 7/8" circle punch.
I tied Cherry Cobbler Metallic Ribbon through the handles and tied a bow at the front.


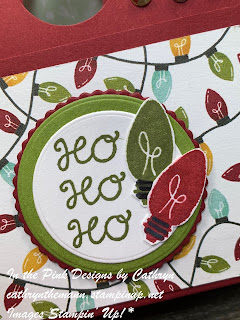
I cut out 3 circles using the Layering Circle dies.
(1)  Smooth circle 1 3/8"  from Basic White Cardstock
(1)  Smooth circle  1 5/8"  from Old Olive Cardstock
(1)  Scalloped Circle 1 3/4"  from Cherry Cobbler Cardstock
I stamped the sentiment, from Little Delights stamp set, onto the Basic White Circle with Old Olive Ink.
I stamped 2 Christmas Lights, from the same stamp set, onto Basic White Cardstock.  One with Old Olive Ink and one with Cherry Cobbler Ink.


I attached the circles together, largest on the bottom, with Liquid Glue.
I attached them all to the front of the box with Dimensionals.
I fussy cut the 2 Christmas Lights by hand and attached them next to the sentiment with Liquid Glue.
I added some Wink of Stella Glitter to the lights.
For the final touch I added 3 Gilded Gems to the right side of the handle.


Supplies:
Joyful Life stamp set
Beautiful Shapes dies
Layering Circle dies
Tidings of Christmas Designer Series Paper
Cherry Cobbler Cardstock
Old Olive Cardstock
Basic White Cardstock
Real Red Ink
Old Olive Ink
Cherry Cobbler Metallic Ribbon
Gilded Gems
Dark Basic Black Stampin' Blend
Wink of Stella
Tear and Tape
Liquid Glue
Dimensionals
Simply Scored
Take Your Pick Tool
Small Circle Punch for the handle

Thank you for visiting my Blog today!  I hope you enjoyed my Christmas Purse.
See you next time.

Love and Hugs,
Cathryn

Monday, December 20, 2021

FESTIVE 3D EMBELLISHED GIFT BOX with GINGERBREAD and PEPPERMINT - Stampin' Up! *


Hi Friends!
My project today is a Gift Box that measures  2 3/4  x  2 1/4  x  7/8" and I made a 3D embellishment for the front.  I used  Gingerbread and Peppermint Designer Series Paper, Frosted Gingerbread stamp set, Peppermint dies and the Layering Circle dies.


I started with a piece of Old Olive Cardstock sized  7 1/4  x  6 3/4".
I scored the  7 1/4" side at:
7/8,  3 5/8  and  4 1/2".
I scored the  6 3/4" side at:
1/2,  2 3/4,  3 5/8  and  5 7/8".
To cut and put the box together you can watch my Video Tutorial Here.
Below is a picture of how your Cardstock should look after scoring, cutting and rounding the corners of the front flap with the Detail Trio Punch.


I attached several pieces of Gingerbread and Peppermint Designer Series Paper to the box.
(3)  2  x  2 1/2" for the front back and inside.
(2)  5/8  x  2 1/2"  for the sides.
(2)  2  x  5/8"  for the top and bottom.
I attached the DSP to the box with Liquid Glue.


I cut 4 ornaments from the Gingerbread and Peppermint Designer Series Paper using the Peppermint dies.
2 Old Olive and 2 Real Red Ornaments,
I scored each ornament down the middle at about 7/8".
I glued two red ornaments together at the sides, then the green ones on either side of the red ones.
Once they were dry I attached the flat side to the front of the box.


I stamped the sentiment, from Frosted Gingerbread stamp set, onto Basic White Cardstockwith Real Red Ink.
I cut the sentiment out with a 1 5/8" circle die from the Layering Circle dies.
I cut a matching Scalloped Circle from Real Red Cardstock using the same dies.
I glued the sentiment on top of the scalloped circle and added it inside the front flap of the box all with Liquid Glue.


I put about 14 Andes Mint Candies inside of the box.  Next I added a Adhesive Velcro dots to the inside of the flap and body of the box.
For the final touch I added Real Red Sheer Ribbon around the top of the lid and tied a bow at the top.


Supplies:
Frosted Gingerbread stamp set
Gingerbread and Peppermint Designer Series Paper
Peppermint dies
Layering Circle dies
Detail Trio Punch
Real Red Sheer Ribbon
Old Olive Cardstock
Real Red Cardstock
Basic White Cardstock
Real Red Ink
Simply Scored Tool
Take Your Pick Tool
Liquid Glue
Tear and Tape
Adhesive Velcro Dots - Amazon

Thank you for visiting my Blog today!  I hope you enjoyed my Christmas Gift Box.
See you next time.

Love and Hugs,
Cathryn

Friday, December 17, 2021

PEN AND TREAT 6X6 PAPER GIFT BOX with PENGUIN PLACE - Stampin' Up!


Hi Friends!
My project today is Christmas Gift Box that holds a Marshmallow Santa, Candy Cane Pen and Penguin Pen.  The box measures  5  x  1 1/2  x  1".  I used Penguin Place stamp set, the Penguin Builder Punch, Tailor Made Tags dies and Tidings of Christmas 6x6 Designer Series Paper.


I started with a piece of Tidings of Christmas Designer Series Paper sized  6  x  5 1/2".
I scored the  6" side at:
1  and  5 1/2".
I scored the  5 1/2" side at:
1 1/2,  2 1/2,  4 and 5".
To cut and put the box together you can watch my Video Tutorial Here.
Below is a picture of my Template.  Your DSP should look like this after cutting and scoring.


I cut a hole in both sides of the top of the top of the box with a 1/8" hole punch.
I put the Marshmallow Santa and the 2 pens inside the box.
I poked Real Red Mini Ruffled Ribbon through the holes I punched in the box and tied a bow at the front.


I cut two of the same sized tags out using the Tailor Made Tags dies.  One from Real Red Cardstock and one from Tidings of Christmas DSP.
I attached them together back to back with Liquid Glue.


I cut the penguin out using the Penguin Builder Punch.  I cut the outer body from Basic Black Cardstock, the inner body from Basic White Cardstock and the feet from Pumpkin Pie Cardstock.
I stamped the eyes using the Penguin Place stamp set and Tuxedo Black Ink.  I stamped the beak with Mango Melody Ink.
I stamped the hat and scarf onto Basic White Cardstock with Real Red Ink.
I fussy cut the hat and scarf out by hand.
I attached the Feet, Hat and Scarf to the Penguin with Liquid Glue.


I stamped the sentiment onto Real Red Cardstock with Tuxedo Black Ink.
I cut it out by hand.  Then I cut he words "Be Cool" away from the rest of the sentiment.
I attached the rest of the sentiment about 1/4" up from the bottom of the tag with Liquid Glue.
I attached the Penguin on top of the sentiment with Dimensionals.
I glued the other piece of the sentiment to the left above the penguins hat.


I looped Gold Trim, from the Simply Elegant Trim Pack, through the hole in the tag and tied it around the bow in another bow.
I added 2 Classic Matte Dots (Black) over the eyes.
I added 4 Green Matte Decorative Dots about 1/2" from the bottom of the box.
I added 6 Red Rhinestone Basic Jewels, inbetween/above and below, the green dots.
For the final touch I added Wink of Stella Glitter to the Hat and Scarf.


Supplies:
Penguin Place stamp set
Penguin Builder Punch
Tailor Made Tags dies
Tidings of Christmas Designer Series Paper
Real Red Mini Ruffled Ribbon
Simply Elegant Trim
Basic White Cardstock
Basic Black Cardstock
Real Red Cardstock
Pumpkin Pie Cardstock
Tuxedo Black Ink
Mango Melody Ink
Matte Decorative Dots
Classic Matte Dots
Ral Red Rhinestone Basic Jewels
Tear and Tape
Liquid Glue
Simply Scored Tool
Take Your Pick Tool
Marshmallow Santa - Dollar Tree
Penguin Pens - Marshalls
Candy Cane Pens - Walmart

Thank you for visiting my Blog today.  I hope you enjoyed my Christmas Pen and Treat box.
See you next time.

Love and Hugs,
Cathryn