Tuesday, August 8, 2023

IRRESISTIBLE BLOOMS 3X3 CARD BOX with BRIGHT & BEAUTIFUL - Stampin' Up!


Shop Stampin' Up! Here

Hi Friends!
My project today is a 3x3" Card Box that measures  3 1/2  x  3 1/2  x  1 1/4".  I used the Irresistible Booms stamp set & dies Bundle, Bright & Beautiful Designer Series Paper, Glittered Organdy Ribbon and Flat Backed Pearls.

You can watch my Video Tutorial Here!


I started with a piece of Thick Basic White Cardstock sized
10  x  6 3/4"
I scored the  10" side at:
1/2,  4,  5 1/4  and  8 3/4".
I scored the  6 3/4" side at:
1 1/4,  4 3/4  and  6".
To cut and put the box together you can watch my Video Tutorial Here.
Below is a picture of how your Cardstock should look after scoring, cutting and round the corners of the top flap.


I attached several pieces of Bright & Beautiful Designer Series Paper to the box.
(2)  3 1/4  x  3 1/4"  front and back
(4)  1  x  3 1/4"  sides
Before attached one of the 3 1/4  x  3 1/4" pieces to the top of the box stamped I stamped the sentiment onto the upper left corner with Old Olive Ink.
I attached the DSP to the box with Liquid Glue.


I cut the lines & dots die, from the Irresistible Blooms dies, out of Thick Basic White Cardsotck.
I used my Silicone Matt, Liquid Glue and a Sponge to put glue on the back.
 I attached the piece to the front of the box about 1/2" above the bottom of the DSP.


I stamped the Large Flower onto Basic White Cardstock with Bubblebath Ink.
I cut the Flower and 3 Leaves, from Old Olive Cardstock using the Irresistible Blooms dies.


I attached the leaves first with Liquid Glue.
I attached the Flower next with Dimensionals.


I tied a bow with Glittered Organdy Ribbon and attached it to the bottom of the Flower with Liquid Glue and Glue Dots.
For the final touch I added 3 Flat Backed Pearls to the box.  A large one in the middle of the Flower and 2 small ones around the sentiment.


Supplies:
Irresistible Blooms stamp set & dies Bundle
Bright & Beautiful Designer Series Paper
Thick Basic White Cardstock
Old Olive Cardstock
Basic White Cardstock
Bubblebath Ink
Old Olive Ink
Glittered Organdy Ribbon
Flat Backed Adhesive Pearls
Simply Scored
Take Your Pick Tool
Silicone Mat
Tear & Tape
Liquid Glue
Dimensionals
Corner Rounder
Small Circle Punch

Thank you for visiting my Blog today.  I hope you enjoyed my 3 x 3" Card Box.
See you next time!

Love and Hugs,
Cathryn

Saturday, August 5, 2023

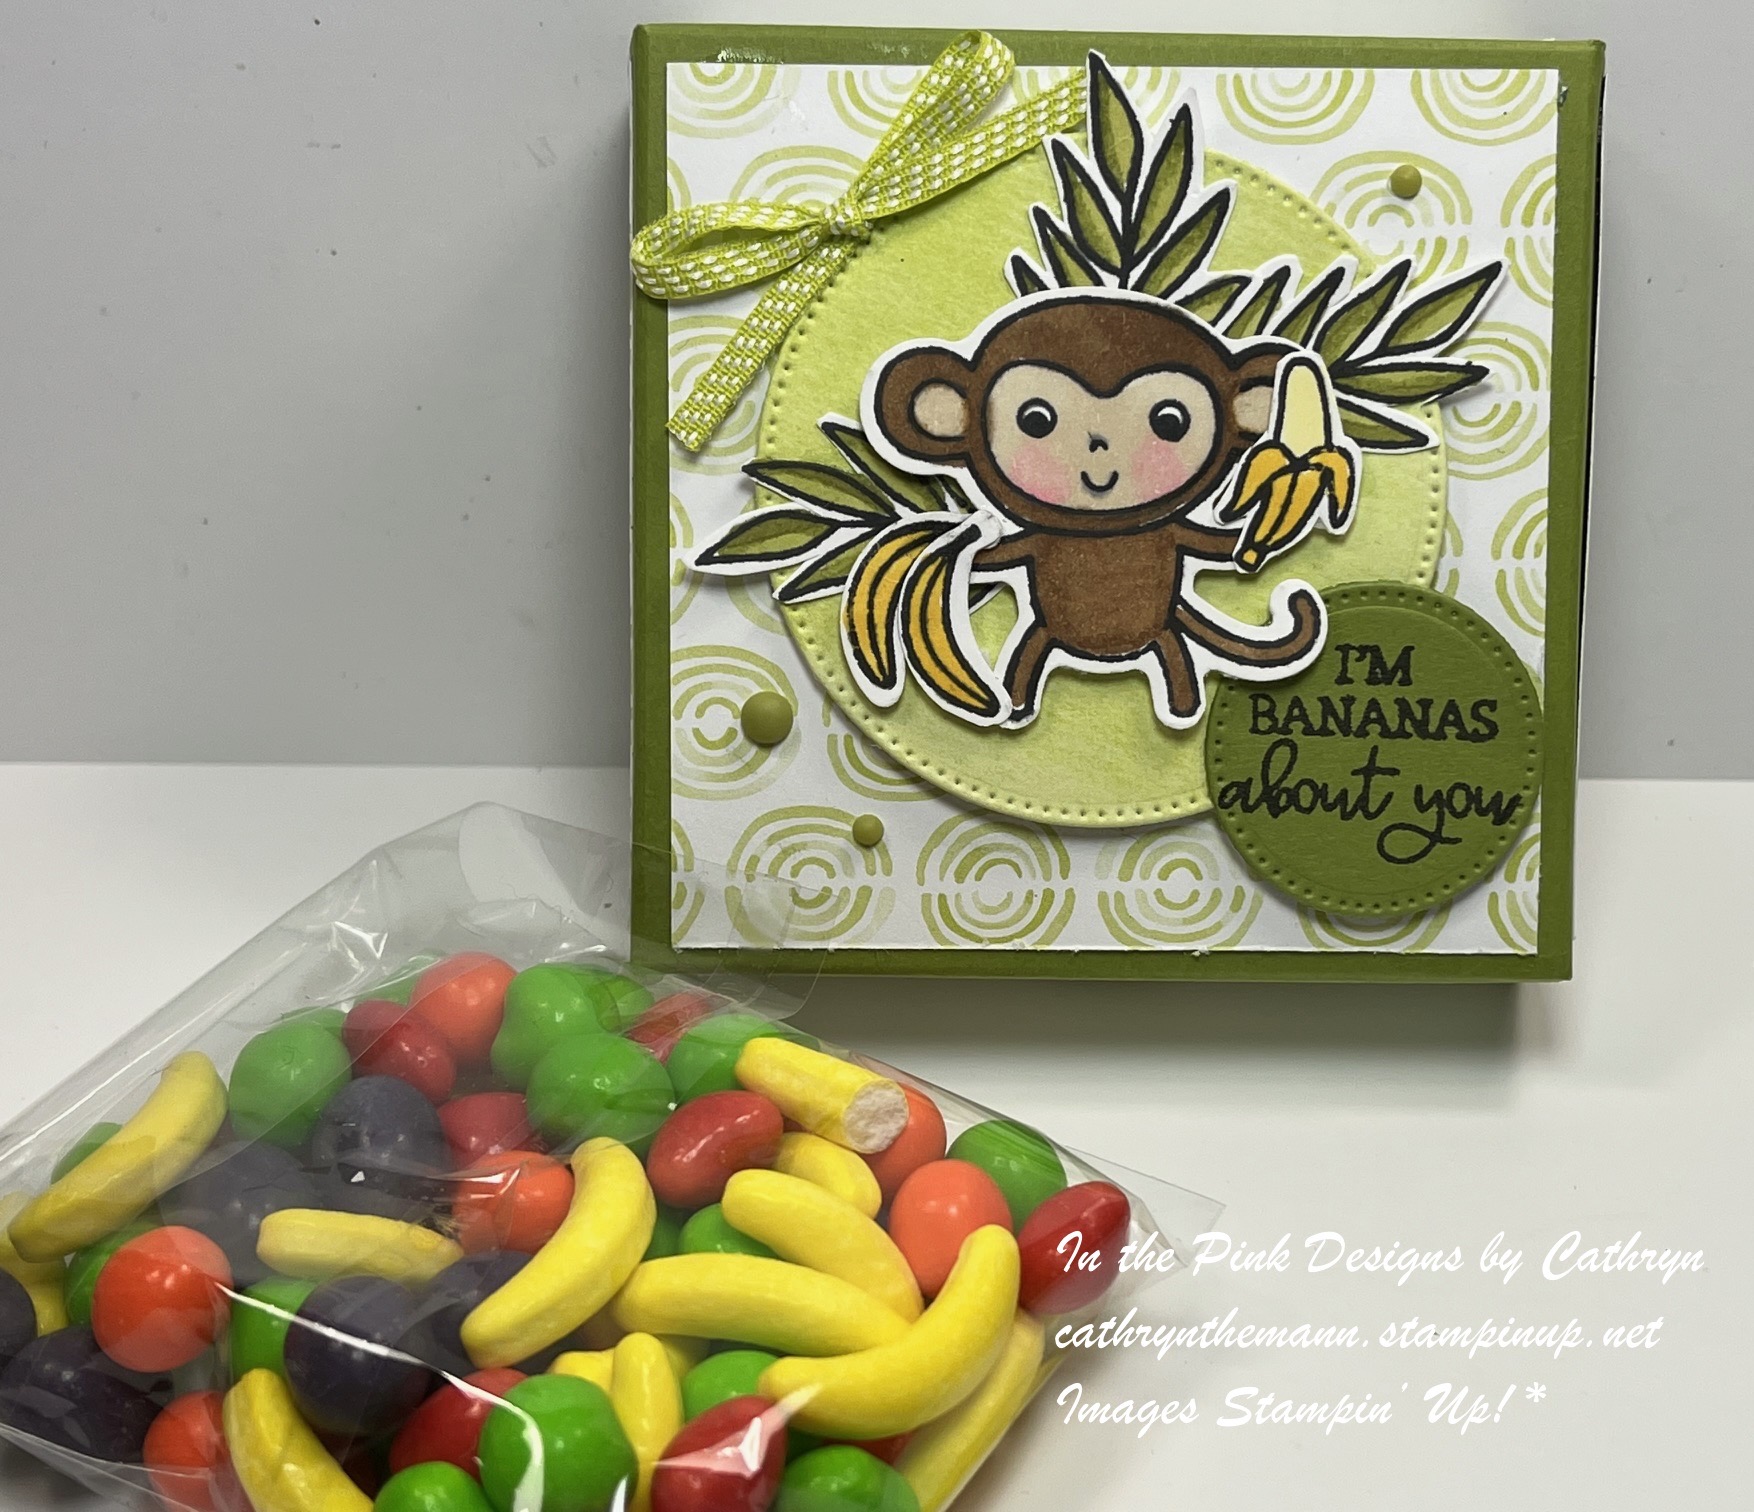
LITTLE MONKEY TREAT BOX with BRIGHT & BEAUTIFUL - Stampin' Up!


Shop Stampin' Up! Here

Hi Friends!
My project today is a Treat Box that measures  3 1/2  x  3 1/2  x  1 1/4".  I used the Little Monkey stamp set & Little Monkey Builder Punch Bundle, Stylish Shapes dies, Bright & Beautiful Designer Series Paper and Lemon Lime Twist Ribbon.

You can watch my Video Tutorial Here!


I started with a piece of Old Olive Cardstock sized
10 3/4  x  6"
I scored the  10 3/4" side at:
1 1/4,  4 3/4, 6  and  9 1/2".
I scored the  6" side at:
1 1/4  and  4 3/4".
To cut and put the box together you can watch my Video Tutorial Here.
Below is a picture of how your Cardstock should look after scoring and cutting.


I attached several pieces of Bright & Beautiful Designer Series Paper to the box.
(2)  3 1/4  x  3 1/4"  top and inside top
(4)  3 1/4  x  1"  sides
I attached the DSP to the box with Liquid Glue.


I stamped the Monkey, 3 Leaf sections, 1 open Banana and 2 closed Bananas, from Little Monkey stamp set, onto Basic White Cardstock with Tuxedo Black Ink.
I cut the Monkey and closed Bananas using the Little Monkey Builder Punch.
I fussy cut the open Banana and Leaves out by hand.


I colored the images with Stampin' Blends.
Light Crumb Cake  -  Face and Ears
Light Flirty Flamingo  -  Cheeks
Light & Dark Pecan Pie  -  Monkey
Light & Dark Old Olive  -  Leaves
Light & Dark Daffodil Delight  -  Bananas


I cut a 2 1/2" circle from Bright & Beautiful Designer Series Paper using the Stylish Shapes dies.
I attached the 3 Leave pieces first with Liquid Glue.
I attached the Monkey Next with Dimensionals.
I attached the Bananas with Liquid Glue and Mini Dimensionals.
I attached the entire piece to the middle of the box top with Dimensionals.


I stamped the sentiment onto Old Olive Cardstock with Tuxedo Black Ink.
I cut the sentiment out with a 1 1/4" circle die from the Stylish Shapes dies.
I attached the circle under the Monkey's Tail with Liquid Glue and Dimensionals.


I tied a bow with Lemon Lime Twist Ribbon, from the Petal Pink & Lemon Lime Twist Ribbon Combo Pack, and attached it to the upper right side of the Circle with Liquid Glue.
For the final touch I added 3 Ombre Matte Decorative Dots around the box.


Supplies:
Little Monkey stamp set & Little Monkey Builder Punch Bundle
Stylish Shapes dies
Bright & Beautiful Designer Series Paper
Old Olive Cardstock
Basic White Cardstock
Tuxedo Black Ink
Stampin' Blends
Petal Pink & Lemon Lime Twist Ribbon Combo Pack
Simply Scored
Take Your Pick Tool
Stampin' Seal+
Liquid Glue
Dimensionals

Thank you for visiting my Blog today.  I hope you enjoyed my Runts Treat Box.
See you next time!

Love and Hugs,
Cathryn

Wednesday, August 2, 2023

EARTHEN TEXTURES GIFT BOX with RADIATING STITCHES DIES - Stampin' Up!


Shop Stampin' Up! Here

Hi Friends!
My project today is a Gift Box that is  3 1/2  x  4 3/4  x  1".  I used the Earthen Textures stamp set & dies Bundle, Radiating Stitch dies, Countryside Inn Designer Series Paper and Threaded Twine.

You can watch my Video Tutorial Here!


I started with a piece of Night of Navy Cardstock sized
9 1/2  x  8 1/2"
I scored the  9 1/2" side at:
1,  4 1/2,  5 1/2  and  9".
I scored the 8 1/2" side at:
1,  5 3/4  and  6 3/4".
To cut and put the box together you can watch my Video Tutorial Here.
Below is a picture of how your Cardstock should look after scoring, cutting and rounding the corners of the top flap.


I attached several pieces of the Countryside Inn Designer Series Paper to the box.
(2)  3 1/4  x  4 1/2"  front and back
(2)  3/4  x  4 1/2"  long sides
(2)  3/4  x  3 1/4"  short sides
(1)  3 1/4  x  1 1/2"  back flap
I attached the DSP to the box with Liquid Glue.


I stamped the Pot with Night of Navy Ink onto Basic White Cardstock.
I stamped the sentiment with Night of Navy Ink onto Boho Blue Cardstock.
I stamped the Reeds with Boho Blue Ink onto Basic White Cardstock.
I cut the stamped images out using the Earthen Textures dies.


I cut 2 Fan Branches from Boho Blue Cardstock using the Earthen Textures dies.
I cut a  2 5/8  x  4" Rectangle from Countryside Inn Designer Series Paper using the Radiating Stitched dies.


I added a set of 3/8" Low Profile Adhesive Backed Velcro Dots to the Back Flap for the closure.
I wrapped Threaded Twine around the side of the box twice, making sure not to place them above the back flap, and tied a bow on the left side.


I attached the Fan Branches to the Rectangle first with Liquid Glue.
I attached the Fringed piece to the back of the Pot with Liquid Glue.
I attached the Pot over the Fan Branches with Dimensionals and Mini Dimensionals.
I attached the entire piece to the front of the box, over the Threaded Twine, with Dimensionals.


I cut the sentiment out by hand and added it to the bottom of the Pot with a Mini Dimensional and a dab of Liquid Glue.
For the final touch I added 3 of the Blue Ombre Matte Decorative Dots around the Leaves.


Supplies:
Earthen Textures stamp set & dies Bundle
Radiating Stitch dies
Countryside Inn Designer Series Paper
Night of Navy Cardstock
Basic White Cardstock
Boho Blue Cardstock
Night of Navy Ink
Boho Blue Ink
Threaded Twine
Ombre Matte Decorative Dots
Simply Scored
Take Your Pick Tool
Tear & Tape
Liquid Glue
Dimensionals
Mini Dimensionals
Corner Rounder
3/8" Low Profile Adhesive Backed Velcro Dots

Thank you for visiting my Blog today.  I hope you enjoyed my Box today.
See you next time!

Love and Hugs,
Cathryn

Monday, July 31, 2023

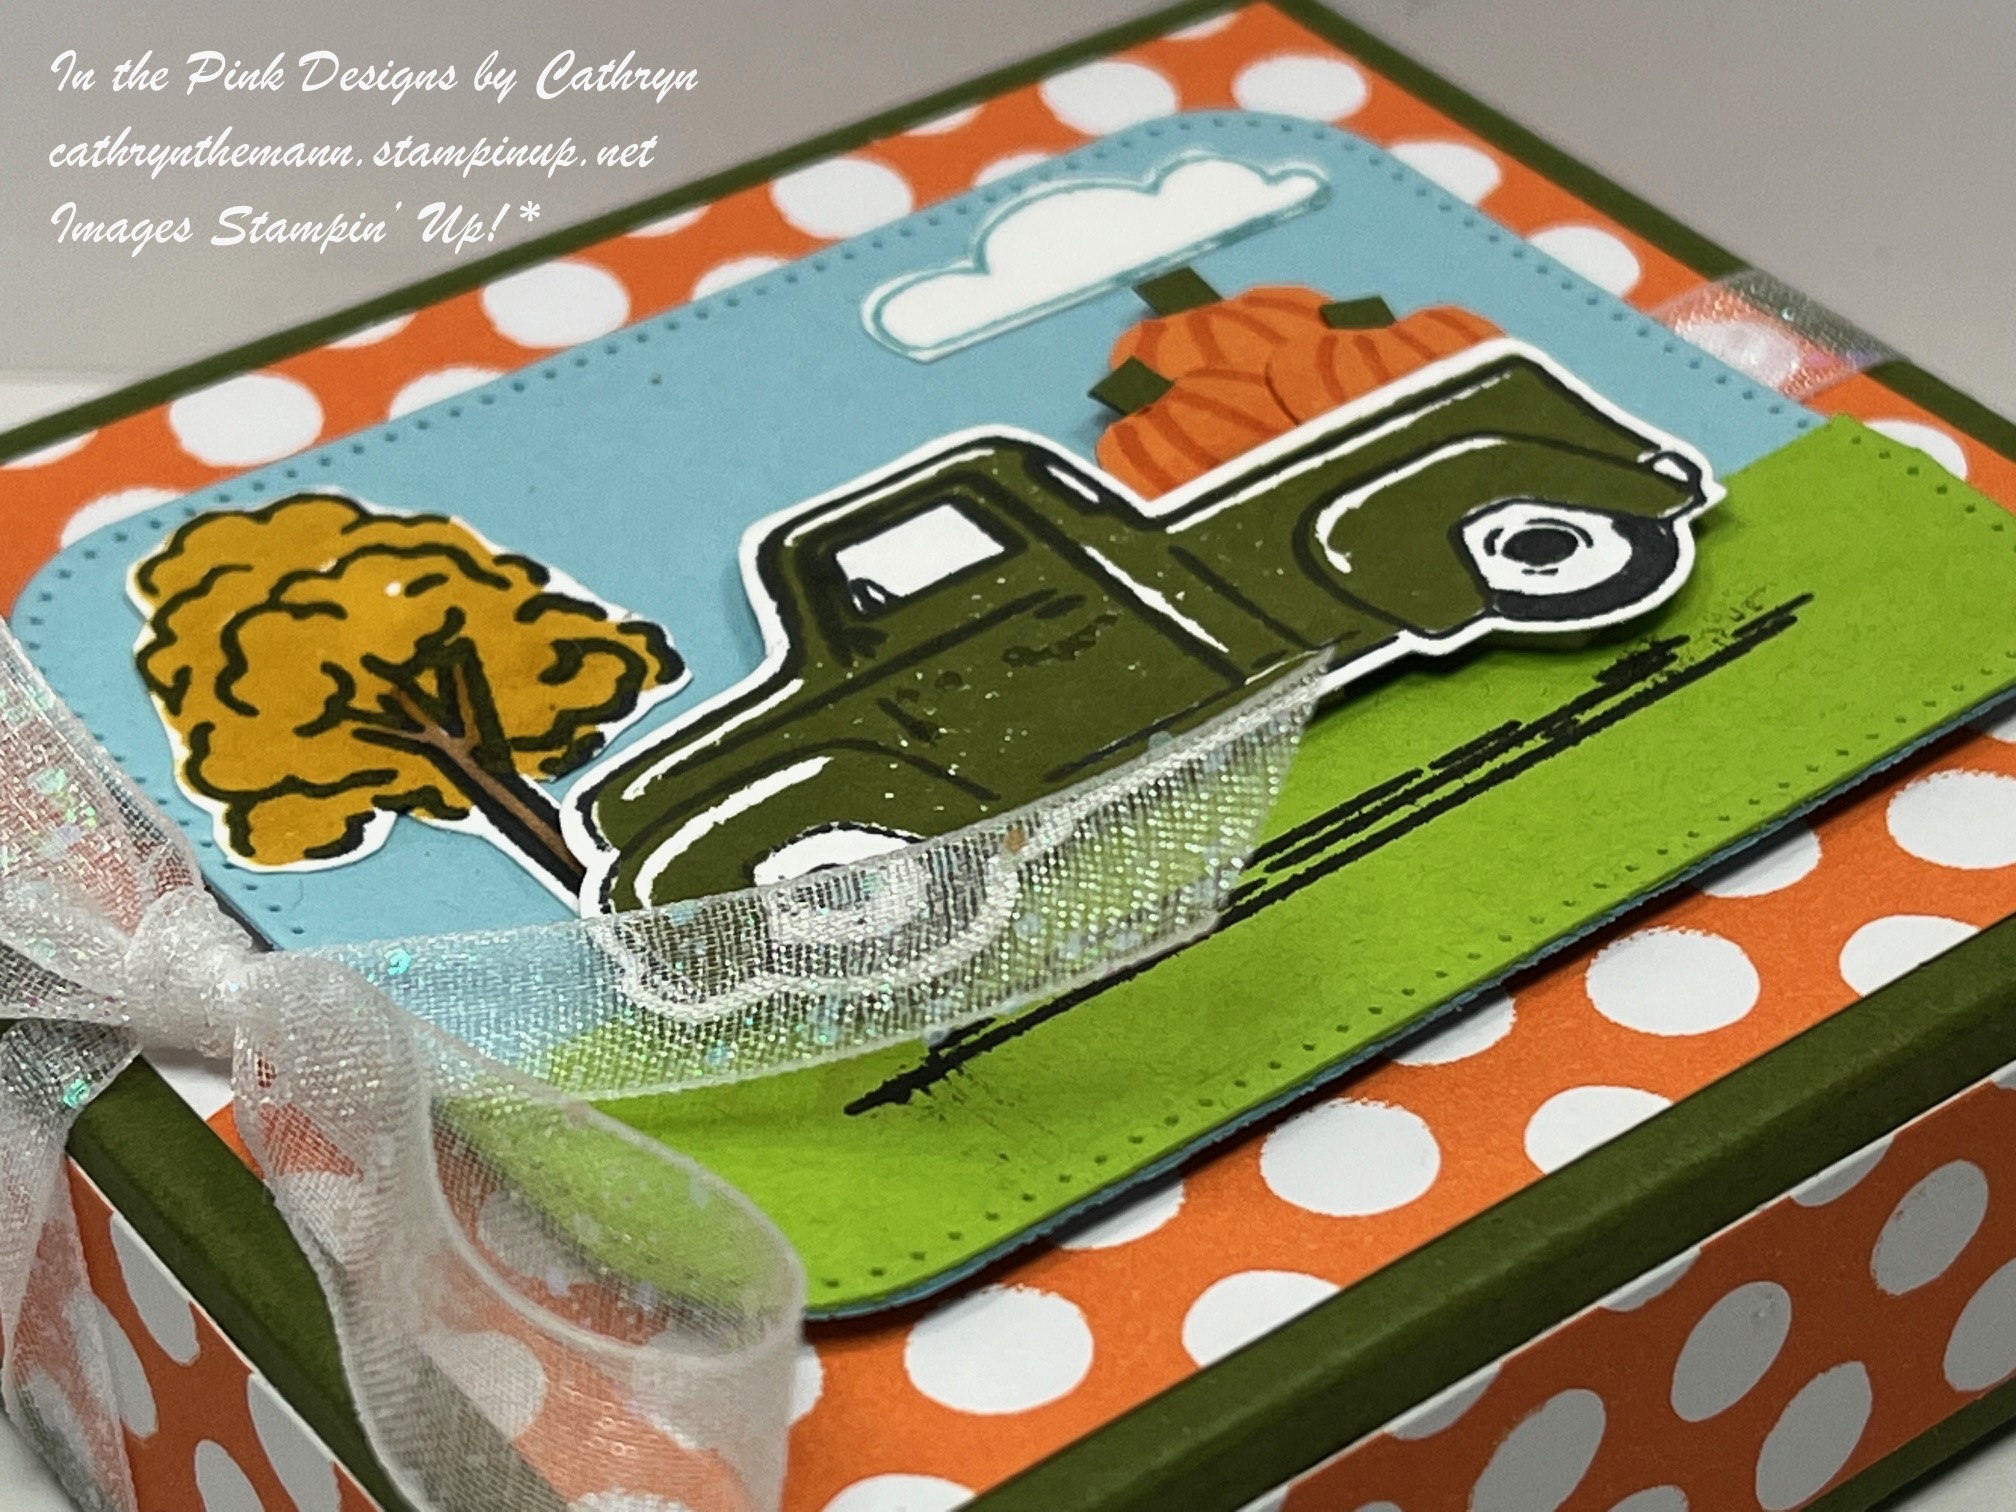
TRUCKING ALONG FALL PUMPKIN TREAT BOX with NESTED ESSENTIALS - Stampin' Up!


Shop Stampin' Up! Here

Hi Friends!
My project today is a Fall Treat Box that measures  3 3/4  x  3 1/4  x  1".  I used the Trucking Along stamp set & Trucking Along Builder Punch Bundle, Nested Essentials dies, Brights Designer Series Paper and Glittered Organdy Ribbon.

You can watch my Video Tutorial Here!


I started with a piece of Mossy Meadow Cardstock sized
10  x  6"
I scored the  10" side at:
1,  4 3/4,  5 3/4  and  9 1/2"
I scored the  6" side at:
1,  4 1/4  and  5 1/4".
To cut and put the box together you can watch my Video Tutorial Here.
Below is a picture of how your Cardstock should look after scoring, cutting and rounding the top corners.


I attached several pieces of Pumpkin Pie Brights Designer Series Paper to the box.
(2)  3 1/2  x  3"  front and back
(2)  3 1/2  x  3/4"  long sides
(2)  3  x  3/4"  short sides
I attached the DSP with Liquid Glue.


I cut 2 of the Largest rectangle dies using the Nested Essentials dies, 1 from Balmy Blue and 1 from Granny Apple Green Cardstock.
I cut the Granny Apple Green to 3/4" in height.
I attached the Granny Apple Green piece to the bottom of the Balmy Blue Rectangle with Liquid Glue.
I stamped the Shadow onto the Granny Apple Green Section of the Rectangles with Tuxedo Black Ink.


I stamped the inside of the Truck, from Trucking Along stamp set, onto Basic White Cardstock with Mossy Meadow Ink.
I stamped the outline of the Truck with Tuxedo Black Ink.
I stamped the outline of the Tree with Tuxedo Black Ink and the inside with Crushed Curry Ink.
I stamped the outline only of the Cloud with Balmy Blue Ink.
I fussy cut the Tree and Cloud out by hand.
I colored the Truck of the Tree with a Dark Pecan Pie Stampin' Blend.
I colored the Wheels with a Dark Basic Black Stampin' Blend.


To make the Pumpkins I cut out 1/2" circles of Pumpkin Pie Cardstock with a circle punch.
I cut out the top of the circle and added a small strip of Mossy Meadow Cardstock for the stem.
I attached the Pumpkins to the Back of the Truck with Liquid Glue.
I attached the Truck to the Rectangles, just above the Shadow stamp, with Dimensionals.
I attached the Tree in front of the Truck, tucked behind the front bumper, with Liquid Glue.
I attached the Cloud to the upper right side.
I tied Glittered Organdy Ribbon around the long side of the box and tied a bow on the left side.
I attached the Truck piece to the middle of the box, over the ribbon, with Dimensionals.


Supplies:
Trucking Along stamp set & Trucking Along Builder Punch Bundle
Nesting Essentials dies
Brights Designer Series Paper
Mossy Meadow Cardstock
Granny Apple Green Cardstock
Balmy Blue Cardstock
Basic White Cardstock
Mossy Meadow Ink
Crushed Curry Ink
Tuxedo Black Ink
Balmy Blue Ink
Stampin' Blends
Glittered Organdy Ribbon
Simply Scored
Take Your Pick Tool
Tear & Tape
Liquid Glue
Dimensionals
1/2" Circle Punch
Corner Rounder

Thank you for visiting my Blog today.  I hope you enjoyed my Fall Treat Box.
See you next time!

Love and Hugs,
Cathryn

Wednesday, July 26, 2023

TRUCKING ALONG SUMMER TREAT BOX with DELIGHTFULLY ECLECTIC - Stampin' Up!


Shop Stampin' Up! Here

Hi Friends!
My project today is a Summer Treat Box that measures  3 1/4  x  3 1/4  x  1".  I used the Trucking Along stamp set and Punch Bundle, Stylish Shapes dies, Delightfully Eclectic Designer Series Paper and Brights Designer Series Paper.

You can watch my Video Tutorial Here!


I started with a piece of Boho Blue Cardstock sized
11  x  7 1/4"
I scored the  11" side at:
3 1/4,  4 1/4,  7 1/2  and  8 1/2"
I scored the  7 1/4" side at:
1,  2,  5 1/4  and  6 1/4"
To cut and put the box together you can watch my Video Tutorial Here.
Below is a picture of how your Cardstock should look after scoring and cutting.


I attached several pieces of Delightfully Eclectic and Brights Designer Series Papers to the box.
(3)   3  x  3"  top, bottom and inside flap
(4)   3/4  x  3"  sides
(1)  2 1/4  x  3"  inside body of the box
I attached the DSP to the box with Liquid Glue.


I stamped the Truck, from Trucking Along stamps set, onto Basic White Cardstock.
Inside Truck  -  Boho Blue Ink
Truck Outline  -  Blueberry Bushel Ink
Palm Tree  -  Tuxedo Black Ink
I cut the Truck out using the Trucking Along Builder Punch.
I fussy cut the Palm Tree, Beach Ball and Surf Board piece out by hand.


I colored the images with Stampin' Blends.
Tires and Middle  -  Light Basic Black
Hub Caps  -  Dark Smokey Slate
Palm Tree  -  Dark Old Olive
Palm Tree Trunk  -  Dark Pecan Pie
Surf Board  -  Dark Daffodil Delight
Beach Ball  -  Dark Real Red, Dark Daffodil Delight and Light Boho Blue


I added 3/8" Low Profile Adhesive Backed Velcro Dots inside the box for a closure.
I ran Real Red Ribbon around the side of the flap, about 1/2" down from the top, and tied a bow on the left side.
I cut an another piece of the Delightfully Eclectic DSP using the Stylish Shapes dies (a little more than 2 1/4")
I attached the Square to the front of the box, tucking the top under the Ribbon, with Liquid Glue.


I attached the Truck and Tree piece to the lower part of the Square with Dimensionals.
For the final touch I added 3 2022-2024 In Color Pearls.


Supplies:
Trucking Along stamp set & Trucking Along Builder Punch Bundle
Stylish Shapes dies
Delightfully Eclectic Designer Series Paper
Brights Designer Series Paper
Boho Blue Cardstock
Basic White Cardstock
Boho Blue Ink
Blueberry Bushel Ink
Tuxedo Black Ink
Stampin' Blends
Real Red & Burlap Ribbon Combo Pack
2022-2024 In Color Pearls
Simply Scored
Take Your Pick Tool
Liquid Glue
Dimensionals

Thank you for visiting my Blog today.  I hope you enjoyed my Summer Treat Box.
See you next time!

Love and Hugs,
Cathryn

Tuesday, July 25, 2023

HORSE & SLEIGH TREAT BOX with ONE HORSE OPEN SLEIGH - Stampin' Up!


Shop Stampin' Up! Here

Hi Friends!
My project today is a treat box that measures  5  x  4  x  1".  I use the Horse & Sleigh stamp set & dies Bundle, One Horse Open Sleigh Designer Series Paper and Adhesive Backed Snowflakes Assortment.

You can watch my Video Tutorial Here!


I started with a piece of Cherry Cobbler Cardstock sized
8 3/4  x  7"
I scored the  8 3/4" side at:
3/4,  1 3/4,  4 3/4  and  5 3/4".
I scored the  7" side at:
1  and  6".
To cut and put the box together you can watch my Video Tutorial Here.
Below is a picture of how your Cardstock should look after scoring, cutting and rounding the corners of the flap.


I attached several pieces of One Horse Open Sleigh Designer Series Paper to the box.
(2)  4 3/4  x  2 3/4"  front and back
(2)  3/4  x  4 3/4"  long sides
(2)  3/4  x  2 3/4"  short sides
I attached the DSP to the box with Liquid Glue.


I stamped the Horse & Sleigh image onto Basic White Cardstock with Tuxedo Black Ink.
I colored the images with Stampin' Blends.
Light and Dark Cherry Cobbler  -  Sleigh,  Woman's Clothes and Bridle & Harness
Dark Mossy Meadow  -  Men's Clothes
Dark Smokey Slate  -  Hoove, Snow Shoes and Bottom of Sleigh
Light & Dark Pecan Pie  -  Horse
SU1000  -  Faces
I cut the image out using the Horse & Sleigh dies.


I cut the 2 Snowdrifts out of Basic White Cardstock using the Horse and Sleigh dies.
I attached the Snow Drifts to the bottom front of the box with Liquid Glue.
I attached the image on top of the Snow Drifts with Mini Dimensionals and Dimensionals.


I added 3 Red Festive Pearls to the Horses's Harness and for the final touch I added 3 Adhesive Backed Snowflakes above the image.


Supplies:
Horse & Sleigh stamp set and dies Bundle
One Horse Open Sleigh Designer Series Paper
Cherry Cobbler Cardstock
Basic White Cardstock
Tuxedo Black Ink
Stampin' Blends
Festive Pearls
Snowflake Assortment
Simply Scored
Take Your Pick Tool
Liquid Glue
Dimensionals
Mini Dimensionals
Corner Rounder
Small Circle Punch

Thank you for visiting my Blog today.  I hope you enjoyed my Treat Box.
See you next time!

Love and Hugs,
 Cathryn

Friday, July 21, 2023

TRUCKING ALONG CHRISTMAS TREAT BOX with LET'S GO FISHING - Stampin' Up!


Hi Friends!
My project today is a Christmas Treat Box that measures  3 1/2  x  2 1/2  x  1 1/4".  I used the Trucking Along stamp set & the Trucking Along Builder Punch Bundle, Stylish Shapes dies and Let's Go Fishing Designer Series Paper.


I started with a piece of Real Red Cardstock sized
10 3/4  x  5"
I scored the  10 3/4" side at:
1 1/4,  4 3/4,  6  and  9 1/2".
I scored the  5" side at:
1 1/4  and  3 3/4".
To cut and put the box together you can watch my Video Tutorial Here.
Below is a picture of how your Cardstock should look after scoring and cutting.


I attached several pieces of Let's Go Fishing Designer Series Paper to the box.
(2)  3 1/4  x  2 1/4"  top and inside top
(2)  1 x  3 1/4"  long sides
(2)  1  x  2 1/4"  short sides
I attached the DSP to the box with Liquid Glue.


I stamped the Truck, from Tucking Along stamp set, onto Very Vanilla Cardstock with Real Red Ink.
I stamped the outline of the Truck with Cherry Cobbler Ink.
I stamped the "Farm Fresh" on the Door with Tuxedo Black Ink and I stamped the Tree with Old Olive Ink.


I cut the Truck out with the Trucking Along Builder Punch.
I cut the Tree out by hand.
I stamped the sentiment onto Very Vanilla Cardstock with Old Olive Ink.
I cut the sentiment out using a label die from the Stylish Shapes dies.


I tied Real Red Dotted Ribbon around the left short side of the box and tied a bow at the top.
I attached the tree to the back of the truck with Liquid Glue.
I attached the sentiment label first, then the Truck with Dimensionals and Mini Dimensionals.


For the final touch I added 3 Gold Festive Pearls to the Christmas Tree.


Supplies:
Trucking Along stamp set & Trucking Along Builder Punch Bundle
Stylish Shapes dies
Let's Go Fishing Designer Series Paper
Real Red Cardstock
Very Vanilla Cardstock
Real Red Ink
Cherry Cobbler Ink
Old Olive Ink
Tuxedo Black Ink
Real Red Dotted Ribbon
Festive Pearls
Simply Scored
Take Your Pick Tool
Liquid Glue
Dimensionals
Mini Dimensionals
Small Circle Punch

Thank you for visiting my Blog today.  I hope you enjoyed my Christmas Treat Box.
See you next time!

Love and Hugs,
Cathryn