Wednesday, September 29, 2021

PENGUIN PLACE RED-NOSED PENGUIN GIFT BOX with PENGUIN PLAYMATES - Stampin' - Up!


Hi Friends!
My project today is a Gift Box that measures  2  x  3 1/4  x  3/4".  I used Penguin Place stamp set, the Penguin Builder Punch, Penguin Playmates Designer Series Paper (Saleabration), Little Delights stamp set, Scalloped Contours dies, Rectangle Stitched dies and the Double Oval Punch.


I started with a piece of Soft Seafoam Cardstock sized
7 1/2  x  4 3/4".
I scored the  7 1/2" side at:
2,  2 3/4,  4 3/4  and  5 1/2".
I scored the  4 3/4" side at:
3/4  and  4".
To cut and put the box together you can watch my Video Tutorial Here.
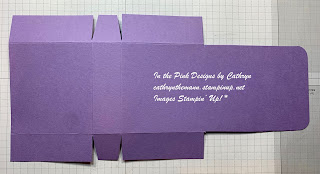
Below is a picture of how your Cardstock should look after scoring and cutting.


I attached several pieces of Penguin Playmates Designer Series Paper to the box.
(1)  3  x  1 3/4  of the Purple Snowflakes for the back of the box
(2)  3  x  1 3/4"  of the Dotted DSP for the inside of the box
(2)  1/2  x  3" for the sides
(2)  1/2  x  1 3/4"  for the top and bottom
I attached the DSP to the box with Liquid Glue.


I cut a Scalloped Circle from Fresh Freesia Cardstock using the Scalloped Contours dies.
I attached it to the front of the box with Stampin' Seal.
I tied Glittered Organdy Ribbon around the box and tied a bow at the side.


I cut 2 of the same stitched rectangles using the Rectangle Stitched dies.  1 from Soft Seafoam Cardstock and 1 from Penguin Playmates Designer Series Paper.
I attached the DSP on top of the Soft Seafoam Cardstock with Liquid Glue.
I attached both rectangles on top of the Scalloped Rectangle, over the ribbon, with Dimensionals.


I cut the penguin from Basic Black and Basic White Cardstocks using the Penguin Builder Punch.
I cut 2 penguin feet from Pumpkin Pie Cardstock with the same punch.
I attached the White Cardstock piece on top of the black Cardstock piece with Liquid Glue.
I stamped the Penguin's face from Penguin Place stamp set.
The eyes with Tuxedo Black Ink.
The Nose with Real Red Ink.
I stamped the antlers with Cinnamon Cider Ink and fussy cut them out by hand.
I attached the antlers above the penguins head with Liquid Glue.


I stamped the sentiment from Little Delights stamp set onto Fresh Freesia Cardstock with Tuxedo Black Ink.
I cut the sentiment out using the Double Oval Punch.
I cut a scalloped oval, using the same punch, from Soft Seafoam Cardstock.
I attached the sentiment oval on top of the scalloped oval and the entire piece to the inside of the box with Liquid Glue.
I added a Matte Decorative Dot on the nose of the penguin.
I also added 3 2021-2023 In Color Jewels around the penguin.


Supplies:
Penguin Place stamp set
Penguin Builder Punch
Penguin Playmates Designer Series Paper
Little Delights stamp set
Double Oval Punch
Scalloped Contours dies
Rectangle Stitched dies
Soft Seafoam Cardstock
Fresh Freesia Cardstock
Basic White Cardstock
Basic Black Cardstock
Pumpkin Pie Cardstock
Tuxedo Black Ink
Cinnamon Cider Ink
Real Red Ink
Glittered Organdy Ribbon
2021-2023 In Color Jewels
Decorative Matte Dots
Liquid Glue
Stampin' Seal
Tear and Tape
Dimensionals

Thank you for visiting my Blog today!  I hope you enjoyed the Penguin box.
See you next time.

Love and Hugs,
Cathryn

Monday, September 27, 2021

FRIGHTFULLY CUTE HALLOWEEN TREAT BOX with FOLD OVER FLAP - Stampin' Up!


Hi Friends!
My project today is a Halloween Treat/Gift Box that measures  2 1/4  x  3  x  1".  I used Frightfully Cute stamp set, Cutest Halloween stamp set, Frightful Tags dies, the Halloween Punch and Cute halloween Designer Series Paper.


I started with a piece of Granny Apple Green Cardstock sized
11  x  4 1/4".
I scored the 11" side at:
3, 4, 7  and  8".
I scored the 4 1/4" side at:
1  and  3 1/4".
To cut and put the box together you can watch my Video Tutorial Here.
Below is a picture of how your Cardstock should look after scoring, cutting and rounding the corners of the flap with the Detail Trio Punch.


I attached several pieces of Cute Halloween Designer Series Paper to the box.
(3)  2  x  2  3/4   two of one pattern for the front and back and one of another pattern  for the inside of the box.
(2)  3/4  x  2 3/4"  for the sides.
(1)  2  x  3/4"  for the top.
I attached the DSP to the box with Liquid Glue.


I stamped the sentiment, from Frightfully Cute stamp set onto Granny Apple Green Cardstock with Tuxedo Black Ink.
I cut the sentiment out with a label die from Frightful Tags dies.
I attached the label to the front of the box with Liquid Glue.


I stamped the pumpkin, from Cutest Halloween stamp set,  onto Basic White Cardstock.
Tuxedo Black Ink for the outline and face.
Pumpkin Pie Ink for the inside of the pumpkin.
Flirty Flamingo for the cheeks.
I cut the pumpkin out using the Halloween punch.


I cut the witch hat and tree from Black Glitter Paper using the Frightful Tags dies.
I stamped the moon from Frightfully Cute stamp set onto Basic White Cardstock with Mango Melody Ink.
I cut the moon out with a circle die from Frightful Tag dies.
I attached the moon and tree on the inside of the front flap with Liquid Glue.


I attached the pumpkin to the front of the box with Dimensionals.
I attached the witch hat with a Dimensional and some Liquid Glue along the edge of the brim.
I tied two 15" lengths of Black and White Gingham Ribbon around the inside of the box and tied a bow at the top.
For the final touch I added 3 yellow Matte Decorative Dots to the band on the witch hat and some black Cute Stars Adhesive Backed Sequins around the sentiment.


Supplies:
Frightfully Cute stamp set
Frightful Tags dies
Cutest Halloween stamp set
Cute Halloween Designer Series Paper
Halloween Punch
Detail Trio Punch
Granny Apple Green Cardstock
Black Glitter Paper
Basic White Cardstock
Black and White Gingham Ribbon
Cute Stars Adhesive Sequins
Matte Decorative Dots
Tuxedo Black Ink
Pumpkin Pie Ink
Flirty Flamingo Ink
Mango Melody Ink
Tear and Tape
Liquid Glue
Dimensionals
Simply Scored
Take Your Pick Tool

Thank you for visiting my Blog today!  I hope you enjoyed my box tutorial today.
See you next time!

Love and Hugs,
Cathryn


Friday, September 24, 2021

EASY TRIANGLE BOX with NUTS ABOUT SQUIRRELS - Stampin' Up! *


Hi Friends!
My project today is a Triangle Box that I filled with about a dozen Hershey's Kisses.  The box measures  5  x  2  x  1 3/4".  I used Nuts about Squirrels stamp set, Seasonal Labels dies, Sweet Symmetry Designer Series Paper and Bumblebee Gingham Ribbon.


I started with a piece of Pear Pizzazz Cardstock sized  9 x 8".
I scored the 9" side at:
2  and  7".
I scored the 8" side at:
2,  4,  and 6".
To cut and put the box together you can watch my Video Tutorial Here.
Below is a picture of how your Cardstock should look after scoring and cutting.


I attached 3 pieces of Sweet Symmetry Designer Series Paper to the box.
(3)  4 3/4  x  1 3/4"
for the front flap, inside flap and the back.
I attached the DSP to the box with Liquid Glue.


I stamped the outline of the squirrel with the nut, from Nuts About Squirrels stamp set, onto Basic White Cardstock with Tuxedo Black Ink.
I stamped the fur with Pumpkin Pie Ink.
I stamped the cap of the acorn with Early Espresso Ink.
I stamped the bottom of the acorn with Cinnamon Cider Ink.
I fussy cut the squirrel out by hand.


I cut a label from Pear Pizzazz Cardstock using the Seasonal Labels dies.
I stamped the sentiment, from Nuts About You stamps set, onto the left side of the label with Early Espresso Ink.
I attached the label 2" from the left side of the DSP, on the front of the box, with Liquid Glue.
I attached the Squirrel next to the sentiment with Dimensionals.


I put about 12 Hershey's Kisses into the box.
I closed the box by tying Bumblebee Gingham Ribbon around the right side of the box with a bow at the top.
For the final touch I added 3 green Matte Decorative Dots to the right side of the box.


Supplies:
Nuts About You stamp set
Seasonal Labels dies
Sweet Symmetry Designer Series Paper
Detail Trio Punch
Pear Pizzazz Cardstock
Basic White Cardstock
Tuxedo Black Ink
Pumpkin Pie Ink
Early Espresso Ink
Cinnamon Cider Ink
Bumblebee Gingham Ribbon
Decorative Matte Dots
Tear and Tape
Liquid Glue
Dimensionals
Simply Scored
Take Your Pick Tool

Thank you for visiting my Blog today!  I hope you enjoyed my Triangle Box Tutorial.
See you next time!

Love and Hugs,
Cathryn

Wednesday, September 22, 2021

HALLOWEEN DOOR HANGER with CUTEST HALLOWEEN - Stampin' Up!


Hi Friends!
My project today is a Halloween Door Hanger.  I used Cutest Halloween stamp set, Cute Halloween Designer Series Paper, Black Glitter Paper, Seasonal Labels dies, Layering Circle dies and Black and White Gingham Ribbon.
The Door Hanger Measures  7  x  3 3/4  x  1".


I started with a piece of Highland Heather Cardstock sized
11 x  5 1/4".
I scored the 11" side at:
3 and 4".
I scored the 5 1/4" side at:
1  and  4 1/4".
I turned back to the original 11" side and scored to the FIRST SCORELINE ONLY at:
7".
Turn the paper to the other 11" side and scored to the FIRST SCORELINE ONLY at:
4".
To cut and put the box together you can watch my Video Tutorial Here.
Below is a picture of how your Cardstock should look after scoring, cutting and rounding the top corners with the Detail Trio Punch.


I attached 2 pieces of Cute Halloween Designer Series Paper to the inside back of the box.
First I attached to the left side:
(1) striped paper sized  1 x 6".
Second I attached to the right side overlapping the striped paper:
(1)  skeleton paper sized  2 1/4  x  6".
I attached the paper with Liquid Glue.
I cut a circle about 1/4" down from the top using a 2 1/4" circle die from the Layering Circle dies.
Below is a picture of how your Cardstock should look after adding the DSP and cutting the circle.


I put the box together with Tear and Tape and attached the rest of the Designer Series Paper in sizes:
Striped Paper
(1)  1 x 3"  for the right side of the front
(1)  3/4  x  2 3/4"  to the side of the box on the right.
Skeleton Paper
(1)  2 1/4  x  3"  for the left side of the front
(1)  3/4  x  3" for the side of the box on the left.


I cut a label from Highland Heather Cardstock and Black Glitter Paper using the Seasonal Label dies.
I stamped the sentiment from Cutest Halloween stamp set on the right side of the Highland Heather label with Tuxedo Black Ink.
I attached the Highland Heather label on top and to the left of the Black Glitter Paper label with Liquid Glue.
I attached both labels to the front of the box with Dimensionals.


I cut a  1 3/8" circle from Black Glitter Paper and a scalloped circle from Basic White Cardstock using the Layering Circle dies.
I attached the Glitter circle over the Basic White scalloped circle with Liquid Glue.
I attached both circles next to the sentiment with Dimensionals.


I fussy cut a Skeleton image from the scraps of DSP and attached it onto the Black Glitter Circle with Dimensionals.
I doubled a length of Black and White Gingham Ribbon and tied a bow.  I attached it to the top of the box with Glue Dots.
For the final touch I added 3 2021-2023 In Color Jewels around the sentiment.


Supplies:
Cutest Halloween stamp set
Cute Halloween Designer Series Paper
Seasonal Labels dies
Layering Circle dies
Detail Trio Punch
Highland Heather Cardstock
Black Glitter paper
Basic White Cardstock
Black and White Gingham Ribbon
Tuxedo Black Ink
2021-2023 In Color Jewels
Tear and Tape
Liquid Glue
Dimensionals
Simply Scored
Take Your Pick Tool
Paddle Ball - Dollar Tree  ($1 for a package of 6)
Jelly Belly Gourmet Candy Corn - Local Grocery Store

Thank you for visiting my Blog today!  I hope you enjoyed my Halloween Door hanger.
See you next time.

Love and Hugs,
Cathryn

Monday, September 20, 2021

QUICK and EASY HALLOWEEN TREAT BOX with 6 x 6 CUTE HALLOWEEN DESIGNER SERIES PAPER - Stampin' Up!


Hi Friends!
My project today is a quick and easy Halloween Treat Box. I made this using one sheet of 6 x 6 paper and some scraps.  The box measures
2 x 4 x 3/4".  It holds at least 2 fun sized candies.
I used Cute Halloween Designer Series Paper,  Cute Halloween stamp set, Frightfully Cute stamp set and the Elegant Tag Punch.


I started with a piece of 6 x 6 Cute Halloween Designer Series Paper.
I scored the first 6" side at:
3/4,  2 3/4,  3 1/2  and  5 1/2".
I turned the paper 1/4 turn and scored at:
3/4  and  4 3/4".
To cut and put the box together you can watch my Video Tutorial here.
Below is a picture of what your DSP should look like after scoring and cutting.


I folded back the top portion and attached it to the body of the box with Stampin' Seal.
I put the box together with Tear and Tape.


I cut a tag from Highland Heather Cardstock using the Elegant Tag Punch.
I stamped the sentiment, from Cute Halloween stamp set, onto the top of the tag.
I stamped 2 bats, from Frightfully Cute Stamp set, onto the bottom of the tag.
I punched a hole in the top of the tag.


I punched to holes in the front and back of the box.
I ran Metallic Mesh ribbon through the holes and slipped the tag onto one of the ends.
I tied a bow at the front.


For the final touch I added three 2021-2023 In Color Jewels around the bats.


Supplies:
Cute Halloween Designer Series Paper
Cutest Halloween stamp set
Frightfully Cute stamps set
Elegant Tag Punch
Metallic Mesh Ribbon
2021-2023 In Color Jewels
Tuxedo Black Ink
Highland Heather Cardstock
Stampin' Seal
Tear and Tape
Simply Scored
Take Your Pick Tool
Small Hole Punch

Thank you for visiting my Blog today!  I hope you enjoyed my Halloween Project.
See you next time!

Love and Hugs,
Cathryn

Friday, September 17, 2021

SKELETON TREAT BOX from SCRAPS with CUTEST HALLOWEEN - Stampin' Up!


Hi Friends!
My project today is a 2 1/4  x  3  x  1 1/4" treat box for Halloween.  I made this box entirely out of scraps I saved.  I used Cutest Halloween stamp set, Cute Halloween Designer Series Paper, Stockings dies, Time of Giving stamp set and the Layering Circle dies.


I started with a piece of Highland Heather Cardstock sized
7 1/2  x  4 1/4".
I scored the  7 1/2" side at:
1/2,  2 3/4,  4  and  6 1/4".
I scored the 4 1/4" side3 at:
1 1/4"
To cut and put the box together you can watch my Video Tutorial Here.
Below is a picture of what your Cardstock should look like after scoring and cutting.


I attached 2 pieces of Cute Halloween Designer Series Paper to the box.
(1)  2  x  2 3/4" for the front
(1)  2  x  1" for the bottom of the back.
I attached the DSP to the box with Liquid Glue.
I cut a tag from Pumpkin Pie Cardstock using the tag die from Stockings dies.
I scored the tag with the bottom to the left at  2 1/2".
I embossed the tag with the Dots Embossing Folder.
I glued the bottom of the tag to the back of the box with Liquid Glue, leaving the top of the tag for the front flap of the box.


I cut a scalloped circle from Black Glitter Paper and a 1 5/8" smooth circle from Highland Heather Cardstock using the Layering Circle dies.
I embossed the Highland Heather circle with the Dots Embossing Folder.
I attached the Highland Heather circle on top of the Black Glitter Scalloped Circle with Liquid Glue.
I attached the entire piece to the front flap of the box with Liquid Glue also.


I stamped the outline of the skull from Cutest Halloween stamp set onto Basic White Cardstock with Tuxedo Black Ink.
I stamped the face inside the outline with Tuxedo Black Ink.
I fussy cut the image by hand and attached it to the circles on the flap with Dimensionals.


I stamped the sentiment from Time of Giving stamp set onto Pumpkin Pie Cardstock with Tuxedo Black Ink.
I cut the sentiment out by hand and attached It to the box with Liquid Glue.
I tied Glittered Organdy ribbon around the flap of the box and tied a bow at the top.
For the final touch I added Wink of Stella Glitter to the face of the skull.


Supplies:
Cutest Halloween stamp set
Time of Giving stamp set
Cute Halloween Designer Series Paper
Stockings dies
Layering Circle dies
Dots and Checks Embossing Folders
Black Glitter Paper
Highland Heather Cardstock
Pumpkin Pie Cardstock
Basic White Cardstock
Tuxedo Black Ink
Liquid Glue
Dimenionals
Tear and Tape
Simply Scored
Take Your Pick Tool
Adhesive Velcro Dots

Thank you for visiting my Blog today!  I hope you enjoyed my Halloween Treat Box tutorial.
See you next time.

Love and Hugs,
Cathryn

Thursday, September 16, 2021

HAND-PENNED PETALS RING BOMB BOX - Stampin' Up!


Hi Friends!
My project today is a square box that is  1 3/4 x 1 3/4".  I made it to fit a Ring Bomb which is a bath fizz with a ring inside!  A lovely Subscriber sent me one so I could design a box for her!  I used Hand-Penned Petals stamp set, Penned Flowers dies, Hand-Penned Designer Series Paper, Stampin' Blends and Glittered Organdy Ribbon.


I started with a piece of Highland Heather Cardstock sized
7 1/2  x  5 1/4".
I scored the 7 1/2" side at:
1/2,  2 1/4,  4  and  5 3/4".
I cut the 5 1/4" side at:
1 3/4  and  3 1/2".
To cut and put the box together you can watch my
Below is a picture of what your Cardstock should look like after scoring, cutting and rounding the corners of the flap with the Detail Trio Punch.


I attached 5 pieces of Hand-Penned Designer Series Paper to the top and sides of the box.
(5)  1 5/8  x  1 5/8
I attached the DSP to the box with Liquid Glue.
I cut a small finger hole out of the front of the box with a small circle punch.


I wrapped Glittered Organdy Ribbon around the box and tied a bow at the front (over the finger hole).
I stamped the flowers from Hand-Penned Petals stamp set onto Basic White Cardstock with Tuxedo Black Ink.
I colored the largest flower and the surrounding leaves with Stampin' Blends.
Light and Dark Soft Succulent for the leaves
Dark Highland Heather for the flower.
I fussy cut the flower and leaves out separately.


I attached the flower first, with Dimensionals on the petals, over the ribbon.
I attached the leaves all around the flower with Liquid Glue at the bases.


I added Wink of Stella glitter to the flower and for the final touch I added a yellow dot from the Playing with Patterns Resin Dots.


Supplies:
Hand Penned Petals stamp set
Penned Flowers dies
Hand-Penned Designer Series Paper
Detail Trio Punch
Small Circle Punch
Highland Heather Cardstock
Basic White Cardstock
Tuxedo Black Ink
Dark Highland Heather Stampin' Blend
Light and Dark Soft Succulent Stampin' Blend
Glittered Organdy Ribbon
Playing with Patterns Resin Dots
Tear and Tape
Liquid Glue
Dimensionals
Simply Scored Tool
Take Your Pick Tool

Thank you for visiting my Blog today!  I hope you enjoyed my Ring Bomb Box tutorial.
See you next time!

Love and Hugs,
Cathryn