Wednesday, October 13, 2021

HALLOWEEN SIMPLE TRIANGLE BOX with FRIGHTFULLY CUTE - Stampin' Up!


Hi Friends!
My project today is my version of a Triangle Box.  I made this box without any extra triangle scoreline.  The box measures  2 1/4" (high)  x  2 1/2  x  2 1/2".  I used Frightfully Cute stamp set, Cute Halloween Designer Series Paper, Layering Circle dies, Metallic Mesh Ribbon, Black Glittered Organdy Ribbon and Cute Stars Adhesive Backed Sequins.


I started with a piece of Pumpkin Pie Cardstock sized  10  x  7 1/2".
I scored the 10" side at:
2 1/2,  5  and  7 1/2".
I scored the 7 1/2" side at:
2 1/2  and  5".
To cut and put the box together you can watch my Video Tutorial Here.
Below is a picture of how your Cardstock should look after scoring, cutting and rounding the corners of the flap with the Detail Trio Punch.


I attached 4 pieces of Cute Halloween Designer Series Paper to the box.
All pieces are  2 1/4  x  2 1/4.
2 pieces for the front and 2 pieces for the inside.
I attached the DSP to the box with Liquid Glue.


I used the Layering Circle dies to cut out three circles.
(1)  1 5/8"  from Daffodil Delight Cardstock
(1)  1 7/8"  from Basic Black Cardstock
(1)  2" Scalloped Circle from Pumpkin Pie
I stamped the witch images from Frightfully Cute stamp set onto the Daffodil Delight circle with Tuxedo Black Ink.


I attached the circles together from large to small, with the witch image on top, with Liquid Glue.
I cut 2 pieces of ribbon to 14" long.  One from Metallic Mesh Ribbon and one from Black Glittered Organdy Ribbon.
I tied them around the box together.
I cut 2 pieces of Silver Simply Elegant Trim and tied them in a bow around the ribbon at the top of the box.


I attached the circles on the front of the box, on top of the ribbons, with Dimensionals.
For the final touch I added 3 Cute Stars Adhesive Backed Stars.


Supplies:
Frightfully Cute stamp set
Cute Halloween Designer Series Paper
Layering Circle dies
Detail Trio Punch
Tuxedo Black Ink
Cute Stars Adhesive Backed Sequins
Pumpkin Pie Cardstock
Basic Black Cardstock
Daffodil Delight Cardstock
Metallic Mesh Ribbon
Black Glittered Organdy Ribbon
Simply Elegant Trim
Liquid Glue
Dimensionals
Liquid Glue
Tear and Tape
Simply Scored
Take Your Pick Tool

Thank you for visiting my Blog today!  I hope you enjoyed my Triangle Box.
See you next time.

Love and Hugs,
Cathryn

Monday, October 11, 2021

FUN SIZED HALLOWEEN CANDY BOX with SEASONAL SWIRL DIES - Stampin' Up!*


Hi Friends!
My project today is a Halloween box that will fit Fun Sized Candy Bars and trinkets.  The box measures  2 3/4  x  2 3/4  x  1".   I used  Sparkle of the Season stamp set, Seasonal Swirl dies, Cutest Halloween stamp set, the Halloween Punch, Seasonal labels dies and the Brights 6x6 Designer Series Paper.


I started with a piece of Basic Black Cardstock sized  8  x  5 1/4".
I scored the 8" side at:
1,  3 3/4,  4 3/4  and  7 1/2".
I scored the 5 1/4" side at:
1,  3 3/4  and  4 3/4".
I put the box together with Tear and Tape.
To cut and put the box together you can watch my Video Tutorial Here.
Below is a picture of what your Cardstock should look like after scoring, cutting and rounding the corners of the flap with the Detail Trio Punch.


I attached 5 pieces of the Brights (Gorgeous Grape color) Designer Series Paper to the box.
(1)  2 1/2  x  2 1/2"  for the front.
(4)  2 1/2  x  3/4"  for the sides.
I attached the DSP to the box with Liquid Glue.
I used a small circle punch to take a partial circle out to the back of the box, where the flap goes in, for a finger grip.


I cut a swirl with stars from Black Glitter Paper using the Seasonal Swirls dies.
I put the swirl face down on my Silicone Mat and sponged glue on the back with a sponge.
I attached the swirl to the front of the box.


I stamped the pumpkin from Cutest Halloween stamp set onto Basic White Cardstock.
I stamped the inside of the pumpkin with Pumpkin Pie Ink.
I stamped the outline and face of the pumpkin with Tuxedo Black Ink.
I stamped the cheeks with Flirty Flamingo Ink.
I cut the pumpkin out using the Halloween Punch.


I cut a witch hat from Gorgeous Grape Cardstock using the Frightful Tags dies.
I stamped the sentiment from Sparkle of the Season stamp set onto Granny Apple Green Cardstock.
I cut the sentiment out using the Seasonal Labels dies.
I attached the pumpkin to the box with Dimensionals.
I attached the hat to the pumpkin's head with a Dimensional at the middle and Liquid Glue on the brim.
I attached the sentiment label under the pumpkin with Dimensionals.
For the final touch I added a Holiday Rhinestone Basic Jewels to the buckle of the witch hat.


Supplies:
Sparkle of the Season stamp set
Seasonal Swirl dies
Cutest Halloween stamp set
Halloween Punch
Seasonal Label dies
Brights Designer Paper
Basic Black Cardstock
Granny Apple Green Cardstock
Gorgeous Grape Cardstock
Pumpkin Pie Ink
Tuxedo Black Ink
Flirty Flamingo Ink
Holiday Rhinestone Basic Jewels
Detail Trio Punch
Liquid Glue
Tear and Tape
Dimensionals
Silicone Mat
Simply Scored
Take Your Pick Tool
Small Circle Punch

Thank you for visiting my Blog today!  I hope you enjoyed my Halloween box.
See you next time.

Love and Hugs,
Cathryn

Friday, October 8, 2021

HALLOWEEN SNOWBALL GIFT BOX with NUTS ABOUT YOU - Stampin' Up!


Hi Friends!
Today I made a square box to fit a Halloween Snowball Treat.  The box measures  3 1/4 x  3 1/4  x  1 1/2".  I used Nuts About You stamp set, Frightful Tags dies, Detailed Pumpkins dies, Scalloped Contours dies and the Brights and Regals Desiginer Series Paper.


I started with a piece of Granny Apple Green Cardstock sized
11  x  6 1/4".
I scored the 11" side at:
1 1/2,  4 3/4,  6 1/4  and  9 1/2".
I scored the  6 1/4" side at:
1 1/2  and  4 3/4".
To cut and put the box together you can watch my Video Tutorial Here.
Below is a picture of my Template.  Your Cardstock should look like this after scoring and cutting.


I cut a Scalloped Rectangle from Pumpkin Pie Cardstock using the Scalloped Contours dies.
I cut the long side of the rectangle to 3".
I attached a piece of Brights Designer Series Paper (Granny Apple Green) sized  2 1/2  x  2 1/2" to the Scalloped Rectangle with Liquid Glue.
I attached 4 pieces of Regals Designer Series Paper (Pumpkin Pie) sized  3  x  1 1/4" to the sides of the box with Liquid Glue.
I used a small circle punch to cut a half moon in the front side of the box for a finger grip.


I stamped the Squirrel Images onto Basic White Cardstock.
I used Pumpkin Pie Ink for the inside of the squirrel and Early Espresso Ink for the outline.
I stamped the leaves using Granny Apple Green and Cajun Craze Inks.
I fussy cut the squirrel and leaves out by hand.
I stamped the inside of the leaves with Early Espresso Ink.
I cut a pumpkin from Gold Foil Paper using the Detailed Pumpkins dies.
I cut the witch hat from Black Glitter Paper using the Frightful Tags dies.


I attached the Gold Pumpkin to the upper right side of the Scalloped Rectangle with Liquid Glue.
I attached the leaves to the stem of the pumpkin with Liquid Glue.
I attached the squirrel to the lower left side of the Rectangle with Dimensionals.
I attached the witch hat to the squirrel with a Dimensional in the middle of the hat and Liquid Glue on the tip and brim of the hat.


I stamped the sentiment from Time of Giving stamp set onto Pumpkin Pie Cardstock with Tuxedo Black Ink.
I cut the sentiment out by hand and attached it above the squirrel's tail with Liquid Glue.
I tied Fine Art Ribbon around the sides of the box and tied a ribbon on the right side.
I attached the Scalloped Rectangle with the images on top of the box and ribbon with Dimensionals.
For the final touch I added 3 Matte Decorative Dots to the witch hat.


Supplies:
Nuts About You stamp set
Time of Giving stamp set
Detailed Pumpkin dies
Frightful Tags dies
Scalloped Contours dies
Gold Foil Sheets
Granny Apple Green Cardstock
Basic White Cardstock
Gold Foil Paper
Black Glitter Paper
Brights and Regals Designer Series Paper
Fine Art Ribbon
Matte Decorative dots
Pumpkin Pie Ink
Granny Apple Green Ink
Cajun Craze Ink
Early Espresso Ink
Tuxedo Black Ink
Small Circle Punch
Dimensionals
Tear and Tape
Liquid Glue
Simply Scored
Take Your Pick Tool

Thank you for visiting my Blog today.  I hope you like my Halloween Box.
See you next time!

Love and Hugs,
Cathryn

Wednesday, October 6, 2021

JOYFUL LIFE LITTLE DEBBIE PARTY CAKE GIFT BOX with FRIGHTFUL TAGS DIES - Stampin' Up!


Hi Friends!
My project today is a Gift Box for a Little Debbie Fall Party Cake and some Adorable Halloween Glasses.
The box measures  5 1/2  x  2 1/2  x  1 1/2".  I used Joyful Life stamp set, Little Delights stamp set, Frightfully Cute stamp set, Frightful Tag dies, Scalloped Contours dies, Seasonal Labels dies and the Brights 6x6 Designer Series Paper.


I started with a piece of Old Olive Cardstock sized   9  x  8 1/2".
I scored the 9" side at:
1 1/2,  7  and  8 1/2".
I scored the  8 1/2" side at:
1/2,  3,  4 1/2  and  7".
To cut and put the box together you can watch my Video Tutorial Here!
Below is a picture of what your Cardstock should look like after scoring, cutting and rounding the corners of the top flap with the Detail Trio Punch.


I attached 6 pieces of Brights Designer Series Paper to the box.
(2)  2 1/4  x  5 1/4"  for the front and back
(2)  1 1/4  x  5 1/4"  for the sides
(2)  2 1/4  x  1 1/4"  for the top and bottom
I attached the DSP to the box with Liquid Glue.
I cut a small half circle in the back of the box for a finger grip with a small circle punch.


I cut a scalloped rectangle from Pumpkin Pie Cardstock using the Scalloped Contours dies.
A Tree and Spider Web from Black Glitter Paper using the Frightful Tags dies.
And a tag from Old Olive Cardstock using the Seasonal Tags dies.


I stamped the pig image, from Joyful Life stamp set, onto Basic White Cardstock with Tuxedo Black Ink.
I colored the pig with Stampin' Dimensionals.
Light and Dark Petal Pink for the pig.
Dark Pumpkin Pie and Light Mossy Meadow for the scarf.
Dark Pumpkin Pie for the cup.
Dark Crumb Cake for the sleeve on the cup.


I stamped the moon from Frightfully Cute stamp set onto Basic White Cardstock with Daffodil Delight Ink.
I stamped a bat on top of the moon with Tuxedo Black Ink.
I cut the image out with the Frightful Tags dies.


I glued the moon and spider web to the box as shown with Liquid Glue.
I fussy cut the pig out and attached it to the Pumpkin Pie Scalloped Rectangle with Dimensionals.
I glued the tree next to and behind the pig's ear with Liquid Glue.
I stamped the sentiment, from Little Delights stamp set, onto Old Olive Cardstock with Tuxedo Black Ink.
I cut the sentiment out with one of the Seasonal Labels dies.
I attached it under the feet of the pig with Dimensionals.


I tied two 12" pieces of Black and White Gingham Ribbon into a bow and attached it to the top-left side of the front of the box with Glue Dots.
I added the Little Debbie cakes and fun glasses (from Walmart) into the box.
For the final touch I added three 2021-2023 In Color Jewels to the top area of the front.


Supplies:
Joyful Life stamp set
Little Delights stamp set
Frightfully Cute stamp set
frightful Tag dies
Scalloped Contours dies
Seasonal Labels dies
Detail Trio Punch
Brights 6x6 Designer Series Paper
Old Olive Cardstock
Basic White Cardstock
Black Glitter Paper
Tuxedo Black Ink
Daffodil Delight Ink
Light and Dark Petal Pink Stampin' Blends
Dark Pumpkin Pie Stampin' Blend
Light Mossy Meadow Stampin' Blend
Dark Crumb Cake Stampin' Blend
Black and White Gingham Ribbon
2021-2023 In Color Jewels
Tear and Tape
Liquid Glue
Glue Dots
Dimensionals
Simply Scored
Take Your Pick Tool

Thank you for visiting my Blog today!  I hope you enjoyed my little scene and box tutorial.
See you next time.

Love and Hugs,
Cathryn

Monday, October 4, 2021

Frightfully Scary Embossed Halloween Gift Box with Old World Paper - Stampin' Up!


Hi Friends!
My project today is an Embossed Halloween Gift Box that measures  3 1/2  x  3  x  1 1/2".  I used Cute Halloween Designer Series Paper, Frightfully Cute stamp set, Cutest Halloween stamp set, Clever Cats stamp set, Frightful Tags dies, Tailor Made Tags dies, Layering Circle dies and Old World Paper 3D Embossing Folder.


I started with a piece of Basic Black Cardstock sized  9 1/2  x  5 1/4".
I scored the  9 1/2" side at:
1/2,  3 1/2,  5  and  8".
I scored the  5 1/4" side at:
1 1/2  and  4".
To cut and put the box together you can watch my Video Tutorial Here.
Below is how your Cardstock should look after scoring and cutting.


I embossed the entire box with Old World Paper 3D Embossing Folder before putting the box together.  It gave the box wonderful texture!
Below is a picture of part of the box with the Embossing included.


I attached 2 pieces of Cute Halloween Designer Series Paper to the box.
(1)  2  x  6".
(1)  2  x  3".
I folded the  2 x 6" piece of DSP around the front and sides of the box.  I reinforced the folds with my Bone Folder and attached it to the box with Liquid Glue.
Then I attached the 2 x 3" piece to the back of the box.


I punched a 1/4" hole in both of the top flaps and tied Metallic Mesh Ribbon through the holes.
I cut a tag from Mango Melody Cardstock using the Tailor Made Tags dies.
I stamped the spider from Cutest Halloween stamp set onto the bottom of the tag.
I stamped the dotted line, from Clever Cats stamp set, on top of the spider.
I cut the tag down to 1 1/2" and punched a hole in the top.
I poked the end of the Metallic Mesh ribbon through the top of the tag and tied a bow at the top of the box.


I stamped the sentiment from Frightfully Cute stamp set onto Basic White Cardstock.
I cut the sentiment out using the Layering Circle dies.
I cut a scalloped circle a little larger than the sentiment circle out of Mango Melody Cardstock and attached them together with Liquid Glue.
I cut a larger circle from Old Olive Cardstock and attached the sentient circles on top with Liquid Glue.


I cut the spider web out of Black Glitter Paper using the Frightful Tags dies.
I attached the web to the middle of the front of the box with a dot of Liquid Glue in the center.
I attached the circles on top of the spider web with Dimensionals.
For the final touch I added 2021-2023 In Color Jewels under the sentiment and on the dotted line, above the spider, on the tag.


Supplies:
Cute Halloween Designer Series Paper
Cutest Halloween stamp set
Frightfully Cute stamp set
Frightful Tags dies
Clever Cats stamp set
Layering Circle dies
Tailor Made Tags dies
Old World Paper 3D Embossing Folder
Basic Black Cardstock
Basic White Cardstock
Black Glitter Paper
Mango Melody Cardstock
Old Olive Cardstock
Tuxedo Black Ink
Metallic Mesh Ribbon
2021-2021 In Color Jewels
Liquid Glue
Tear and Tape
Dimensionals
Simply Scored
Take Your Pick Tool

Thank you for visiting my Blog today!  I hope you enjoyed my Embossed Box Tutorial.
See you next time.

Love and Hugs,
Cathryn

Friday, October 1, 2021

EASY NO CUT HALLOWEEN TREAT BOX with CUTE Halloween DSP - Stampin' Up!


Hi Friends!
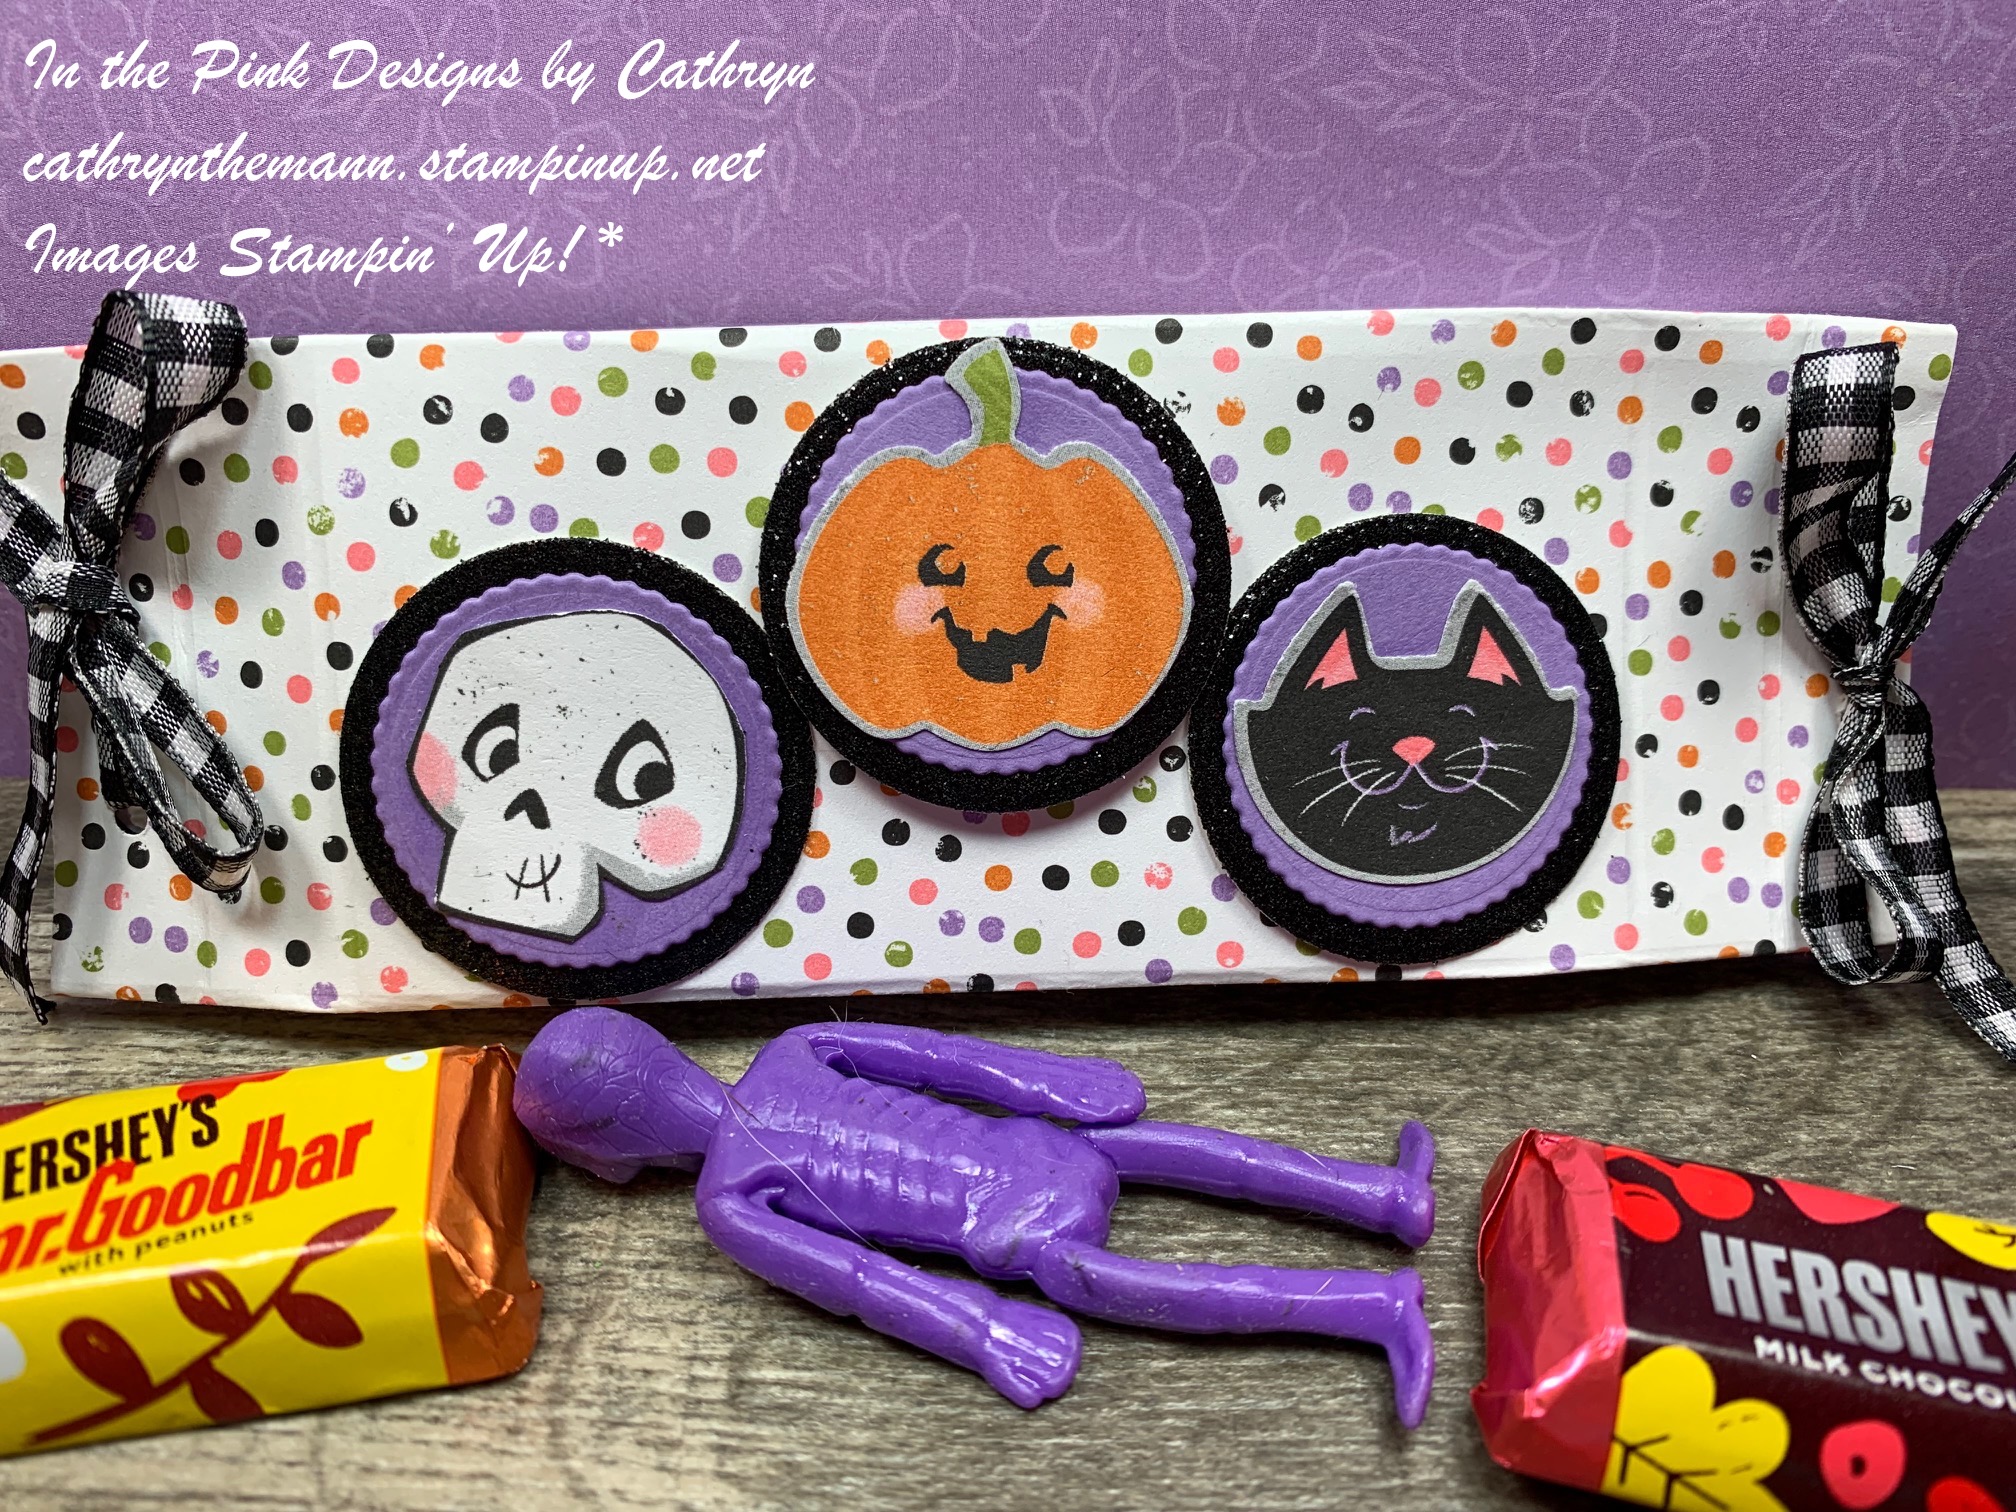
My project today is an Easy No Cut Halloween treat box I made from one piece of 6x6 Cute Halloween Designer Series Paper.  I also used the Halloween punch, Layering Circle dies and Black and White Gingham Ribbon.


I started with a piece of Cute Halloween Designer Series Paper sized  6  x  5 1/2".
I scored the 6" side at:
1/2,  1,  5  and  5 1/2".
I scored the  5 1/2" side at:
1/2,  2 1/2,  3  and  5".
To put the box together you can watch my Video Tutorial Here.


I cut (3) 1 3/8" circles from Black Glitter Paper and (3) 1 1/8"  scalloped circles from Highland Heather Cardstock using the Layering Circle dies.
I attached the Highland Heather circles on top of the Black Glitter ones with Liquid Glue.
I cut a pumpkin and cat from the Cute Halloween Designer Series Paper using the Halloween Punch.
I fussy cut a skull from the DSP by hand.
I attached the 3 images on top of the Highland Heather circles with Liquid Glue.


I attached the skull and cat circles all the way to the left and right front of the box with Liquid Glue.
I attached the pumpkin in the middle at the top fo the box with Dimensionals.
I punched 2 holes on each side of the end flaps and ran Black and White Gingham Ribbon through them, tying a bow on top.


Supplies:
Cute Halloween Designer Series Paper
Halloween Punch
Layering Circle dies
Black Glitter Paper
Highland Heather Cardstock
Black and White Gingham Ribbon
Liquid Glue
Dimensionals
Tear and Tape
Simply Scored
Take Your Pick Tool

Thank you for visiting my Blog today!  I hope you enjoyed my Halloween Project.
See you next time!

Love and Hugs,
Cathryn

Wednesday, September 29, 2021

PENGUIN PLACE RED-NOSED PENGUIN GIFT BOX with PENGUIN PLAYMATES - Stampin' - Up!


Hi Friends!
My project today is a Gift Box that measures  2  x  3 1/4  x  3/4".  I used Penguin Place stamp set, the Penguin Builder Punch, Penguin Playmates Designer Series Paper (Saleabration), Little Delights stamp set, Scalloped Contours dies, Rectangle Stitched dies and the Double Oval Punch.


I started with a piece of Soft Seafoam Cardstock sized
7 1/2  x  4 3/4".
I scored the  7 1/2" side at:
2,  2 3/4,  4 3/4  and  5 1/2".
I scored the  4 3/4" side at:
3/4  and  4".
To cut and put the box together you can watch my Video Tutorial Here.
Below is a picture of how your Cardstock should look after scoring and cutting.


I attached several pieces of Penguin Playmates Designer Series Paper to the box.
(1)  3  x  1 3/4  of the Purple Snowflakes for the back of the box
(2)  3  x  1 3/4"  of the Dotted DSP for the inside of the box
(2)  1/2  x  3" for the sides
(2)  1/2  x  1 3/4"  for the top and bottom
I attached the DSP to the box with Liquid Glue.


I cut a Scalloped Circle from Fresh Freesia Cardstock using the Scalloped Contours dies.
I attached it to the front of the box with Stampin' Seal.
I tied Glittered Organdy Ribbon around the box and tied a bow at the side.


I cut 2 of the same stitched rectangles using the Rectangle Stitched dies.  1 from Soft Seafoam Cardstock and 1 from Penguin Playmates Designer Series Paper.
I attached the DSP on top of the Soft Seafoam Cardstock with Liquid Glue.
I attached both rectangles on top of the Scalloped Rectangle, over the ribbon, with Dimensionals.


I cut the penguin from Basic Black and Basic White Cardstocks using the Penguin Builder Punch.
I cut 2 penguin feet from Pumpkin Pie Cardstock with the same punch.
I attached the White Cardstock piece on top of the black Cardstock piece with Liquid Glue.
I stamped the Penguin's face from Penguin Place stamp set.
The eyes with Tuxedo Black Ink.
The Nose with Real Red Ink.
I stamped the antlers with Cinnamon Cider Ink and fussy cut them out by hand.
I attached the antlers above the penguins head with Liquid Glue.


I stamped the sentiment from Little Delights stamp set onto Fresh Freesia Cardstock with Tuxedo Black Ink.
I cut the sentiment out using the Double Oval Punch.
I cut a scalloped oval, using the same punch, from Soft Seafoam Cardstock.
I attached the sentiment oval on top of the scalloped oval and the entire piece to the inside of the box with Liquid Glue.
I added a Matte Decorative Dot on the nose of the penguin.
I also added 3 2021-2023 In Color Jewels around the penguin.


Supplies:
Penguin Place stamp set
Penguin Builder Punch
Penguin Playmates Designer Series Paper
Little Delights stamp set
Double Oval Punch
Scalloped Contours dies
Rectangle Stitched dies
Soft Seafoam Cardstock
Fresh Freesia Cardstock
Basic White Cardstock
Basic Black Cardstock
Pumpkin Pie Cardstock
Tuxedo Black Ink
Cinnamon Cider Ink
Real Red Ink
Glittered Organdy Ribbon
2021-2023 In Color Jewels
Decorative Matte Dots
Liquid Glue
Stampin' Seal
Tear and Tape
Dimensionals

Thank you for visiting my Blog today!  I hope you enjoyed the Penguin box.
See you next time.

Love and Hugs,
Cathryn