Friday, April 12, 2024

COFFEE CARD & TREAT BOX with LATTE LOVE - Stampin' Up!

Shop Stampin' Up! Here


Hi Friends!
My project today is a Treat Box for a Coffee Gift Card and Candy that measures 3 3/4  x  4  x  3/4".  I used the Latte Love stamp set & dies bundle, the Decorative Circle Punch, Stylish Shapes dies, Mini Pocket Envelope dies and A Little Latte Designer Series Paper.

You can watch my Video Tutorial Here!


I started with a piece of Pretty Peacock Cardstock sized
9 1/2  x  6 1/4"
I scored the  9 1/2" side at:
1/2,  4 1/4,  5  and  8 3/4"
I scored the  6 1/4" side at:
3/4,  4 3/4  and  5 1/2"
To cut and put the box together you can watch my Video Tutorial Here.
Below is a picture of what your Cardstock should look like after scoring and cutting.


I attached several pieces of A Little Latte Designer Series Paper to the box.
(2)  3 1/2  x  3 3/4"  front and back
(2)  1/2  x  3 1/2"  shorter sides
(2)  1/2  x  3 3/4"  longer sides
I attached the DSP to the box with Liquid Glue.


I stamped the Cup, from Latte Love stamp set, onto Lost Lagoon Cardstock with Pretty Peacock Ink.
I stamped the Coffee with Pecan Pie Ink.
I cut the images out using the Latte Love dies.
I colored the white edge of the Coffee die cut with a Dark Pecan Pie Blend.


I put the Coffee onto the Cup with Liquid Glue.
I attached the pieces of the French Press together using Liquid Glue and my Silicone mat.
I attached the French Press to the upper left of the box front with Liquid Glue.


I cut a circle out of Pretty Peacock Cardstock using the Decorative Circle Punch.
I cut a  2 1/8" circle from A Little Latte DSP using the Stylish Shapes dies.
I attached the two circles together with Liquid Glue.


I attached the Cup to the circles with Dimensionals,
I attached the entire piece to the front of the box with more Dimensionals.


I cut an oval label from Basic White Cardstock using the Mini Pocket Envelope dies.
I stamped the sentiment, from Latte Love stamp set, with Pretty Peacock Ink.
I attached the label above the Cup with Liquid Glue.
I added 3 Pecan Pie Swirl Dots around the box for the final touch.


Supplies:
Latte Love stamp set
Decorative Circle Punch
Stylish Shapes dies
M in I Picket Envelope dies
A Little Latte Designer Series Paper
Pretty Peacock Cardstock
Smokey Slate Cardstock
Pool Party Cardstock
Lost Lagoon Cardstock
Early Espresso Cardstock
Pretty Peacock Ink
Pecan Pie Ink
Dark Pecan Pie Stampin' Blend
Swirl Dots
Tear & Tape
Liquid Glue
Dimensionals
Simply Scored
Take Your Pick Tool
Corner Rounder
Small Circle Punch

Thank you for visiting my Blog today.  I hope you enjoyed my latte box.
See you next time!

Love & Hugs,
Cathryn

Wednesday, April 10, 2024

LIP BALM KEY CHAIN BOX with SUBMARINE LIFT - Stampin' Up!


Shop Stampin' Up! Here

Hi Friends!
My project today is a Box for a Lip Balm Holder that measures  3 1/2  x  2  x  1 1/2".  I used the Submarine Life stamp set & punch Bundle, Perennial Postage dies and Lighter Than Air Designer Series Paper.

You can watch my Video Tutorial Here!


I started with a piece of Tahitian Tide Cardstock sized
7 1/2  x  7 1/4"
I scored the  7 1/2" side at:
1/2,  2 1/2,  4  and  6".
I scored the  7 1/4" side at:
1 1/2,  5  and  6 1/2".
To cut and put the box together you can watch my Video Tutorial Here.
Below is a picture of what your Cardstock should look like after cutting.


I attached several pieces of Lighter Than Air Designer Series Paper to the box.
(2)  3 1/4  x  1 3/4"  front and back
(2)  3 1/4  x  1 1/4"  long sides
(2)  1 3/4  x  1 1/4"  short sides
I attached the DSP to the box with Liquid Glue.


I stamped the Submarine onto Basic White Cardstock.
Daffodil Delight Ink  -  Body of Submarine
Pumpkin Pie Ink  -  Propellor
Granny Apple Green Ink  -  Periscope
I cut the images out using the Submarine Life Builder Punch.


I attached the pieces of the Submarine together using Liquid Glue and my Silicone Mat.
I cut a rectangle from Basic White Cardstock using the Perennial Postage dies.
I stamped the sentiment, from Submarine Lift stamp set, onto the label with Tahitian Tide Ink.
I but the end off the label and attached it to the upper left of the box with Liquid Glue.


I tied Lemon Lime Twist Ribbon around the right side of the box twice and tied a bow at the top.
I attached the Submarine onto the box with Dimensionals and Mini Dimensionals.


For the final touch I added 3 Azure Afternoon Rainbow Dots to the Submarine.


Supplies:
Submarine Life stamp set & Submarine Life Builder Punch Bundle
Perennial Postage dies
Lighter Than Air Designer Series Paper
Tahitian Tide Cardstock
Basic White Cardstock
Tahitian Tide Ink
Daffodil Delight Ink
Pumpkin Pie Ink
Lemon Lime Twist Ribbon
Rainbow Dots
Tear & Tape
Liquid Glue
Dimensionals & Mini Dimensionals
Simply Scored
Take Your Pick Tool
Corner Rounder
Small Circle Punch

Thank you for visiting my Blog today.  I hope you enjoyed my Submarine Box.
See you next time!

Love and Hugs,
Cathryn

Tuesday, April 9, 2024

FUN FOLD GET WELL CARD with SUBMARINE LIFE - Stampin' Up!


Shop Stampin' Up! Here

Hi Friends!
My project today is a Fun Fold Get Well Card.  I used the Submarine Life Stamp Set & Punch Bundle, Warmest Heart stamp set, Perennial Postage dies and Lighter Than Air Designer Series Paper.

You can watch my Video Tutorial Here!


I started with a piece of Tahitian Tide Cardstock sized
4 1/4  x  11"
I scored the  11" side at:
5 1/2"
I cut  2 3/4" off the front of the card.


I attached a Striped piece of Lighter Than Air Designer Series Paper, sized
2 1/2  x  4"
 to the left side of the front of the card.
Next I attached the "cut off" piece of Cardstock to the middle of the front of the Card.
I attached a piece of Dotted DSP, sized
4  x  2 1/2"
 to the horizontal piece of Cardstock I just attached.


I cut a piece of Basic White Cardstock sized
5 1/4  x  4"
I stamped the underwater scene, from Submarine stamp set, onto the piece of Basic White Cardstock.
Tahitian Tide Ink  -  Sentiment, Bubbles and little fish.
Crumb Cake Ink  -  Sea Floor
Parakeet Party & Granny Apple Green Inks  -  Sea Grass
Real Red Ink  -  Crab
Large Goldfish & 3 small  -  Pumpkin Pie Ink
Daffodil Delight Ink  -  Starfish
Boho Blue Ink  -  Small Fish
I attached the stamped Basic White Cardstock inside the card with Liquid Glue.
I attached another piece of Basic White Cardstock sized
2 1/2  x  4"
to the left side of the inside of the card for a place to write a note.


I stamped the Submarine onto Basic White Cardstock.
Submarine Body  -  Daffodil Delight Ink
Propellor  -  Pumpkin Pie Ink
Periscope  -  Parakeet Party Ink
I cut the Submarine pieces out using the Submarine Builder Punch.
I put the Submarine pieces together with Liquid Glue and a Silicone Mat.

I cut a 1 3/8  x  5/8" label from Basic White Cardstock using the Perennial Postage dies.
I stamped the sentiment "Get Well Soon", from Warmest Heart stamp set, onto the label with Tahitian Tide Ink.
I attached the label to the bottom right of the Card Front with Liquid Glue.
I attached the Submarine to the Card Front with Dimensionals and Mini Dimensionals.
For the final touch I added 3 Azure Afternoon Rainbow Dots around the card.


Supplies:
Submarine Lift stamp set & Punch Bundle
Warm Heart stamp set
Perennial Postage dies
Lighter Than Air Designer Series Paper
Tahitian Tide Cardstock
Basic White Cardstock
Daffodil Delight Ink
Pumpkin Pie Ink
Granny Apple Green Ink
Parakeet Party Ink
Crumb Cake ink
Real Red Ink
Boho Blue Ink
Rainbow Dots
Liquid Glue
Dimensionals & Mini Dimensionals
Simply Scored
Take Your Pick Tool

Thank you for visiting my Blog today.  I hope you enjoyed my Fun Fold Card.
See you next time!

Love & Hugs,
Cathryn

Friday, April 5, 2024

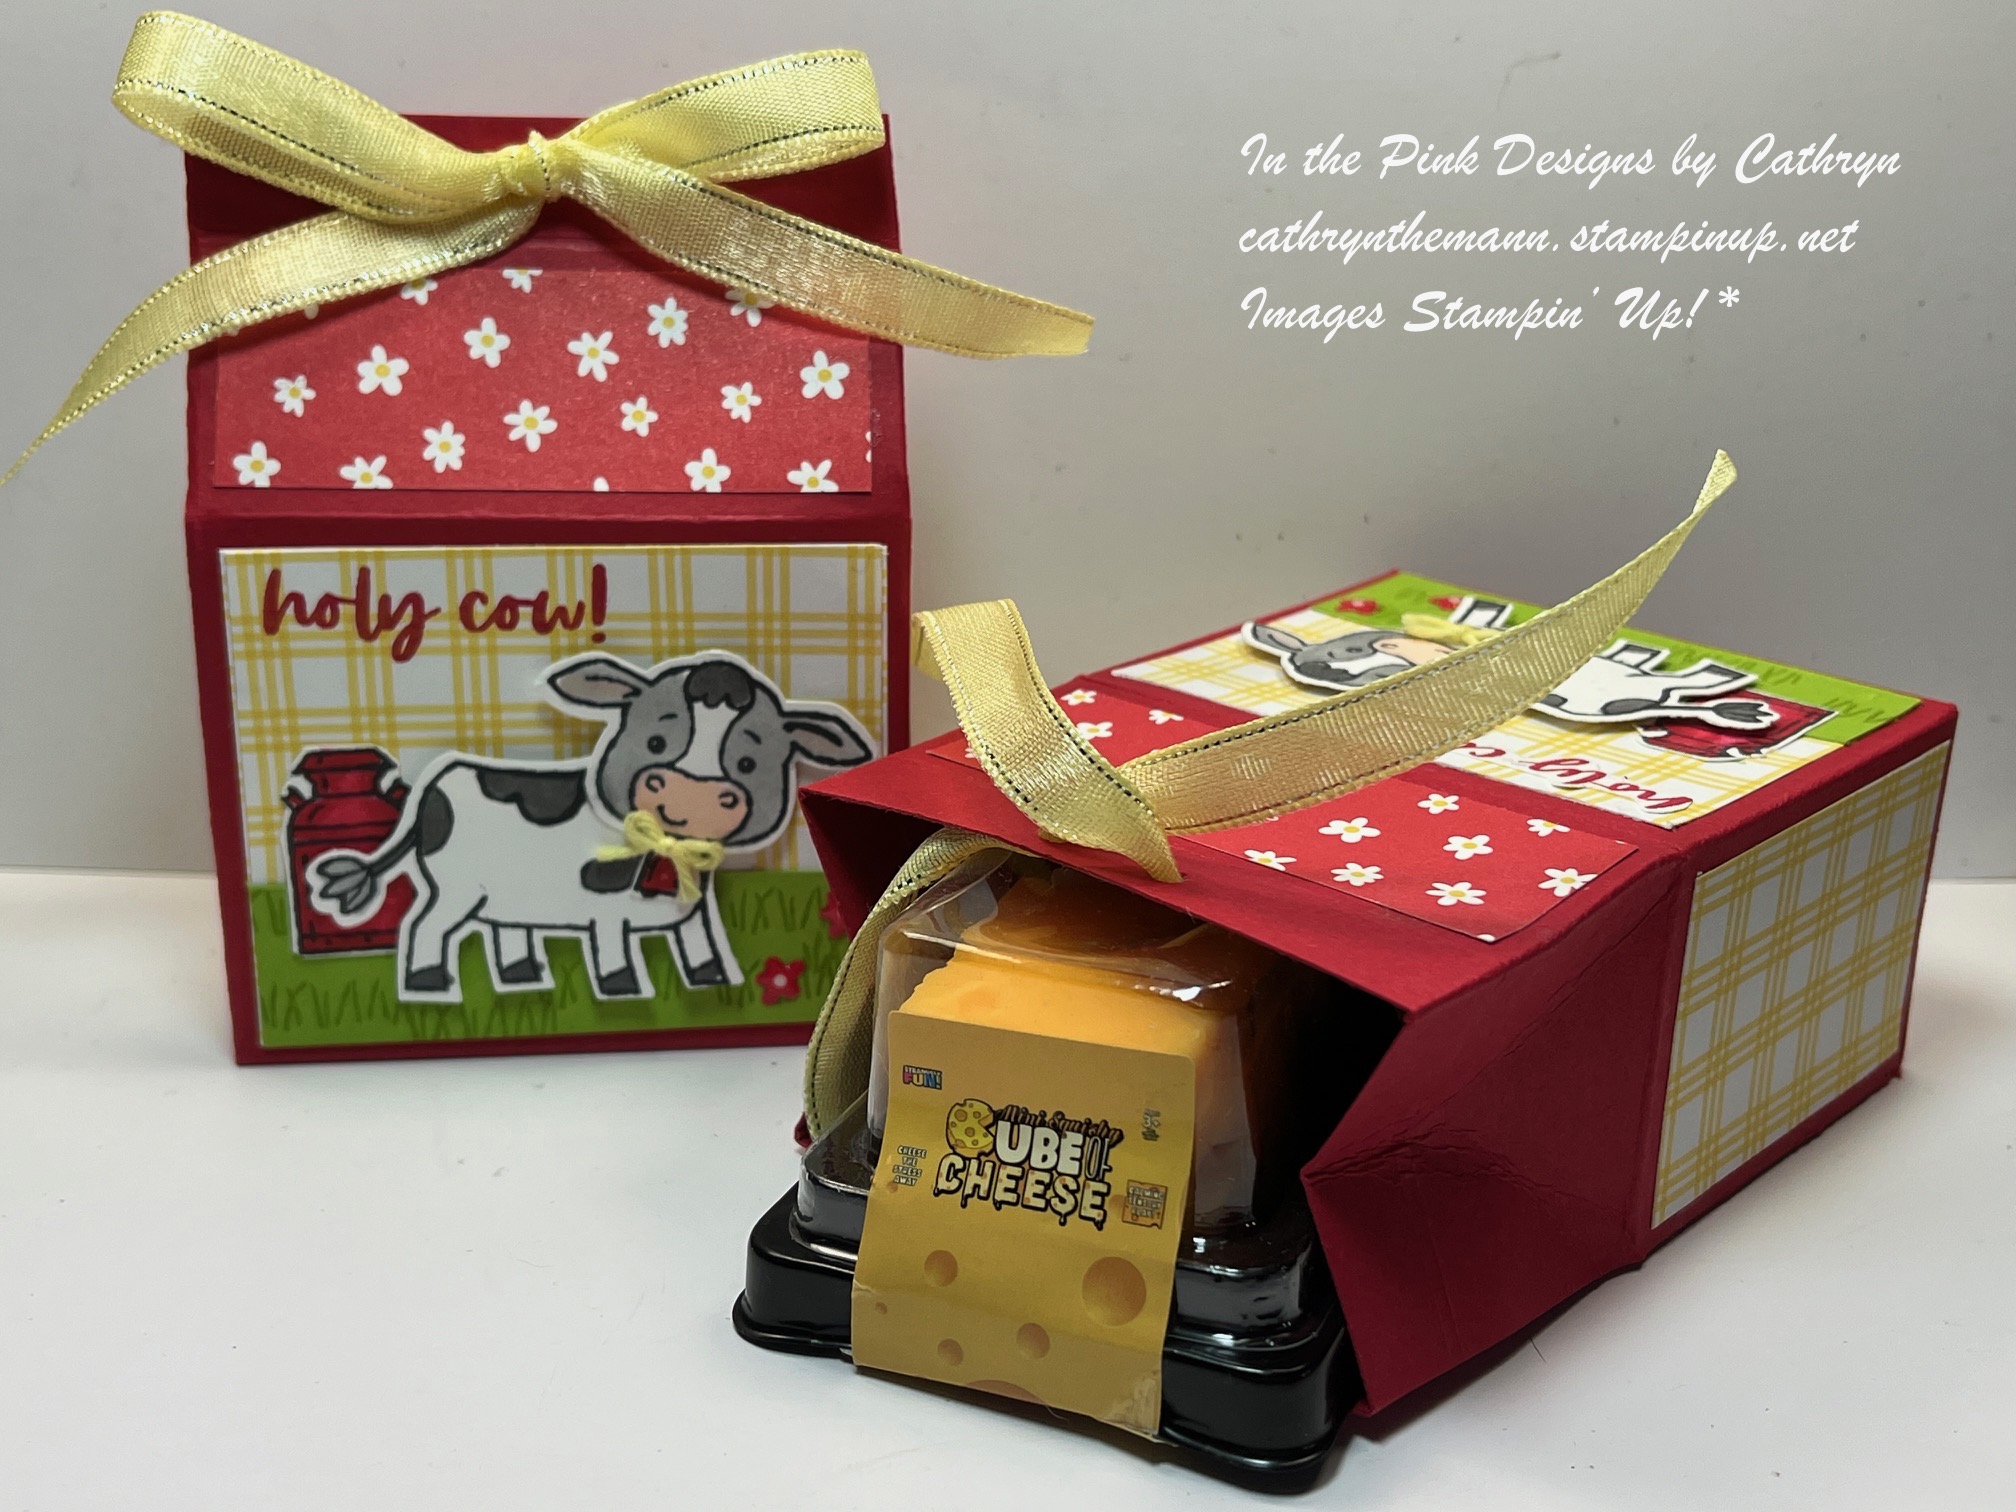
SQUISHY CHEESE TOY GIFT BOX with CUTEST COW - Stampin' Up!


Shop Stampin' Up! Here

Hi Friends!
My project today is a Box that measures  3  x  4  x  1 3/4".  I used the Cutest Cow stamp set & Punch Bundle, Bee Mine Designer Series Paper, Sheer Ribbon Combo Pack and Stampin' Blends.

You can watch My Video Tutorial Here!


I started with a piece of Real Red Cardstock sized
10  x  6"
I scored the  10" side at:
1 3/4,  4 3/4,  6 1/2  and  9 1/2"
I scored the  6" side at:
1 3/4,  4 1/4  and  5 1/2"
To cut and put the box together you can watch my Video Tutorial Here.
Below is a picture of how your Cardstock should look after scoring and cutting.


I attached several pieces of Bee Mine Designer Series Paper to the box.
Upper Box - Red DSP
(2)  2 3/4  x  1"
Lower Box
(2)  2 3/4  x  2 1/4"  front and back
BEFORE putting the front piece on I stamped the sentiment to the upper left of the DSP with Real Red Ink.
(2)  1 1/2  x  2 1/4"  sides
I attached the DSP to the box with Liquid Glue.


I stamped the images from Cutest Cow stamp set onto Basic White Cardstock with Tuxedo Black Ink.
I cut the Cow pieces out using the Punch.
I fussy cut the Milk Can and Bell out by hand.
I put the Cow together with Liquid Glue.


I colored the images with Stampin' Blends.
Light & Dark Smokey Slate  -  Cow
Dark Petal Pink  -  Muzzle
Light & Dark Real Red  -  Milk Can and Bell


I cut a piece of Granny Apple Green Cardstock to
2 3/4  x  3/4"
I stamped the Grass image all over the Cardstock with Granny Apple Green Ink.
I attached the "Grass" to the bottom of the front of the box with Liquid Glue.


I attached the Milk Can to the left side of the Grass with Liquid Glue.
I attached the Cow to the middle of the Grass with Dimensionals.
I attached the Bell just below the Cow's head with Liquid Glue.
I tied a tiny bow with Yellow Twine and attached it to the top of the Cow's Bell with Liquid Glue.


I punched 2 sets of holes in the top of the box and ran Lemon Lolly Sheer Ribbon through them, tying a bow at the front.
For the final touch I added 2 Red Flowers, from the Hearts & Flowers Embellishments, in front of the Cow.


Supplies:
Cutest Cow stamp set & Punch Bundle
Bee Mine Designer Series Paper
Real Red Cardstock
Granny Apple Green Cardstock
Basic White Cardstock
Tuxedo Black Ink
Granny Apple Green Ink
Real Red Ink
Stampin' Blends
Baker's Twine 3 Pack
Sheer Ribbon Combo Pack
Hearts & Flowers Embellishments
Tear & Tape
Liquid Glue
Dimensionals
Simply Scored
Take Your Pick Tool
Hole Punch

Thank you for visiting my Blog today.  I hope you liked my Cow box.
See you next time!

Love & Hugs,
 Cathryn

Wednesday, April 3, 2024

MOTHER'S DAY GIFT BOX with the FLOWER CART BUNDLE - Stampin' Up!


Shop Stampin' Up! Here

Hi Friends!
My project today is a Gift Box for Mother's Day that measures  3 1/2  x  2 3/4  x  1".  I used the Flower Cart stamp set & dies Bundle, Perennial Postage dies, Lighter Than Air Designer Series Paper and Balmy Blue Variegated Ribbon.

You can watch my Video Tutorial Here!


I started with a piece of Balmy Blue Cardstock sized
8 1/2  x  7"
I scored the  8 1/2" side at:
1,  3 3/4,  4 3/4  and  7 1/2"
I scored the. 7" side at:
3/4,  1 3/4,  5 1/4  and  6 1/4"
To cut and put the box together you can watch my Video Tutorial Here.
Below is a picture of how your Cardstock should look after scoring and cutting.


I attached several pieces of Lighter Than Air Designer Series Paper to the box.
(2)  3 1/4  x  2 1/2"  front and back
(2)  3 1/4  x  3/4"  long sides
(2)  2 1/2  x  3/4"  short sides
I attached the DSP to the box with Liquid Glue.


I stamped the images from the Flower Cart stamp set onto Basic White Cardstock.
Leaves  -  Granny Apple Green Ink
Flowers  -  Fresh Freesia Ink
Pots  -  Balmy Blue Ink
I cut the images out using the Flower Cart dies.


I cut a  2 3/4  x  2" rectangle from Bright & Beautiful Designer Series Paper using the Perennial Postage dies.
I stamped the sentiment onto the bottom with Tuxedo Black Ink.


I attached the rectangle to the top of the front of the box with Dimensionals.
I attached the Flowers to the Pots with Liquid Glue.
Next, I attached the entire piece to the rectangle, over the "Happy" part of the sentiment with Dimensionals.


I tied a bow with Balmy Blue Variegated Ribbon and attached it over the Flowers with Liquid Glue and a Glue Dot.
I added a Low Profile 3/8" Adhesive Velcro Dots to the flap for the closure.


For the final touch I added a Iridescent Rhinestone Basic Jewel to the left Pot.


Supplies:
Flower Cart stamp set & dies Bundle
Perennial Postage dies
Lighter Than Air Designer Series Paper
Bright & Beautiful Designer Series Paper
Balmy Blue Cardstock
Basic White Cardstock
Granny Apple Green Ink
Fresh Freesia Ink
Tuxedo Black Ink
Balmy Blue Variegated Ribbon
Stampin' Seal+
Liquid Glue
Dimensionals
Simply Scored
Take Your Pick Tool
Corner Rounder
3/8" Low Profile Adhesive Velcro Dots

Thank you for visiting my Blog today.  I hope you enjoyed my Mother's Day Box.
See you next time!

Love & Hugs,
Cathryn

Tuesday, April 2, 2024

BIRTHDAY TREAT BOX with HOORAY FOR SURPRISES - Stampin' Up!


Shop Stampin' Up! Here

Hi Friends!
My project today is a Birthday Treat Box that measures  3  x  4 1/2  x  1".  I used the Hooray for Surprises stamp set & dies Bundle, Everyday Details dies, Stylish Shapes dies and Delightfully Eclectic Designer Series Paper.

You can watch my Video Tutorial Here!


I started with a piece of Bubble Bath Cardstock sized
8 1/2  x  7 1/4"
I score the  8 1/2" side at:
1/2,  3 1/2,  4 1/2  and  7 1/2"
I scored the  7 1/4" at:
1,  5 1/2  and  6 1/2".
To cut and put the box together you can watch my Video Tutorial Here.
Below is a picture of how your Cardstock should look after scoring and cutting.


I attached several piece of Delightfully Eclectic Designer Series Paper to the box.
(2)  2 3/4  x  4 1/4"  front and back
(2)  3/4  x  2 3/4"  short sides
(2)  3/4  x  4 1/4"  long sides
I attached the DSP to the box with Liquid Glue.


I cut a  2 1/4  x  3 3/4" rectangle from the Striped side of the Delightfully Eclectic Designer Series Paper using the Everyday Details dies.
I stamped the sentiment, from Hooray for Surprises stamp set, onto the bottom of the Rectangle with Smokey Slate Ink.


I stamped the Cake onto Basic White Cardstock with Bubble Bath Ink.
I cut it out with the Hooray for Surprises dies.
I cut a  2 1/4" circle from Basic White Cardstock using the Stylish Shapes dies.
I stamped the Flame onto the top of the circle first with Daffodil Delight Ink.
Next I stamped the Candle with Melon Mambo Ink.
I attached the Cake onto the circle, below the Candle, with Dimensionals.


I tied White and Silver Sheer Ribbon around the short side of the box and tied a bow on the left side.
I attached the circle to the top of the rectangle with Dimensionals.
I attached the entire piece onto the box, over the ribbon with Dimensionals.


I added a White Flower, from the Hearts & Flowers Embellishments, to the bottom layer of the Cake.
For the final touch I added 3 Rhinestone Basic Jewels to the circle.


Supplies:
Hooray for Surprises stamp set & dies Bundle
Everyday Details dies
Styish Shapes dies
Delightfully Eclectic Designer Series Paper
Bubble Bath Cardstock
Basic White Cardstock
Bubble Bath Ink
Melon Mambo Ink
Daffodil Delight Ink
Smokey Slate Ink
Silver & White Sheer Ribbon
Hearts & Flowers Embellishments
Rhinestone Basic Jewels
Tear & Tape
Liquid Glue
Dimensionals
Simply Scored
Take Your Pick Tool
Corner Rounder
Small Circle Punch

Thank you for visiting my Blog today.  I hope you enjoyed my Treat Box today.
See you next time!

Love & Hugs,
Cathryn

Friday, March 29, 2024

SUMMER TREAT BOX with BEACH DAY - Stampin' Up!


Shop Stampin' Up! Here

Hi Friends!
My project today is a Summer Treat Box that measures  4  x  4  x  1".  I used the Beach Day stamp set & dies Bundle, Stylish Shapes dies, Deckled Circle dies and Lighter Than Air Designer Series Paper.

You can watch my Video tutorial Here!


I started with a piece of Lemon Lolly Cardstock sized
10 1/2  x  6"
I scored the  10 1/2" side at:
1,  5,  6  and  10".
I scored the  6" side at:
1  and  5".
To cut and put the box together you can watch my Video Tutorial Here.
Below is a picture of how your Cardstock should look when your finished cutting.


I attached several pieces of Lighter Than Air Designer Series Paper to the box.
(2)  3 3/4  x  3 3/4"  front and back
(4)  3/4  x  3 3/4"  sides
I attached the DSP to the box with Liquid Glue.


I a  3" circle from Lighter Than Air (yellow) Designer Series Paper using the Stylish Shapes dies.
I cut a 3 1/4" circle from Basic White Cardstock using the Deckled Circle dies.
I attached Them together with Liquid Glue.
I cut a piece of Crumb Cake Cardstock with the sand die from the Beach Days dies.
I cut a piece of Tahitian Tide Cardstock with the bottom of the Waves dies.
I cut each of them, the Tahitian Tide Cardstock about 1" longer, with the same Stylish Shape die circle.
I layered the two pieces on top of the 3" circle with Liquid Glue.


I stamped the Umbrella, Beach Chair and Sand Castle onto Basic White Cardstock with Tuxedo Black Ink.
I colored the images with Stampin' Blends.
Light & Dark Bubble Bath  -  Umbrella
Light & Dark Balmy Blue  -  Beach Chair
Light Crumb Cake  -  Sand Castle
I cut the images out using the Beach Day dies.

'
I attached the Umbrella with a Dimensional on the top and Liquid Glue to the Pole.
I attached the Beach Chair with Dimensionals and the Sand Castle with Liquid Glue.


I wound White Herringbone Ribbon around the middle of the box and tied a bow at the top.
I attached the decorated circles to the front of the box, over the ribbon, with Dimensionals.


I cut the 2 pieces of the Palm Tree top from Parakeet Party Cardstock using the Beach Day dies.
I attached them together with Liquid Glue.
I attached the bottom half of the leaves to the upper right side of the circles.
For the final touch I added Lemon Lolly Dots to the middle of the Palm Leaves and lower right of the box.


Supplies:
Beach Day stamp set & dies Bundle
Stylish Shapes dies
Deckled Circle dies
Lighter Than Air Designer Series Paper
Lemon Lolly Cardstock
Tahitian Tide Cardstock
Crumb Cake Cardstock
Parakeet Party Cardstock
Basic White Cardstock
Tuxedo Black Ink
Stampin' Blends
White Herringbone Ribbon
Liquid Glue
Dimensionals
Simply Scored
Take Your pick Tool

Thank you for visiting my Blog today.  I hope you enjoyed my Beach Day Treat Box.
See you next time!

Love and Hugs,
Cathryn