Wednesday, July 21, 2021

PENGUIN PLACE FOLD OVER TOP GIFT BOX DIY with FRIGHTFUL TAGS


Hi Friends!
My project today is a Gift Box with a Fold Over Top.  I used some of the NEW Products from the Mini Catalog that goes live on 8/03/21.  I used Penguin Place stamp set, Penguin Builder Punch, Frightful Tag dies, Penguin Playmates SALEABRATION Designer Series Paper and Glittered Organdy Ribbon.


I started with a piece of Fresh Freesia Cardstock sized  8 1/2  x  8".
I scored the  8 1/2" side at:
1 1/2,  4,  5 1/2  and  8".
I scored the  8 " side at:
1 1/2,  5  and  6".
To cut and put the box together you can watch my Video Tutorial Here.
I put the box together with Tear and Tape.


I attached 4 pieces of Penguin Playmates Designer Series Paper (SALEABRATION item, FREE with 50$ purchase) in sizes:
(2)  3 1/4  x  2 1/4"  for the front and back.
(1)  2 1/4  x  1 3/4"  for the front flap.
(1)  2 1/4  x  3/4"  for the top.
I attached the DSP to the box with Liquid Glue.


I cut 2 labels using the Frightful Labels dies.  One from the Penguin Playmates DSP and one from Fresh Freesia Cardstock.  I attached them together, DSP on top of Cardstock, with Liquid Glue.
I attached the label to the front flap of the box, with Liquid Glue on the top half only of the label.
I attached a 5/8" Adhesive Velcro Dot on the back of the flap and on the body of the box.


I stamped the Penguin image from Penguin Place stamp set onto Basic White Cardstock with Tuxedo Black Ink.
I stamped the beak onto the Penguin Image with Mango Melody Ink.
I stamped the feet with Mango Melody Ink also.
I cut the Penguin and Feet out using the Penguin Builder Punch.
I attached the feet behind the Penguin body with Liquid Glue.


I stamped the Hat and Scarf images, from Penguin Place stamp set, onto Basic White Cardstock with Fresh Freesia Ink.
I fussy cut the images and attached them to the Penguin with Liquid Glue.
I attached the Penguin to the label on the front of the box with Dimensionals.


I tied Glittered Organdy Ribbon around the top of the Flap and tied a bow at the top.
I added 3 Purple Posy dots, from Playing with Patterns Resin Dots, to the top left of the flap  and  a Fresh Freesia Jewel, from 2021-2023 In Color Jewels, to the Penguin's Hat.


Supplies:
Penguin Place stamp set
Penguin Builder Punch
Penguin Playmates SALEABRATION Designer Series Paper
Frightful Tag dies
Glittered Organdy Ribbon
Playing with Patterns Resin Dots
2021-2023 In Color Jewels
Fresh Freesia Cardstock
Basic White Cardstock
Tuxedo Black Ink
Mango Melody Ink
Fresh Freesia Ink
Dimensionals
Liquid Glue
Tear and Tape
Simply Scored Tool
Take Your Pick Tool
5/8" Adhesive Velcro Dots

Thank you for visiting my Blog today!  I hope you enjoyed my tutorial.
See you next time!

Love and Hugs,
Cathryn


Tuesday, July 20, 2021

SWEET LITTLE STOCKING PUPPY GIFT BOX with SEASONAL LABELS DIES


Hi Friends!
Today I used some NEW products from the Mini Catalog that goes live on August 3!  I made a  5 3/4  x  3 x  1 1/4" gift box with a ribbon tie at the top.  I used Sweet Little Stocking stamp set, Stocking dies, Seasonal Labels dies, Sweet Stockings Designer Series Paper, Scalloped contours dies and Glittered Organdy Ribbon.


I started with a piece of Real Red Cardstock sized  9  x  7".
I scored the 9" side at:
1/2,  3 1/2,  4 3/4  and  7 3/4".
I scored the 7" side at:
1 1/4,  5 1/2  and  6 1/2".
To cut and put the box together you can watch my Video Tutorial Here.
Below is a picture of how your Cardstock should look after scoring, cutting and putting the box together with Tear and Tape.


I attached Sweet Stockings Designer Series Paper in sizes:
(2)  4  x  2 3/4"  for the front and back
(2)  4  x  1"  for the sides
(2)  2 3/4  x  3/4"  for the flaps
and
(1)  2  x  3 1/4" for the mat inside the scalloped rectangle.
I attached the DSP to the box with Liquid Glue.
I cut a scalloped square from Evening Evergreen Cardstock using the middle size rectangle die from the Scalloped Contours dies.
I attached the 2 x 3 1/4" piece of DSP on top of the Scalloped Rectangle with Liquid Glue.


I stamped the puppy, long stocking and Santa hat images from Sweet Little Stockings stamp set onto Basic White Cardstock with Tuxedo Black Ink.
I colored the puppy using Light and Dark Soft Suede Stampin' Blends.
I colored the Stocking with a Dark Real Red Stampin' Blend.
I glued the puppy to the stocking first, then the hat onto the puppy's head.


I cut holly leaves from Evening Evergreen Cardstock and berries from Real Red Cardstock using the Stocking dies.
I glued them to the bottom of the white area of the stocking.
I attached the puppy and stocking on top of the Scalloped Rectangle piece with Dimensionals.
Then, I attached the entire piece to the front of the box with Dimensionals also.


I punched 2 holes in the top of the flaps with a 1/8" hole punch.  I ran Glittered Organdy Ribbon through the holes and tied a bow at the front.
I cut a label from Real Red Cardstock using the Seasonal Labels dies.
I stamped the sentiment from Sweet Little Stockings stamp set with Tuxedo Black Ink.
I cut the label down to  2 3/4", punched a hole in the end and tied it with White Baker's Twine around the bow.
For the final touch I added a small Opal Round to the pompom on the Santa hat.


Supplies:
Sweet Little Stockings stamp set
Stocking dies
Seasonal Labels dies
Sweet Stockings Designer Series Paper
Scalloped Contours dies
Glittered Organdy Ribbon
Light and Dark Soft Suede Stampin' Blends
Dark Real Red Stampin' Blends
Real Red Cardstock
Evening Evergreen Cardstock
Basic White Cardstock
Opal Rounds
White Bakers Twine
Liquid Glue
Tear and Tape
Simply Scored Tool
Take Your Pick Tool
1/8" hole punch

Thank you for visiting my Blog today.  I hope you enjoyed my tutorial today!
See you next time!

Love and Hugs,
Cathryn


Friday, July 16, 2021

HALLOWEEN GOODIES BOX TUTORIAL with CUTEST HALLOWEEN and FRIGHTFUL TAGS


Hi Friends!
My project today is a Halloween Goodie Box.  I made this box to fit some Cat licorice I put into a Cellophane Bag.  I used some NEW products from the Mini Catalog that are available on August 3rd.  I used Cutest Halloween stamp set, the Halloween Punch, Frightful Tags dies, Cute Halloween 6x6 Designer Series Paper and Cute StarsAdhesive Backed Sequins.


I started with a piece of Pumpkin Pie Cardstock sized  10  x  4 1/4".
I scored the 10" side at:
4, 5  and  9".
I scored the  4 1/4" side at:
1  and  3 1/4".
I turned the Cardstock back to the original 10" side at scored to the FIRST SCORELINE ONLY at:
2 1/2  and  6 1/2".
Turn to the OTHER SIDE OF THE 10" SIDE and score to the FIRST SCORELINE ONLY at:
3 1/2  and  7 1/2".
To cut and put the box together you can watch my Video Tutorial Here!
Below is a picture of what your Cardstock should look like after you score and cut the Cardstock.


I attached 3 pieces of Cute Halloween 6x6 Designer Series Paper to the box in sizes:
(2)  3 3/4  x  2"  for the front and back
(1)  3/4  x  2"  for the top flap
I attached the DSP to the box with Liquid Glue.


I cut a Scalloped Circle from Basic Black Cardstock using the Layering Circle dies.
I cut a spider web from Pumpkin Pie Cardstock and a label from Gorgeous Grape Cardstock using the Frightful Tag dies.
I stamped the sentiment from Cutest Halloween stamp set on the top of the Gorgeous Grape Tag with Tuxedo Black Ink.
I punched a Cat Images from the Cute Halloween DSP using the Halloween Punch.
I attached the cat onto the label, below the sentiment, with a Dimensional.


I attached the Spiderweb to the Black Scalloped Circle with a Dot of Liquid Glue in the center.
I attached the Gorgeous Grape Label on top of the Spider Web with 2 Dimensionals.
I placed the entire piece on the front of the box with Dimensionals too.
I punched 2 holes in the front flap and front wall of the box using a 1/8" hole punch.
I cut 12" piece of Glittered Organdy Ribbon and ran it from the inside of the box through the back of the flap and tied a bow at the front.
For the final touch I added 3 Cute Stars Adhesive Backed Sequins onto the label.


Supplies:
Cutest Halloween stamp set
Halloween Punch
Frightful Tag dies
Cute Halloween 6x6 Designer Series Paper
Pumpkin Pie Cardstock
Gorgeous Grape Cardstock
Basic White Cardstock
Basic Black Cardstock
Cute Stars Adhesive Backed Sequins
Liquid Glue
Tear and Tape
Simply Scored Tool
Take Your Pick Tool
1/8" hole punch

Thank you for visiting my Blog today.  I hope you enjoyed my Halloween box.
See you next time!

Love and Hugs,
Cathryn


Wednesday, July 14, 2021

SWEETS & TREATS BABY BUNDT CAKE BAKERY BOX TUTORIAL with STOCKING DIES - Stampin' Up!


Hi Friends!
I have a Sneak Peek of some of the new products from the NEW MINI CATALOG today!  My project is a Bakery Box for a Baby Bundt Cake.  I used Sweets and Treats stamp set, the Stockings dies, Blushing Bride Frayed Grosgrain Ribbon and Whimsy and Wonder Specialty Designer Series Paper.


I started with a piece of Blushing Bride Cardstock sized
10 1/2  x  7 1/4".
I scored the 10 1/2" side at:
1,  4 1/4,  5 3/4  and  9".
I scored the  7 1/4"  side at:
1/2,  2,  5 1/4  and  6 3/4".
To cut and put the box together you can watch my Video Tutorial Here.
Below is a picture of what your Cardstock should look like after scoring, cutting and rounding some of the corners with the Detail Trio Punch.
I put the box together with Tear and Tape.


Before I put the box together I punched a Circle in the top part of the box with a  2 1/4"  circle punch.  You could also use the Layering Circle dies.
I attached a  3 x 3" piece of Whimsy and Wonder Specialty Designer Series Paper over the hole I punched with Liquid Glue.  I punched a  2 1/4" hole in the DSP using the hole in the Cardstock as a guide.
I attached Whimsy and Wonder Specialty Designer Series Paper in sizes:
(1)  3 x 3" (for the top of the box lid that has the hole in it.
(4)  3  x  1 1/4"  for the sides
(1)  3  x  3/4" for the fold over part of the front flap.
I attached the DSP with Liquid Glue.


I attached a  2 3/4  x  2 3/4" piece of Window Sheet inside the top flap with Glue Dots.
I attached a 3/8" Adhesive Velcro Dot inside the front flap and on the front of the box for a closure.
I tied a bow with Blushing Bride Frayed Grosgrain Ribbon and attached it to the front flap with 2 Glue Dots.


I stamped the cake image from Sweets and Treat stamp set onto Basic White Cardstock and a Mint Macaron piece of the DSP with Tuxedo Black Ink.
I colored the image on the Basic White Cardstock first.
I colored the leaves with a Light Mossy Meadow Stampin' Blend.  I colored the Berries used a Blender Pen and Blushing Bride Ink.
I fussy cut the image leaving the bottom of the cake behind.
I fussy cut the Mint Macaron Image also leaving off the top leaves and Berries.
I attached the Basic White Cardstock image over the Mint Macaron image with Liquid Glue.
I attached the entire cake to the bottom left side of the Window with Dimensionals.


I stamped the sentiment onto Mint Macaron Cardstock with Tuxedo Black Ink.
I cut the sentiment out with a tag die from the Stockings dies.
I attached the tag to the top right side of the box with Liquid Glue.
For the final touches I added Wink of Stella Glitter to the white part of the cake and added a 2021-2023 Soft Succulent Jewel to the tag.


Supplies:
Sweet and Treats stamp set
Stockings dies
Whimsy and Wonder Specialty Designer Series Paper
Blushing Bride Frayed Grosgrain Ribbon
Detail Trio Punch
Blushing Bride Cardstock
Mint Macaron Cardstock
Basic White Cardstock
Window Sheets
Tuxedo Black Ink
Blender Pen
Blushing Bride Ink
Light Mossy Meadow Stampin' Blend
2021-2023 In Color Jewels
Simply Scored Tool
Take Your Pick Tool
Liquid Glue
Tear and Tape
Glue Dots
2 1/4" Circle Punch

I hope you enjoyed my Tutorial today.  Thank you for visiting my Blog.
See you next time!

Love and Hugs,
Cathryn


Friday, July 9, 2021

COUNT ON ME POST IT NOTE HOLDER with PANSY PETALS - Stampin' UP!


Hi Friends!
My project today is a Post it Note Holder that can also hold tea bags or some treats.  I used Count on Me stamp set, Pansy Petals Designer Series Paper, Tasteful Label dies and Layering Circles dies.


I started with a piece of Fresh Freesia Cardstock sized
8 1/2  x  5 1/8".
I scored the  8 1/2" side at:
2 1/2,  3,  6 1/8  and  6 5/8".
I scored the  5 1/8" side at:
1/2,  1,  4 1/8  and  4 5/8".
To cut and put the box together you can watch my Video Tutorial Here.
Below is a picture of what your cardstock should look like after scoring, cutting and rounding some of the corners using the Detail Trio Punch.


I attached 2 pieces of Pansy Petals Designer Series Paper to the box in sizes:
(1)  2 1/4  x  2 7/8"  for the front flap.
(1)  2 7/8  x  1 5/8"  for the inside of the box.
I attached them to the box with Liquid Glue.


I attached a 3/8" Adhesive Velcro Dot inside the top flap and onto the body of the box.
Next I tied Fresh Freesia Open Weave Ribbon around the box and tied a bow at the right side.
I stamped the Koala image from Count on Me stamp set onto Basic White Cardstock with Tuxedo Black Ink.  I colored the image with Stampin' Blends:
Light Petal Pink for the inner ears.
Light and Dark Smokey Slate for the rest of the Koalas.


I cut the image out using the Layering Circle dies.
I cut a matching scalloped circle from Fresh Freesia Cardstock and attached the image to it with Liquid Glue.
I attached the Scalloped Circle to a larger So Saffron Circle with Dimensionals.
I attached the So Saffron Circle to a Label I cut from Fresh Freesia Cardstock, using the Tasteful Label dies, with Liquid Glue.
I attached the entire embellishment on top of the box with Dimensionals on the top and bottom of the back of the tag.


I cut a tag from So Saffron Cardstock using the Tasteful Label dies.  I stamped the sentiment from Count on Me stamp set onto the label with Tuxedo Black Ink.
I cut the top off the label, punched a small hole in it and ran White Baker's Twine through the hole.
I tied the label onto the bow on the box.
For the final touch I added a Loose Flower Flourish to one of the Koala's ears with Liquid Glue.


Supplies:
Count on Me stamp set
Tasteful Label dies
Layering Circle dies
Pansy Petals Designer Series Paper
Fresh Freesia Cardstock
Basic White Cardstock
So Saffron Cardstock
Fresh Freesia Open Weave Ribbon
Loose Flower Flourishes
Dimensionals
Liquid Glue
Simply Scored
Take Your Pick Tool
3/8" Adhesive Velcro Dots

Thank you for visiting my Blog today.  I hope you enjoyed my tutorial.
See you next time!

Love and Hugs,
Cathryn


Thursday, July 8, 2021

ARTISTICALLY INKED GIFT BOX TUTORIAL with SCALLOPED CONTOURS - Stampin' Up!


Hi Friends!
Today I made a rectangle Gift Box using Artistically Inked stamp set, Artistict dies, Scalloped Contours dies and Expressions in Ink Designer Series Paper.  The box measures  4  x  2 3/4  x  1 1/4".  This is the perfect size box for small gifts, treats and/or a Gift Card.


I started with a pieces of Pear Pizzazz Cardstock sized  8 1/2  x  7".
I scored the  8 1/2"  side at:
1/2,  3 1/4,  4 1/2  and  7 1/4".
I scored the  7"  side at:
1 1/4,  5 1/4  and  6 1/2".
Below is a picture of what your Cardstock should look like after scoring, folding, cutting and rounding the corners of the flap with the Detail Trio Punch.
You can also watch my Video Tutorial where I explain each step in cutting and putting the box together.
I put the box together using Tear and Tape.


I attached 4 pieces of Expressions in Ink Designer Series Paper in sizes:
(1)  3 3/4  x  2 1/2"  for the top
(2)  3 3/4  x  1"  for the long sides
(2)  2 1/2  x  1"  for the short sides
I attached the DSP to the box with Liquid Glue.


I cut a Scalloped Rectangle from Basic White Cardstock using the Scalloped Contours dies.
I stamped the sentiment, from Artistically Inked stamp set, onto the top-right corner with Tuxedo Black Ink.
I attached the Rectangle to the center of the top of the box with Liquid Glue.
I stamped the small flower image, from the same stamp set, with Pale Papaya Ink onto Basic White Cardstock.  I cut it out with the Artistic dies.
I cut the leaves from Pear Pizzazz Cardstock using the Artistic dies also.


I cut apart the leaves and placed them on the rectangle how I thought I would like them.  I loosely put the flower on top and adjusted the leaves to exactly where I wanted them.  Then I put Dimensionals on the back of the flower and pressed it down on top of the leaves to secure them both.  If some of the leaves do not feel secure you can add a little Liquid Glue behind them.
For the final touch I added 3 Gold Metallic Pearls to the middle of the flower.


Supplies:
Artistically Inked stamp set
Artistic dies
Scalloped Contours dies
Expressions in Ink Designer Series Paper
Pear Pizzazz Cardstock
Basic White Cardstock
Pale Papaya Ink
Tuxedo Black Ink
Metallic Pearls
Simply Scored Scoring Tool
Take Your Pick Tool
Tear and Tape
Liquid Glue
Dimensionals

Thank you so much for visiting my Blog today.  I hope you enjoyed my project today.
See you next time!

Love and Hugs,
Cathryn


Tuesday, July 6, 2021

BUBBLE BATH GIFT BAG with TAILOR MADE TAGS and OMBRE GIFT BAGS - Stampin' Up!


Hi Friends!
For my project today I made a cute bag for some Powdered Bubble Bath.  I used the 2021-2023 In Color Ombre Bags, Badger Besties stamp set, the Old World Paper 3D Embossing Folder and the Tailored Tags dies.  This project can be easily changed up to a Masculine or Child's theme.


I started by embossing a Polished Pink Ombre Gift Bag with the Old World Paper 3D Embossing Folder.
I cut one of the largest tags from Tailor Made Tags dies from Basic White Cardstock.
I cut another of the same tag from Polished Pink DSP from the 2021-2023 In Color Designer Series Paper.
I cut the Polished Pink tag down to 2 1/2" in length.


I stamped the word HELLO, from Biggest Wish stamp set onto the bottom of the Basic White Tag with Daffodil Delight Ink.
I stamped the word friend, from the same stamp set, over the HELLO with Polished Pink Ink.


I attached the Polished Pink piece of the tag to the top of the Basic White Tag with Liquid Glue.
I attached a piece of Daffodil Delight Cardstock, sized  3/8  x  2", above the stamped images with Liquid Glue.
I put some Bumblebee Gingham Ribbon through the top of the tag and tied it with White Crinkled Seam Binding Ribbon Bow.
I attached the tag to the top of the Ombre Gift Bag with a clip.
For the final touch I added 3 Polished Pink Jewels to the left side of the Daffodil Delight strip of Cardstock.


Supplies:
Badger Besties stamp set
Biggest Wish stamp set
Tailor Made Tags dies
2021-2023 In Color Designer Series Paper
Basic White Cardstock
Daffodil Delight Cardstock
Daffodil Delight Ink
Polished Pink Ink
Bumblebee Gingham Ribbon
Crinkled Seam Binding Ribbon
2021-2023 In Color Jewels
Simply Scored
Take Your Pick Tool
Liquid Glue
Dimensionals

I hope you enjoyed my Tutorial Today.  Thank you for visiting my Blog.
See you next time!

Love and Hugs,
Cathryn


Friday, July 2, 2021

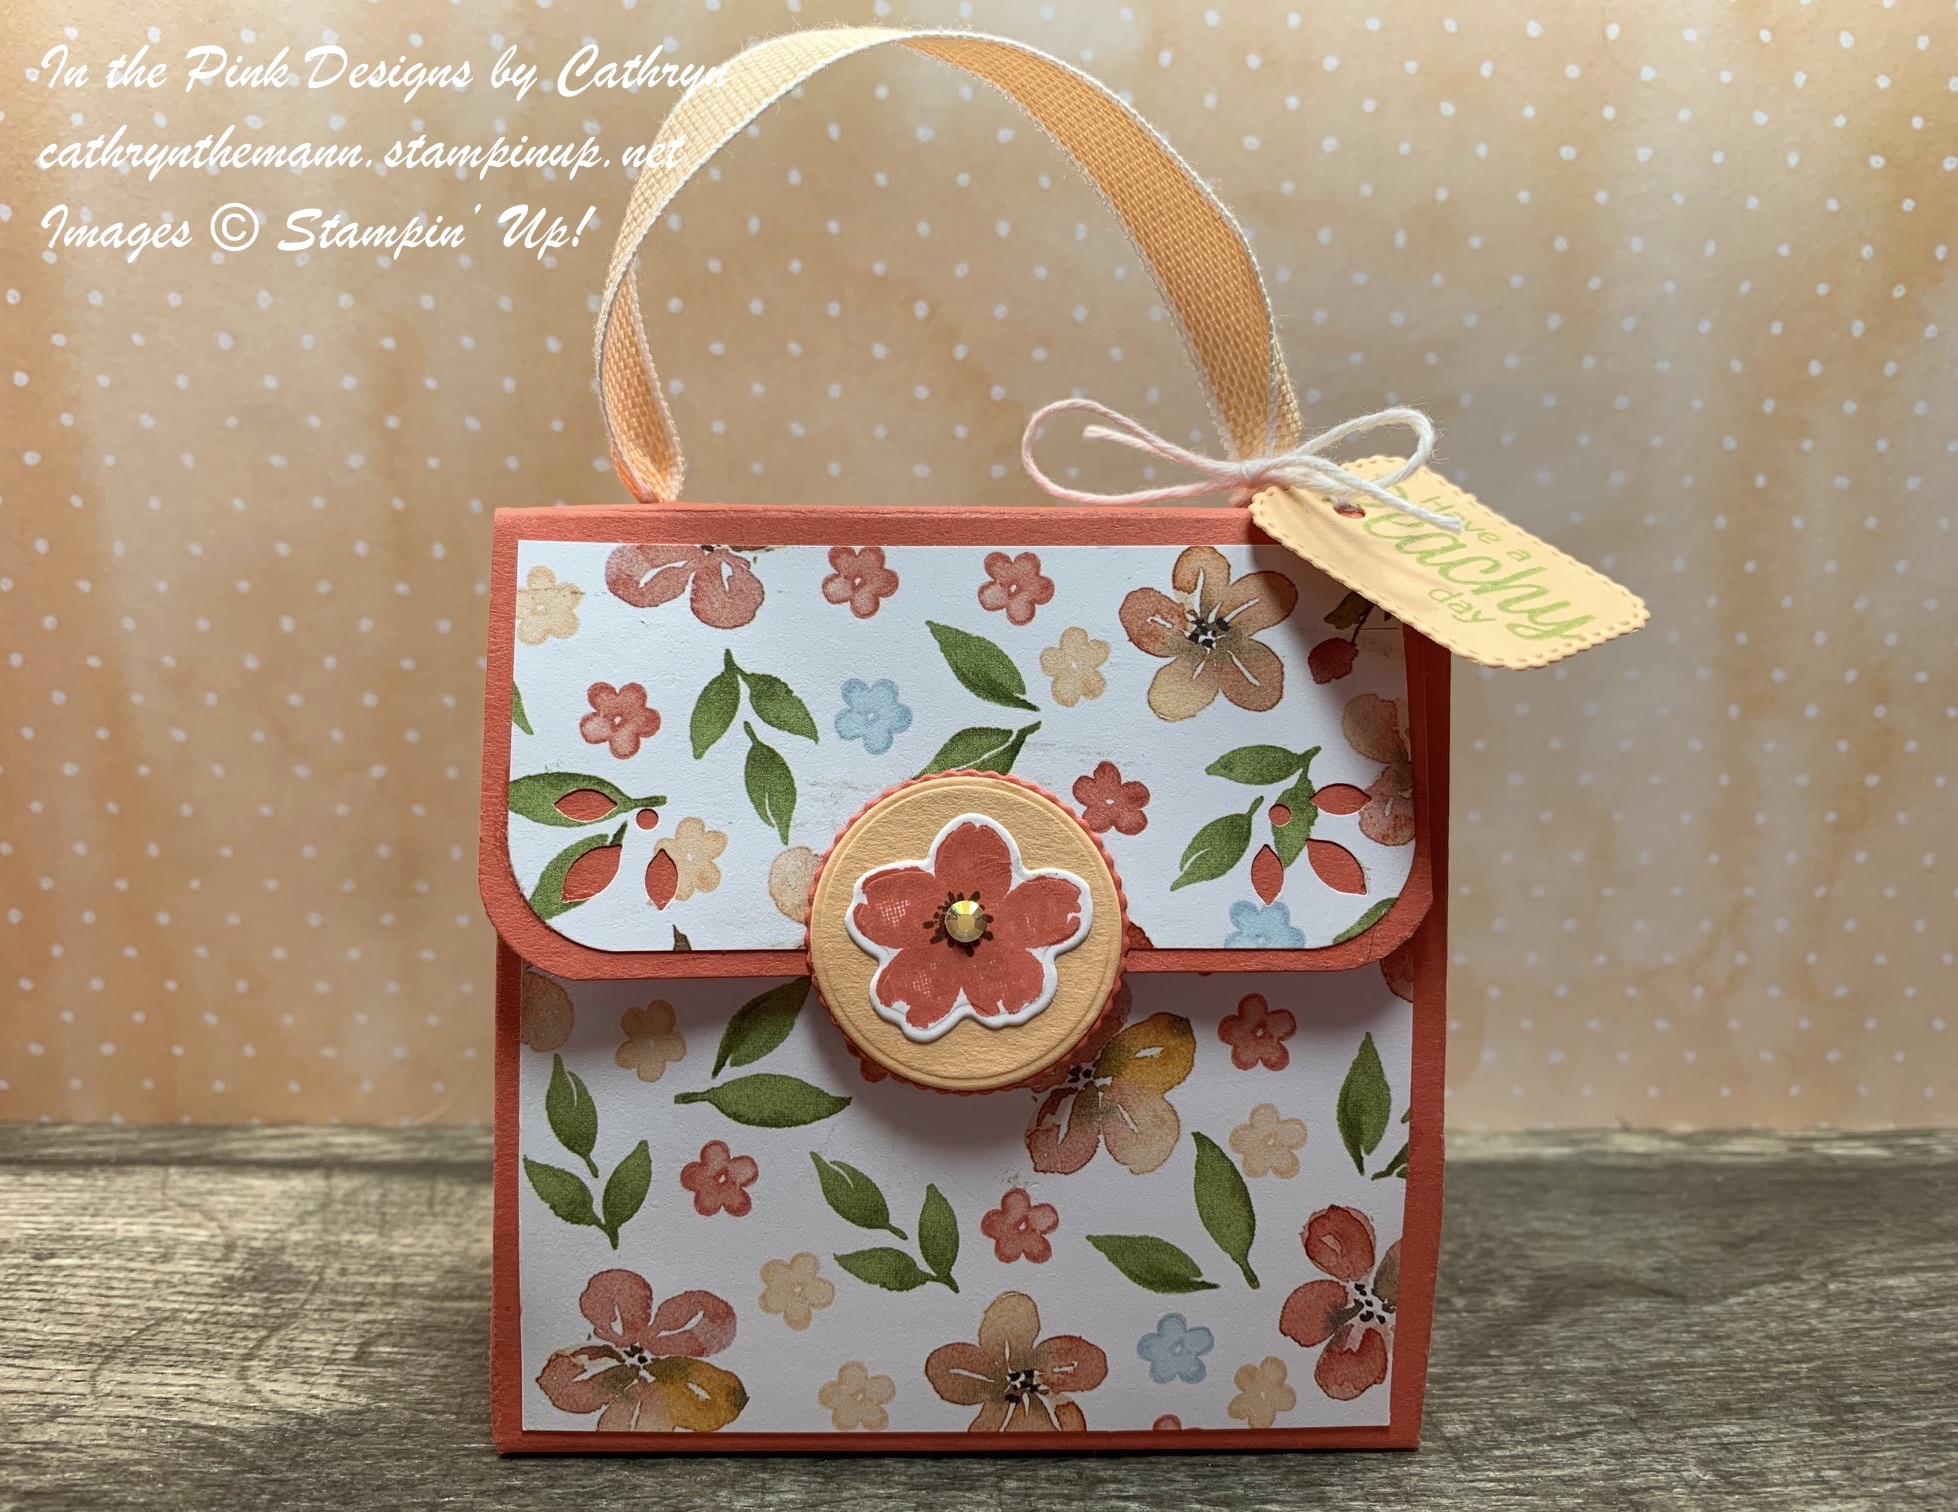
PAPER PURSE TUTORIAL with SWEET AS A PEACH - Stampin' Up!


Hi Friends!
Today I made a paper purse for my project.  I used Sweet as a Peach stamp set, the Peach dies, You're a Peach Designer Series Paper, the Detail Trio Punch and the Layering Circle dies.  The purse measures  3 1/2  x  3 1/2  x  1 1/2".  I put a pretty lipstick inside but it would also be perfect for a gift card or some treats!


I started with a piece of Calypso Coral Cardstock sized
10 1/2  x  7 1/4".
I scored the  10 1/2" side at:
1/2,  4,  5 1/2  and  9".
I scored the 7 1/4" side at:
1 1/2,  5  and  5 1/2".
Below is a picture of how your Cardstock should look after you score, cut and round the corners of the flap with the Detail Trio Punch.
To cut and put the box together you can also watch my Video Tutorial Here.


I attached 3 pieces of You're a Peach Designer Series Paper to the box:
(2)  3 1/4  x  3 1/4"
(1)  3 1/4  x  1 1/2"
I rounded the bottom corners of the flap piece with the Detail Trio Punch and them used the "half flower" side of the same punch on the same corners again.
I attached them to the front, back and front flap with Liquid Glue.


I punched a hole in each side of the top of the box, about 1" from each side, with a 1/8" hole punch.
I cut a piece of Pale Papaya Woven Ribbon about 8" and tied a knot in one end.  I poked it through one of the holes in the top from the inside to the outside.  I pulled the ribbon through the other hole from the outside to the inside and tied another knot.  This made the handle.


I attached 5/8" Velcro dots to the inside of the flap and front of the box for the closure.  I stamped the flower image from Sweet as a Peach stamp set with Calypso Coral Ink onto Basic White Cardstock.  I stamped the middle of the flower with Early Espresso Ink.  I cut the flower out using the Peach dies.


I cut a smooth circle from Pale Papaya Cardstock and a Scalloped Circle from Calypso Coral Cardstock using the Layering Circle dies.  I attached them together and the flower onto using Liquid Glue.
I attached the top half of the Flower Embellishment onto the front flap with Liquid Glue.


I cut a label from Pale Papaya Cardstock using the Messages die.
I stamped the sentiment, from Sweet as a Peach stamp set, onto the label with Pear Pizzazz Ink.
I punched a hole in the side of the label and tied it to the side of the bag handle with White Baker's Twine.
For the final touch I added a Pale Papaya Jewel from the 2021-2023 In Color Jewels, to the middle of the flower.


Supplies:
Sweet as a Peach stamp set
Peach dies
Messages die
Layering Circle dies
You're a Peach Designer Series Paper
Detail Trio Punch
Calypso Coral Cardstock
Pale Papaya Cardstock
Basic White Cardstock
Calypso Coral Ink
Pear Pizzazz Ink
Early Espresso Ink
Pale Papaya Woven Ribbon
Liquid Glue
Tear and Tape
White Baker's Twine
2021-2023 In Color Jewels

I hope you enjoyed my Purse Tutorial today.  Thank you for visiting my Blog.
See you next time!

Love and Hugs,
Cathryn