Friday, April 17, 2020

Thank You Card with Best Dressed from Stampin' Up

Hello Friends!
Today for my project I used the Delightful Tag Topper Punch on a Thank You card. The beautiful Blackberry Bliss accented paper is from the Best Dressed 6 x 6 Designer Series pack.


The measurements of the paper are:
Best Dressed DSP - 4 x 5 1/4"
Blackberry Bliss Behind the Tag - 4 x 2 1/4"
Whisper White Tag - 2 x 4" 


I cut the Whisper White with the Delightful Tag Topper Punch.  Then I used the Layered with Kindness stamp set and the Old Olive Stampin' Pad for the leaves and Sentiment.  I rounded the corners and attached both to the card with Dimentionals and as a final touch I tied Polka Dot Tulle Ribbon on the top of the tag.  You can see my tutorial here


Supplies:
Whisper White Cardstock
Blackberry Bliss Cardstock
Best Dressed 6 x 6 Designer Series Paper
Delightful Tag Topper Punch
Layered with Kindness stamp set
Polka Dot Tulle Ribbon
Old Olive Stampin' Pad
Memento Tuxedo Black stamp pad
Dimensionals
Snail Adhesive
Basic Rhinestones

Wednesday, April 15, 2020

Pressed Petals Square Box with Lid

Hi Friends,
Today's project is a Square 2 piece box made with Pressed Petals Designer Series Paper from Stampin' Up. 


I started with the bottom.  I used a 7 x 7" piece of Very Vanilla.
I scored on all sides at 1 3/4".
The lid is a piece of 5 1/2 x 5 1/2" Very Vanilla.
I scored on all sides at 1".
I then burnished and cut the 2 pieces.  You can see how on my video tutorial.


I used Pressed Petals Designer Series Paper on the box.
1 piece for the top of the lid sized  3 3/8 x 3 3/8"
4 pieces for the sides of the lid sized 3/4 x 3 3/4"


On the top of the box I used:
1 1/2" Circle punch in Mossy Meadow
1 3/8" Scallop Punch in Very Vanilla
1 1/8" Circle Punch of Pressed Petals Designer Series Paper
I used the Thoughtful Blooms Punch
I added Rhinestone Basic Jewels to the middle of the flowers.

I then Tied Gold Metallic Edged Ribbon around the entire box and added some Wink of Stella.

You Can Shop Stampin' Up with ME HERE.

Supply List:
Very Vanilla Cardstock
Mossy Meadow Cardstock
Pressed Petals Designer Series Paper
1 1/2" Circle Punch
1 3/8" Scallop Punch
1 1/8" Circle Punch
Thoughtful Blooms Punch
Simply Scored Board
Dimensionals
Gold Metallic Edged Ribbon
Rhinestone Basic Jewels

I hope you enjoyed my project for today.  I will be doing projects on Mondays, Wednesdays and Fridays.  See you soon!

Monday, April 13, 2020

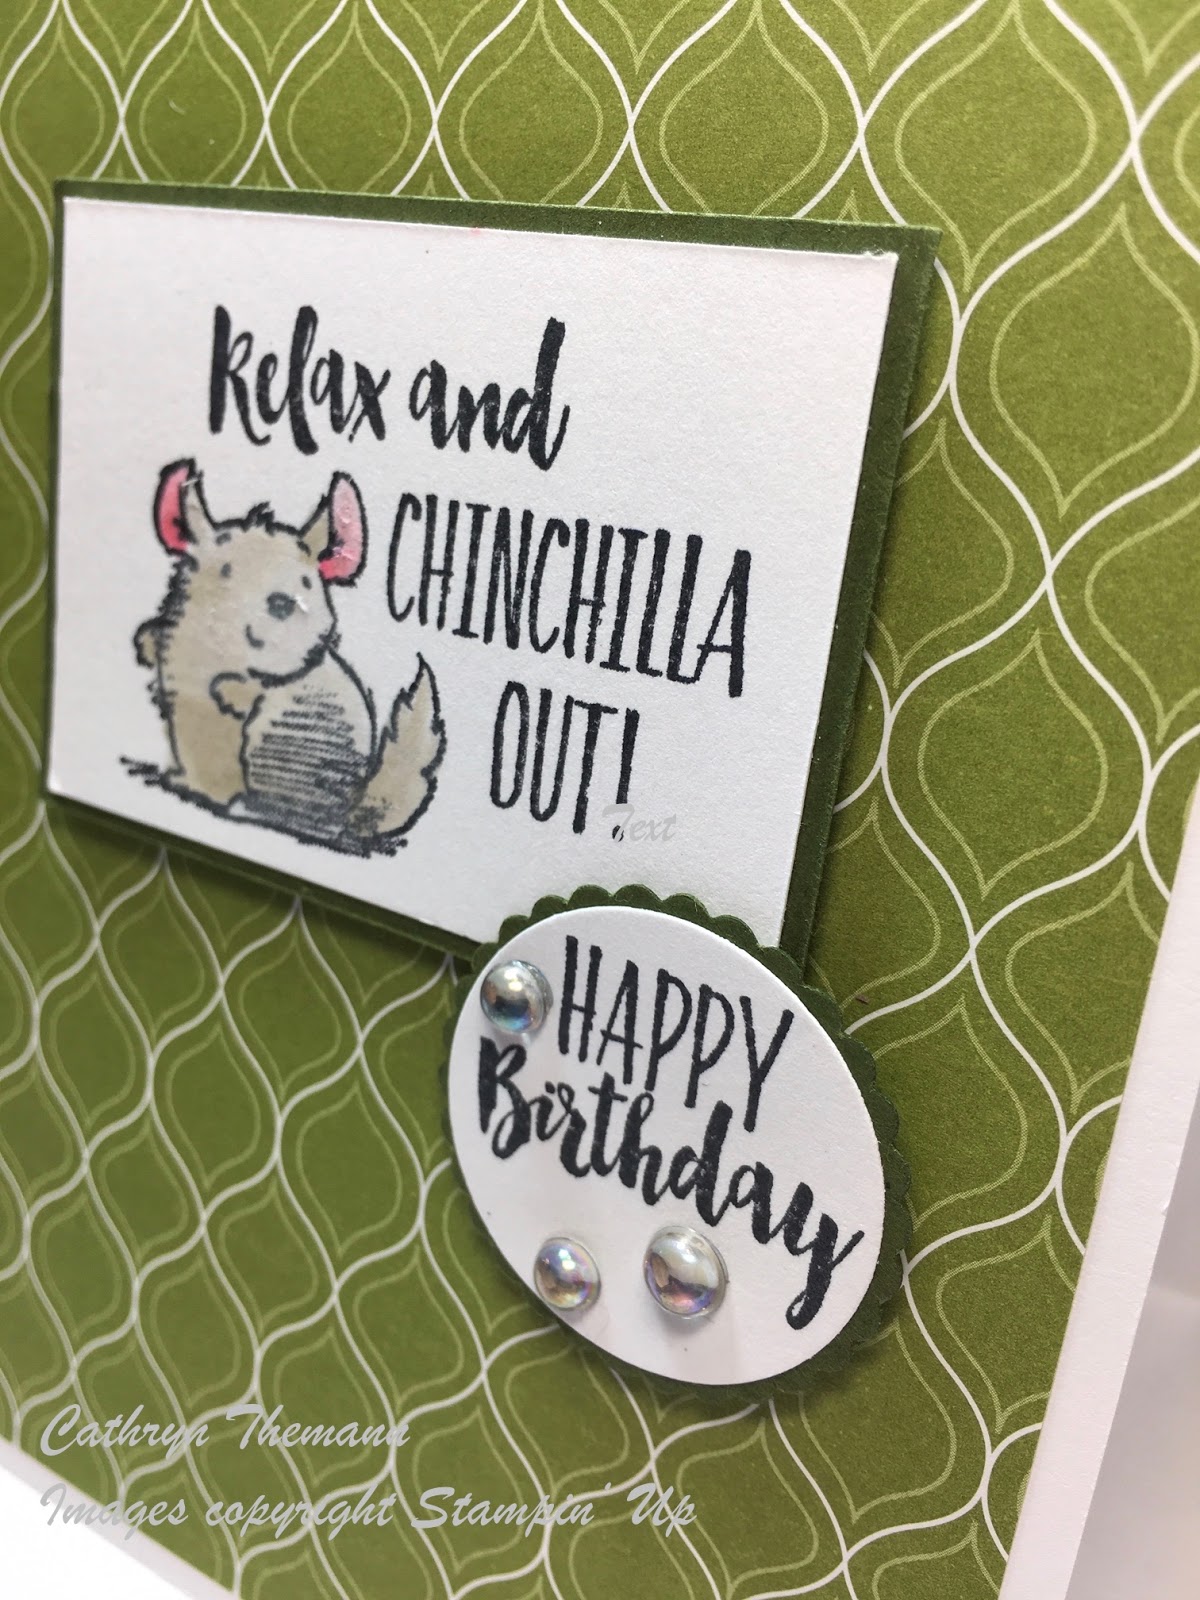
Chinchilla Birthday Card with Stampin' Up

Hi Friends,
I hope you had a wonderful weekend and Holiday.
Today's project is a Birthday Card using the adorable Chinchilla Image from the Stampin' Up stamp set Witty-Cisms.

 If you leave a comment here or on my YouTube video you can win a set of  Rococo Rose Stampin Blends.  I will pick a winner at random from all comments.


I Stamped the image on a 2 1/2 x 1 3/4" piece of Whisper White Cardstock and colored it with a Blender Pen.
I mounted the image on a 2 3/4 x 2" piece of Mossy Meadow.


I cut out a circle in Whisper White with the 1 1/2" Circle Punch and stamped it with the "Happy Birthday" (also from Witty-Cisms stamp set).  Then I backed it with Mossy Meadow punched with the 1 3/8"  scalloped punch.
I put Dimensionals on the back of the image and "Happy Birthday" circle. 
Finally I put a few Epoxy Droplets on the circle.


Supplies:
Witty-Cisms Stamp Set
Brights Designer Series Paper
Whisper White Cardstock
Mossy Meadow Cardstock
Memento Tuxedo Black Ink
Crumb Cake Stampin Pad
Melon Mambo Stampin Pad
Blender Pen
Dimensionals
Snail Adhesive
Epoxy Droplets

I hope you enjoyed todays card.  I hope everyone is safe and well.
Till next time!

Friday, April 10, 2020

Peek A Boo Bunny Box

Hello Friends,
I hope everyone is well and doing ok during this quarantine.  Crafting makes me happy and I have a lot of time for it right now!

Today I have made a Box to hold a Hershey Chocolate Bunny.  I got a pack of 6 from Walmart for about $3.

You Can see my YouTube Video Tutorial here!


I used a piece of Brights Designer Series Paper that measured 5 1/2 x 5 1/2".

I Scored one side at:
1/2,  1,  3,  and 3 1/2"

I turned the paper to the side and Scored at:
1/2,   4 1/2  and  5"


To cut the box please see my tutorial here.

I made the Window with 1 3/8" Scallop Punch and 1 3/4" Punch.


 I tied ribbons around the boxes using the Tea Room Ribbon Combo Pack and Daffodil Delight Ribbon.


You Can Shop With Me HERE.

 Supplies:
Brights Designer Series Paper
Delightful Day Stamp Set
Melon Mambo Cardstock
Bermuda Bay Cardstock
Simply Scored Board
1 3/8" Scallop Circle Punch
1 3/4" Circle Punch
Tea Room Combo Ribbon Pack
Daffodil Delight Ribbon
Tombow Glue

I hope you enjoyed my post today!  Happy Easter and Passover to all who celebrate!
Stay safe and well.

Wednesday, April 8, 2020

Graduation Gift Card Holder - Plus a GIVEAWAY!


Hello Friends!
Today I have made a Graduation Gift Card Holder.
I used the Stampin' Up Witty-Cisms stamp set and some Country Club Designer Series Paper. 


First I started with a piece of  7 1/4 x 4"  Basic Grey Cardstock.
I scored the long side at  2 1/4" and  5 1/2".


The Country Club Designer Series Paper is cut at:
(2)  2  x  3 3/4"
(1)  3  x  3 3/4"
(1)  1 1/2   x  3 3/4"

 To make the Belly Band I used a piece of Smokey Slate Cardstock cut at  8 1/2 x 1 1/4.
I stamped the image on a  1 1/2"  Circle of Whisper White Cardstock  and  added an additional  1 3/4"    Circle of Basic Grey Cardstock.
I added Metallic Thread on the back of the circles and adhered the embellishment to the Belly Band with Dimentionals.


 Supplies:
Whitty-Cisms Stamp Set
Basic Grey, Whisper White and Smokey Slate  Cardstock
Country Club Designer Series Paper
Tombo Glue
Snail
Silver Metallic Thread
Dimensionals
Memento Tuxedo Black Ink Pad
Blender Pen

Now for a GIVEAWAY!!!  
The First 3 people to shop Stamping' Up with ME will get a goody in the mail directly from Me!

1st Order  -  Sending You Thoughts Stamp Set
2nd Order  -  Rococo Rose Blender Pens Light and Dark
3rd Order  -  6 x 6 pack (28 pieces) of Flowering Foils Designer Series Paper
Thank you for stopping by today.  I hope you enjoyed my Gift Card.  Be safe and well.

Monday, April 6, 2020

Birthday Bonanza Box Tutorial

Hello Friends!
Today I made a 3 x 3 x1 1/2" Box using Birthday Bonanza Designer Series Paper.

You Can See My UTube Tutorial HERE.


I used a piece of Coastal Cabana Cardstock that was  9 1/2 x 6 1/2"

Score the long side at  3,  4 1/2,  7 1/2  and 9"

Score the short side at  1 1/2,  4 1/2  and 6"


The DSP in Birthday Bonanza, I cut
2 each  -  2 3/4  x  2 3/4"
4 each  -  2 3/4  x  1 1/4"


For the decoration I used:
 1 3/8" Scallop Punch
1 1/4" Circle Punch
1" Circle Punch
1/2" circle punch for finger hole


You Can Shop With Me HERE

Other Supplies:
Detailed Trio Punch for corners
Snail Adhesive
Tear and Tape Adhesive
Dimentionals
Silver Metallic Edged Ribbon

Thank you for visiting today.  Stay safe and well!

Friday, April 3, 2020

Baby Card using Witty-Cisms from Stampin' Up


Hello Friends!
Todays project is a Baby Card made with Witty-Cisms and Thoughtful Blooms from Stampin' Up.


I used a piece of Best Dressed DSP 4 x 5 1/4" for the background
2 Pieces Old Olive 2 x 2 1/2"
1 Whisper White for image 1 3/4 x 2 1/4
Flip side of DSP Best Dressed 1 3/4 x 2 1/4 


Supplies Used:
Witty-Cisms Stamp Set
Thoughtful Blooms Stamp set and Punch
Best Dressed Designer Series Paper 6 x 6
Daffodil Delight Cardstock
Whisper White Cardstock
Old Olive Cardstock
Daffodil Delight Stampin Pad
Melon Mambo Stampin Pad
Blender Pen
Wink of Stella
Basic Rhinestones
Snail Adhesive


Thank you for stopping by, I hope you enjoyed my project today!
Be Safe and Well.

Tuesday, March 31, 2020

Delightful Tag Topper Pinch Box


Hello Friends!
Today I have a box I made with the Stampin' Up Delightful Tag Topper Punch and some Designer Series Paper (DSP) from the Peaceful Poppies Collection.  I made this one with a magnetic closure.  If you would rather not use magnets you can also close it with a ribbon instead.

All of the details of how to make this box are on my Video.


I made a bookmark using the Poppy paper also.  I cut a piece of paper with a 7/8" punch and added it to a Bookmark Jewelry Tray.


Supplies:
Pool Party Cardstock  -  6 3/4" x 6 1/2"
Peaceful Poppies Designer Series Paper  -  (2) 1 3/4" x 3 1/4", (1) 1 3/4" x 3"
Delightful Tag Topper Punch
 Similar Small Magnetic Discs
Snail Adhesive
Tea Room Combo Ribbon Pack
Epoxy Droplets


Thank you for stopping by today!  I hope you stay well and have a peaceful day. 

Sunday, March 29, 2020

Happy Birthday Card with Layered with Kindness stamp set

Hello Friends!
It is wonderful to be back on my blog again!  It has been way too long.  Time passes so quickly.  My oldest daughter is getting her Graduate Degree in Speech Pathology and my "little" twins are Juniors in High School!
We all are going through a rough time right now with quarantining.  I hope you enjoy my card and a video I made.  My dogs bark in the beginning but it only lasts about 15 seconds.

I have recently become a Stampin' Up Independent Demonstrator and I hope to show you some of the products that I have enjoyed working with.  This is my first video EVER!!! It's very exciting for me!


I started with a piece of Designer Series Paper measuring 5 1/2 x 2 3/4".  I attached the DSP to the left side of my card base.
Then I stamped my flower images from the Delightful Day stamp set on a piece of cardstock 2 3/4 x 2".   I mounted that on a mat measuring  3 x 2 1/4".

 I stamped my label from the Layered with Kindness stamp set and punched it out with the Label Me Lovely Punch.


I attached the flower panel flat to the card and then popped the Happy Birthday label up on dimentionals for a little height.  For a final touch I added some rhinestones.


My Supplies:
Label Me Lovely Punch
Layered with Kindness Stamp Set
Delightful Day Stamp Set
Best Dressed Designer Series Paper
Whisper White Cardstock
Pear Pizzaz Cardstock
Pear Pizzaz Classic Stampin Pad
Melon Mambo Classic Stampin Pad
Rhinestone Basic Jewels
Memento Ink Pad
Stampin Dimensionals

Thank you for visiting my blog today.  I appreciate all my followers and I LOVE comments!

Wishing you and your loved ones Health and Safety!!!

Thursday, June 11, 2015

Thank You for Teacher

Good Morning!
Today I have a card I made for a teacher Thank you.
I used the new Enclosed: Apple die from Papertrey Ink.  I know a lot of the country is out of class already but School is not over for my kids for two more weeks.


My Supplies:
Enclosed: Apple die  -  Papertrey Ink
Pure Poppy and White Card Stock  -  Papertrey Ink
Patterned Paper  -  Crate Paper
Trim  -  Recollections

Thank you for stopping by.  Enjoy your day!