Monday, September 21, 2020

SCRAP BUSTER HALLOWEEN PENCIL HOLDERS - Stampin' Up! and Dollar Tree

Hi Friends,
My project today is perfect for using all of your small scraps of Paper.  I made Halloween Pencil Holders using some pencil toppers I found at the Dollar Tree.  I used Little Treats stamp set, Little Treat Box dies, Festive Corners stamp set and Snow Time dies.  I used mostly scraps from the Brights DSP and scraps of matching Cardstock.


I started with a scrap of Brights Designer Series Paper.  I cut it with the smaller label from Halloween Magic dies.
I used a small circle punch (big enough to fit your pencil through, mine was 3/8") to cut a hole at the top and the bottom of the label.  You could also make a slit at the top and bottom with a craft knife.  I slid the pencil in the top and out the bottom hole.  I secured the pencil at the back with a glue dot and added one of the pencil toppers on top.


I cut the scallop circle out of various scraps with the die from Little Treat Box dies.  The spider I cut from Basic Black Cardstock using the same die set.
I used a 1 3/8" circle punch (you can use any similar size circle) for the circle to stamp the sentiment on from Festive Corners stamp set.
I attached the circle to the scallop circle with a Dimensional, then to the pencil holder with liquid glue.
I added the Spider to the bottom of the sentiment piece with liquid glue also.  I added some Wink of Stella to the main part of the spider.


I cut a piece of Mango Melody Cardstock with a label die from Snow Time die set.  I stamped the word SPOOKY from Festive Corners stamp set on the label.  I punched a small hole in the top and tied it to the top of the pencil under the Pencil Topper with twine from the Playful Pets Ribbon Combo Pack.


Supplies:
3/8" Hole Punch (or similar)
1 3/8" Circle Punch (or similar)
Dollar Tree Pencil Toppers

Thank you so much for stopping by.
See you next time!

Friday, September 18, 2020

Have a Hoot Owl Halloween Box - Stampin' Up!

Hi Friends!
My project today is a long box measuring  4 3/4  x  2 3/4  x  3/4".  I used Have a Hoot stamp set, Peek a Hoot dies, Stitched Nested Label dies and Layering Circle dies.  I made this box to fit one of the cute Pumpkin Brownies from Little Debbie snacks.  It will also fit Pop Rocks candy, fun size candy bars and many other things.


I started with a piece of Basic Black Cardstock  7 1/2  x  6 3/4".
I scored the 7 1/2" side at:
3/4,  3 1/2,  4 1/4  and  7"
I scored the 6 3/4" side at:
3/4,  5 1/2  and 6 1/4"

To cut and put the box together please watch my video Tutorial here.


I attached a piece of 4 5/8  x  2 5/8" Plaid Tidings Designer Series Paper to the top of the box with Stampin' Seal.
I cut a piece of Highland Heather Cardstock with the 2nd largest die of the Stitched Nested Label dies.
I stamped the caped owl image on the bottom of the label and the sentiment on the top left.  I colored the branches only with light and dark Soft Suede Stampin' Blends.
I cut a Circle from Daffodil Delight Cardstock and a Scalloped Circle from Basic Black Cardstock (both from the Layering Circle dies). I attached the circles together and then to the top right hand side of the label with liquid glue.


I stamped another owl image and cut it out with the corresponding Peek-a-Hoot die.  I colored the image with Stampin' Blends:
Light and Dark Crumb Cake
Light and Dark Pumpkin Pie
Dark Daffodil Delight
I attached the owl,  on top of the owl already stamped on the label and overlapping the moon, with Dimensionals.


I cut three bats out of Basic Black Cardstock with the Halloween Magic dies.  I bent the wings up and attached them on the box with Liquid Glue.  I added some sparkle to the bats with Wink of Stella.
I cut the branches from the Peek-a-Hoot dies out of Soft Suede Cardstock and poked then under the owl.
I attached the label onto the box with 5 Dimensionals on the back.


Supplies:
Small Circle Punch
Light and Dark Crumb Cake
Light and Dark Pumpkin Pie
Dark Soft Suede
Dark Daffodil Delight

Wednesday, September 16, 2020

Halloween Treat Box for Dog Bones

Hi Friends!
My project today is a Halloween Dog Bone Treat Box.  I have a bunch of families that Trick-or-Treat in my neighborhood that bring along their dogs and I wanted to make a gift for the pups!
I used Pampered Pets stamp set, Pets dies, Gather Together stamp set, Gathered Leaves dies, Festive Corners stamp set and Brights 6x6 Designer Series Paper.


I started with a piece of Brights DSP sized   6 x 4 3/4".
I scored the 6" side at:
1/2,  2 3/4,  3 1/4  and  5 1/2"
I scored the 4 3/4" side at:
1/2,  3 3/4  and  4 1/4"

To cut and put this box together please watch my Video Tutorial.


I stamped the images and sentiment with Tuxedo Black Ink.
I colored the dog with Stampin' Blends:
Basic Black light and dark for the nose
Smokey Slate light and dark for the body
dark Pumpkin Pie for the collar
I colored the pumpkin with:
light and dark Pumpin Pie and
dark Shaded Spruce


I stamped the sentiment and spider before I put the box together.
I attached the dog to the box with Liquid Glue and the Pumpkins with Dimentionals.
I added some Rhinestones to the bottom left of the front of the box and one one the dogs collar.
I closed the box with a library clip that I tied some Daffodil Delight Ruched Ribbon to.


Supplies:
Light and Dark Basic Black
light and dark Smokey Slate
Light and Dark Pumpkin Pie
Dark Shaded Spruce
Daffodil Delight Ruched Ribbon
Tuxedo Black Ink
Tear and Tape Adhesive
Dimentionals

I hope you enjoyed my project today.
See you next time!
\

Monday, September 14, 2020

Halloween Cookie Box with Festive Post - Stampin' Up!

Hi Friends!
My post today is a 4 1/2  x  2 1/4  x  1 1/4" box that I made to fit a 2 Pack of Oreo Halloween Cookies.  I used Festive Post Stamp set, Plaid Tidings Designer Series Paper and the Rectangular Postage Stamp Punch.

Please Subscribe!


I started with a piece of Basic Black Cardstock sized  8  x  5 1/2".
I scored the 8" side at:
1/2,  3,  4 1/4  and  6 3/4"
I scored the 5 1/2" side at:
1,  3 3/4  and  5"

To cut and put the box together please watch my video tutorial here.


I added Plaid Tidings Designer Series Paper sized:
(2)  2 5/8  x  2 3/8"
(2)  2 5/8  x  1 1/8"
(3)  2 3/8  x  1 1/8"


I stamped the Broom Image from Festive Post stamp set with Tuxedo Black Ink and cut it out with the Rectangular Postage Stamp Punch.  I colored the ties of the broom with a Dark Pumpkin Pie Stampin' Blend.
I attached the Broom Image to a piece of Pumpkin Pie Cardstock sized  1 1/2  x  2 1/8"  with Liquid Glue.
I added a piece of Basic Black Cardstock sized  1 5/8  x  2 1/4"   to the back of the Image with Dimensionals.
I attached it to the front of the box with Liquid Glue.


I punched 2 holes in the top flaps of the box and ran some doubled Linen Thread through it.
I stamped the sentiment onto a piece of Whisper White Cardstock and cut it down to 1 1/4  x  3/4".
I added Pumpkin Pie Cardstock behind it sized  1 3/8  x  7/8".
I added Basic Black as the final layer behind sized  1 1/2  x  1".
I punched a hole in the side of the tag and strung it on the Linen Thread and tied a bow.
I added some Wink of Stella to the Broom tops.


Supplies:
Liquid Glue
Hole Punch

I hope you enjoyed my project today.
See you next time!

Friday, September 11, 2020

Halloween Magic Window Box - Stampin' Up!

Hi Friends!
My project to today is a Rectangle Window Box I made with Halloween Magic dies, Warm Wraps dies and Hallows Night Magic stamp set.
The box measures  4 1/2 x  2 3/4  x  1".


I started with a piece of Gorgeous Grape Cardstock sized  8  x  7".
I scored the 8" side at:
1,  3 3/4,  4 3/4  and  7 1/2"
I scored the 7" side at:
1,  5 1/2  and  6 1/2"

To cut and put this box together please watch my video tutorial here.


I used the Brights 6x6 Designer Series Paper on this box sized:
(2)  4 1/4  x  2 1/2"
(2)  4 1/4  x  3/4"
(2)  2 1/2  x  3/4"
I put the DSP on the box before I put the box together so I could cut the window out.
I cut my window sheet to  4  x  2 1/4".


I used the Warm Hugs dies to cut the two layering shapes for the sentiment.  The circle I cut from Pumpkin Pie Cardstock and the other from Gorgeous Grape Cardstock.
I stamped the Sentiment from Hallows Night Magic onto the Gorgeous Grape piece with Tuxedo Black Ink.


I Stamped the spiders on Gorgeous Grape Cardstock with Versamark Ink and covered them with Black Embossing Powder.  I then cut them out with the Corresponding die.
For the bat I Embossed (with Versamark Ink and Black Embossing Powder) a piece of Basic Black Cardstock and then cut the bats out using the die.


I attached the Sentiment piece on top of the Orange Circle with Dimensionals.  I attached the Orange Circle and Spiders with Liquid Glue.
For the final touch I added Rhinestones around the box.

You can shop for your Stampin' Up! supplies with me here.

Supplies:
Black Embossing Powder
Small Circle Punch for finger hole
Rhinestones
Candy Corn

I hope you enjoyed my 3D project today!
See you next time.

Wednesday, September 9, 2020

Halloween Pouch wint 6x6 Papers using Ghoulish Goodies - Stampin' Up!

Hi Friends!
My project today is a Treat Pouch using a piece of 6x6" paper.  I used Plaid Tidings 6x6 Designer Series Paper, Ghoulish Goodies stamp set and the Lovely Labels Pick a Punch.

You see my Video Tutorial Here.

You can shop Stampin' Up! with Me Here.


I started with a 6x6 piece of Plaid Tidings Designer Series Paper.
I scored 1 side at:
2,  2 3/4,  4 3/4  and  5 1/2"
I turned the  paper to the next side and scored at:
3/4  and  5 1/4"
To cut and put the box together please watch my video tutorial here.


I put a Reese's Peanut Butter Pumpkin candy inside and sealed the bottom of the pouch with liquid glue.  I folded the top flap over the back, punched 2 holes with a 1/8" hole punch and ran some Daffodil Delight Ruched Ribbon through the holes and tied a bow.


I stamped the images from Ghoulish Goodies stamp set with Tuxedo Black Ink onto Whisper White Cardstock and cut them out with the Layering Circles dies.
I cut a Scalloped Circle out of Basic Black Cardstock with the same die set.
I attached the image piece to the Black Scallop with Dimensionals.
I attached the entire Image piece to the middle of the punch with Dimensionals also.


I stamped the sentiment on a piece of Pumpkin Pie Cardstock that was 3/4" wide.  I punched it with the Lovely Labels Pick a Punch and then cut it down to 2".
I punched a hole in the top of the punch, ran some Linen Thread Through it and tied it around the bow.
I added some Wink of Stella on the Witch and cauldron and I added a Rhinestone on the Cats collar.


Supplies:
1/8" Hole Punch
Reese's Pumpkin Shaped Peanut Butter Cup

I hope you enjoyed my project today.
See you next time!

Tuesday, September 8, 2020

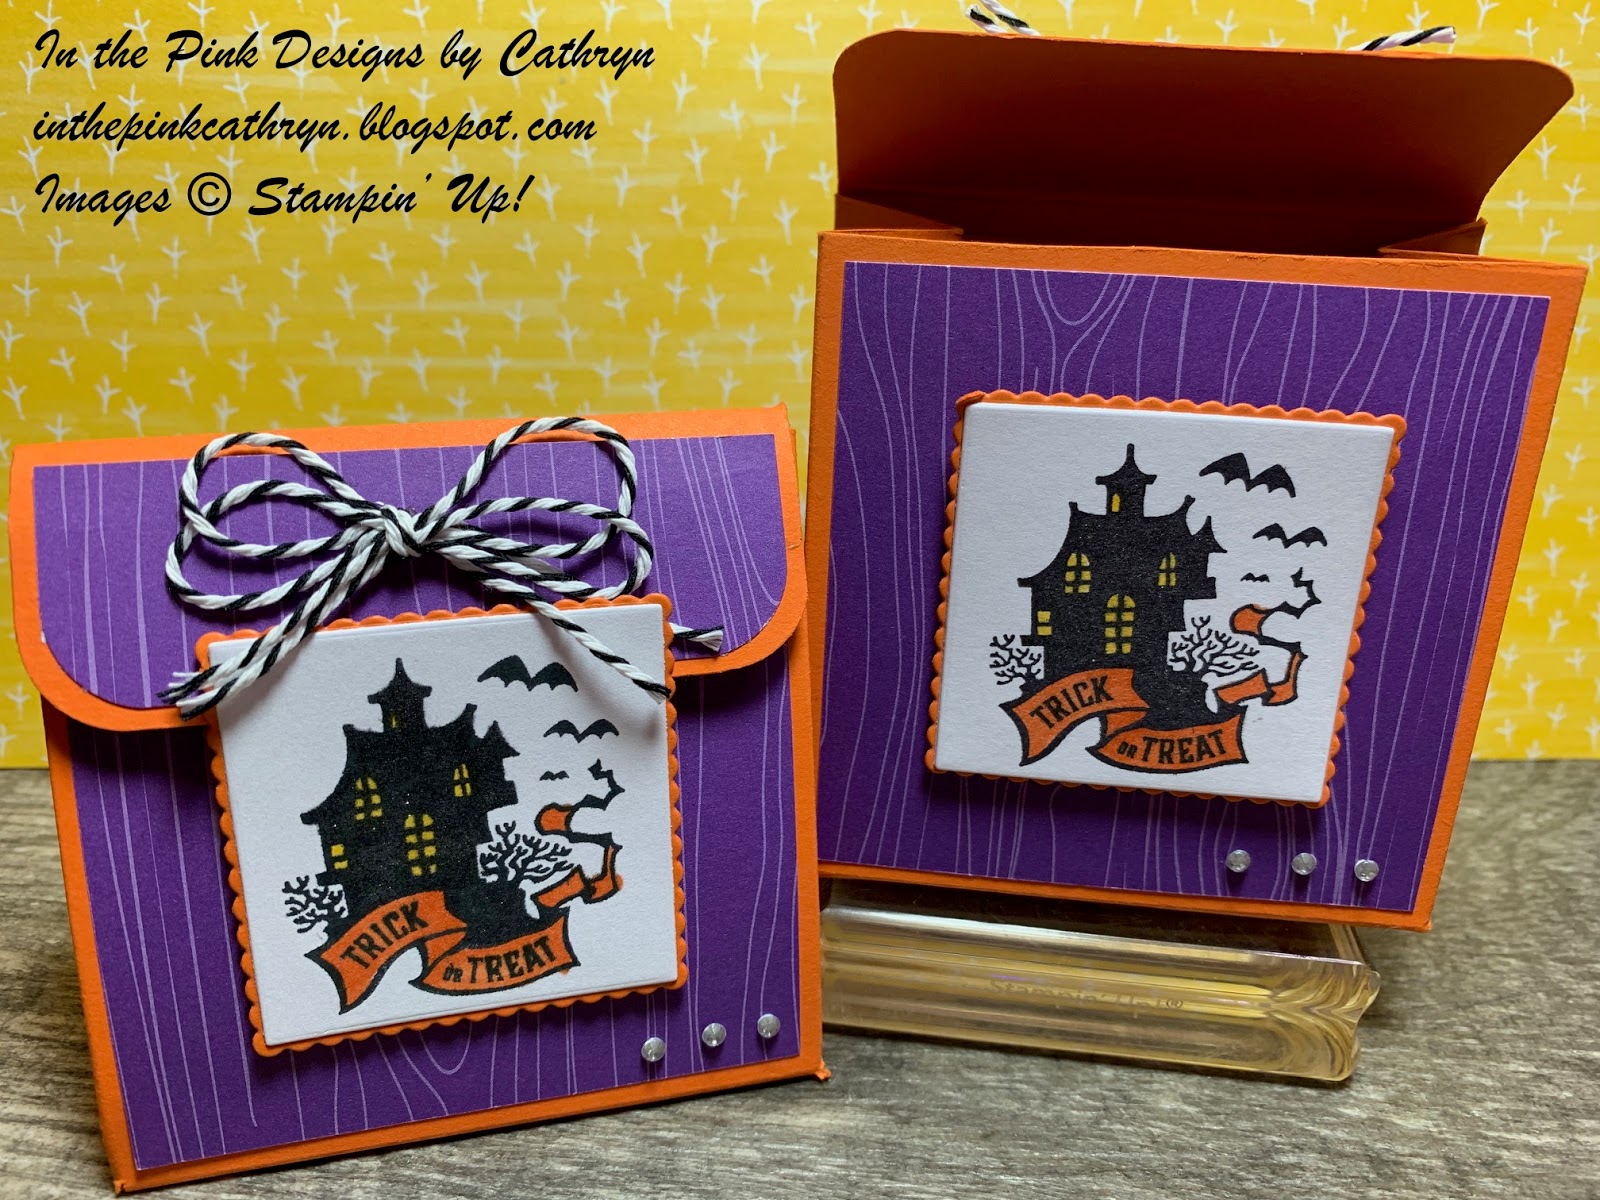
Spooky Tent Box for Dollar Tree Goodies - Stampin' Up!

Hi Friends!
My project today is a Tent Box with a Fold Over Flap.  I made this box to fit some goodies from the Dollar Tree.  I used Everything Essential stamp set, Brights 6x6 Designer Series Paper and Layering Squares dies.

You can see my Video Tutorial Here.

You Can Shop Stampin' Up! with Me Here.


I started with a piece of Pumpkin Pie Cardstock sized 10 1/2  x  6"
I scored the 10 1/2" side at:
3 1/4,  5,  8 1/4  and  10"
I scored the 6" side at:
1 1/4  and  4 1/2"
Turn back to the 10 1/2" side with the 1 1/4" strip on top.
Score to the 1st score line ONLY at:
1 3/8  and  6 3/8"
To cut and put this box together please see my video tutorial here.


I Rounded the corners of the top flap with the Detail Trio Punch.
I added Brights DSP to the Front, Back and Flap sized:
(2)  3  x  3"
(1)  1  x  3"
I cut a square and a scalloped square with the Layering Squares dies with Whisper White and Pumpkin Pie Cardstock.
I stamped the Haunted House Image from Everything Essential stamp set onto a piece of Whisper White Cardstock using Tuxedo Black Ink.


I colored the windows of the image with a Dark Daffodil Delight Stampin' Blend.  I colored the banner with a Dark Pumpkin Pie Stampin' Blend.
I used Liquid Glue to mount the Image onto the Pumpkin Pie Scalloped Square and I attached it to the middle of the box with Dimensionals on the Bottom and Middle only.  The flap tucks under the top of the Image.


I used the the Black and White Twine from the Playful Pets Ribbon Combo Pack to make a double bow.  I attached the bow with 2 glue dots to the middle of the top flap.
I added Wink of Stella to the entire house and added Rhinestones to the bottom right of the box.


You can shop for your Stampin' Up supplies with Me Here.

Supplies:
Everything Essential stamp set
Layering Squares dies
Brights 6x6 Designer Series Paper
Detail Trio Punch
Whisper White Cardstock
Pumpkin Pie Cardstock
Tuxedo Black Ink
Playful Pets Ribbon Combo Pack
Dark Pumpkin Pie Stampin' Blend
Dark Daffodil Delight Stampin' Blend
Wink of Stella
Rhinestone Basic Jewels
Simply Score Tool
Ruler
Goodies from Dollar Tree

Thank you for stopping by today!
See you next time.

Friday, September 4, 2020

Have a Hoot Mini Liquor Bottle Box - Stampin' Up!

Hi Friends!
My project today is a Box sized 4 1/2  x  1 1/2  x  1 1/2".  I made it to fit a Mini Liquor Bottle but it could fit many things.  I used Have a Hoot stamp set, Peek-A-Hoot dies and Brights 6x6 Designer Series Paper.

You Can Shop Stampin' Up! with Me Here!

See My Video Tutorial Here.


I started with a piece of Basic Black Cardstock sized  7 3/8  x  6  3/4".
I scored the  7 3/8"  side at:
1 1/2  and  5 7/8"
I scored the 6 3/4"  side at:
1 1/2,  3,  4 1/2  and  6"
To cut and put the box together you can watch my video tutorial here.


I added Brights 6x6 DSP to all sides and the top and bottom.
(4)  4 1/8"  x  1 1/4"
(2)  1 1/4  x  1 1/4"
I cut a label out of Basic Black Cardstock from the Peek-A-Hoot dies.
I stamped the sentiment on the top of the label using Versamark Ink and White Stampin' Emboss Powder.
I stamped the Owl and Pumpkin Image onto Whisper White Cardstock with Tuxedo Black Ink.


I colored the Image with Stampin' Blends:
Dark Daffodil Delight
Light and Dark Pumpkin Pie
Light and Dark Soft Suede
L and Dark Crumb Cake
Light Mossy Meadow
I cut the image out with the corresponding Peek-A-Hoot die.
I attached it to the Basic Black Label with a Dimensional.


I cut the Spider Web from the same dies out of Basic Black and attached under the label on the top left side.
I tied some Old Olive Ribbon through the top of the label.
I tied a black ribbon around the box and tied a bow on the side.
I put Dimensionals on the top and bottom of the back of the label and attached it over the ribbon.


For the final touches I added some Old Olive Rhinestones (Retired) and put Wink of Stella on the Spider Web and Pumpkin cut outs.

You can shop Stampin' Up Supplies with Me here.

Supplies:
Have a Hoot stamp set
Peek-A-Hoot dies
Brights 6x6 Designer Series Paper
Basic Black Cardstock
Whisper White Cardstock
Versamark Ink
White Stampin' Emboss Powder
Memento Tuxedo Black Ink
Heat Tool
Dimensionals
Old Olive Ribbon - Ornate Garden Ribbon Combo Pack
Stampin' Blends:
Daffodil Delight
Pumpkin Pie
Shaded Spruce
Crumb Cake
Mossy Meadow
Rhinestones

I hope you enjoyed my project today.
See you next time!

Wednesday, September 2, 2020

Hallows Night Magic Rectangular Box - Stampin' Up!

Hi Friends!
My project today is a 4 1/2  x  4 1/2  x 1" Rectangular Box with the opening at the side.  I used Hallows Night stamp set, Halloween Magic dies and Brightly Gleaming Specialty Designer Series Paper.


I started with a piece of Basic Black Cardstock sized  8 x 7".
I scored the 8" side at:
1/2,  3 1/4,  4 1/4  and  7"
I scored the 7" side at:
1,  5 1/2  and  6 1/2"
To cut and put the box together please watch my video tutorial here.


(2)  2 5/8  x  4 3/8"
(2)  4 3/8  x  7/8"
(2)  7/8  x  2 5/8"
I attached the paper to the top, bottom and all sides with Stampin' Seal.

I cut both label from the Halloween Magic dies.  The large one from Basic Black Cardstock and the smaller one from Pretty Peacock Cardstock.
On the Pretty Peacock Label I stamped with Versamark Ink and sprinkled with Black Embossing Powder, then used my heat tool on it.
I stamped the small bat image with Tuxedo Black Ink onto Whisper White Cardstock and cut it out with the corresponding die.


I put 3 packages of Pop Rocks Candy inside the box.  I wound some Metallic Edges Ribbon around the box and tied a bow on the right hand side of what will be the top.
I attached the Basic Black Label over the ribbon with Dimenstionals at the top and bottom of the back of the label.
I attached the Pretty Peacock Label on top of the Black one with Dimensionals.
I added the bat on the lower left hand corner of the labels with a glue dot.
For the final touch I added some Rhinestones to the labels.


Supplies:
Hallows Night Magic stamp set
Halloween Magic dies
Brightly Gleaming Specialty Designer Series Paper
Pretty Peacock Cardstock
Basic Black Cardstock
Whisper White Cardstock
Versamark Ink
Tuxedo Black Ink
Black Embossing Powder (from my stash)
Rhinestone Basic Jewels
Metallic Edge Ribbon
Stampin' Seal Adhesive
Simply Score Tool
Heat Tool

Thank you for stopping by my blog.
See you next time!