Friday, October 30, 2020

Thanksgiving Hostess Gift Box - Stampin' Up!


Shop Stampin' Up! Here

Hi Friends,
My project today is a  3  x  3  x  1" box with a Belly Band.  I made it to be a Thanksgiving Favor or Hostess Gift Box.  I used Gilded Autumn Designer Series Paper, Arrange a Wreath stamp set, Hippo and Friends dies and Layering Circle dies.


I started with a  11 x 5"  piece of Mint Macaron Cardstock.
I scored the 11" side at:
3, 4, 7 and 8"
I scored the 5" side at:
1 and 4"
For the Belly Band I used a  9 1/2  x  1 1/4" piece of Mint Macaron Cardstock.
To cut and put the box and Belly Band together please watch my video tutorial here.


I attached the Gilded Autumn DSP to the top and sides of the box in sizes:
(1)  2  3/4  x  2  3/4"
(4)  2  3/4  x  1"
I used the Detail Trio Punch to round the corners of the bottom of the larger piece.


I used a die from the Hippo and Friends dies to cut some Gold Foil paper for the large label and the sentiment label from Cajun Craze Cardstock, for the top of the box.  I used the Layering Circle dies to cut the circle out of the same DSP and the Scallop from Cajun Craze Cardstock.
I stamped the small label with a sentiment from Arrange a Wreath stamp set with Versamark Ink.  I sprinkled it with Gold Stampin' Emboss Powder and Embossed it with my Heat Tool.


 I wound the Belly band snuggly (not too tight, but not loose) around the box and glued the ends (with Liquid Glue) to each other at the top of the box.  Make sure it can be pulled off the box with reasonable ease.
Next I removed the belly band and glued the gold label over the joined ends of the band with Liquid Glue.
I attached the Scallop circle and smooth circle together with Liquid Glue, then attached it on top of the gold label with Dimensionals.
I attached the Sentiment Label on top of the pile with more Dimensionals.
I tied a double strand of the Gold Cord from the Wonder of the Season Ribbon Combo Pack.  I attached the bow to the box with a Glue Dot.


Supplies:

I hope you enjoyed my project today!  If you have any questions or suggestions, please let me know in the comments.  See you next time!

Wednesday, October 28, 2020

Quick Halloween Treat Bag using 6x6 Paper and Everything Essential stamp set


Shop Stampin' Up! Here

Hi Friends!
My project today is a Quick Halloween Treat Bag.  This is great for last minute gifts for family, co-workers or Trick or Treaters!  I  only used 1 sheet of 6x6 Plaid Tidings Designer Series paper for the bag.  I also used Everything Essential stamp set, the Essential Tag Punch and Detail Trio Punch.


I started with a 6 x 6" piece of Plaid Tidings Designer Series Paper.
I scored the first side at:
1,  2 3/4,  3 3/4  and  5 1/2"
I turned the paper 1/4 turn at scored at:
1  and  4 1/2"
To cut and put the  box together please watch my video tutorial here.


I punched a hole in the top of the bag and ran some Glittered Organdy Ribbon through it and tied a bow at the top.
I stamped the pumpkin images from Everything Essential stamp set onto Pumpkin Pie Cardstock and Whisper White Cardstock.
I colored the image on the Whisper White Cardstock with Light and Dark Pumpkin Pie Stampin' Blends.
I fussy cut the colored image without the stem.


I Punched out the Image on the Pumpkin Pie Cardstock with the Essential Tag Punch.
I attached the colored image over the pumpkin on the tag with Dimensionals.


I used liquid glue to attached the Pumpkin Pie Tag over the Basic Black Tag.
I punched a hole in the top of the tag and put some gold string, from the Forever Greenery Ribbon Combo Pack, through it.
I tied the string around the bow and tied it in the back.


Supplies:

I hope you enjoyed my project today.
See you next time!

Monday, October 26, 2020

Thanksgiving Pouch with Gilded Autumn Specialty Paper


Hi Friends,
For my project today I used the Gilded Autumn Specialty Designer Series Paper.  I made a pouch for Thanksgiving.  I put some Pumpkin Seeds inside but a small gift or some other goodies would also fit.  It measures  4  x  4  x  3/4".  I also used A Wish for Everything stamp set and North Pole Wonder dies.


I started with a piece of DSP sized  10  x  5 3/4".
I scored the 10" side at:
1/2,  4 1/2,  5 1/4  and  9 1/4"
I scored the 5 3/4" side at:
3/4  and  4 3/4"
To cut and put the pouch together you can watch my video tutorial here.


Using the North Pole wonder dies I cut the spiked circle out of Gold Foil Paper. (In the other version I cut it from Cajun Craze Cardstock),  I cut the round circle,  from the same die set, out of the opposite side of the DSP.
I stamped the sentiment, with Early Espresso Ink, from the A Wish for Everything stamp set.
I attached the sentiment circle to the foil with liquid glue.


I cut the Leaves from Gold Foil Paper using Forever Flourishing dies.
I played them on the pouch, put Dimensionals on the back of the Sentiment piece and layer the Dimensionals on top of the gold leaves.  If the gold leaves are still loose add a few dots of liquid glue under some of the leaves.


I tied a bow with Metallic Copper Ribbon from the Basketweave and Metallic Ribbon Combo Pack.
I attached it to the front of the pouch with 2 Glue Dots.
For the final touch I added some Gilded Gems to the bottom of the circle.
I wrapped my goodies in Gold Foil Tissue Paper and slipped it in the pouch.


Supplies:

Thank you for stopping by today, see you next time!

Friday, October 23, 2020

Halloween Treat Bag with Peek a Hoot - Stampin' Up!


Shop Stampin' Up! Here

Hi Friends!
For my project today I wanted to make a project that looked like a brown bag.  It would be perfect for the kids and men in our lives!  I used Have a Hoot stamp set, Celebration Label dies, Halloween Magic dies, Layering Circle dies and the In Color Designer Series Paper.


I started with a piece of  Crumb Cake Cardstock  sized  10 1/2  x  6 1/2.
I scored the 10 1/2" side at:
2 1/2,  5,  7 1/2,  10"
I scored the 6 1/2" side at:
2"
To cut and put the bag together you can watch my tutorial here.


I cut a  4 1/4  x  2 1/4"  piece of 2020 - 2021 In Color Designer Series Paper.
I stamped the bottom of the paper, with the sentiment from Have a Hoot stamp set,  with Versamark Ink.
I sprinkled the sentiment with White Stampin' Emboss Powder and heated it up with my Heat Tool.  I attached the stamped paper to the front of the bag with Stampin' Seal.


I cut the label with Celebration Label dies out of Pumpkin Pie Cardstock.  I stamped the Image from Peek a Hoot stamp set with Tuxedo Black Ink on the Pumpkin Pie label.
I stamped a second of the same image on a scrap piece of Whisper White.  I colored ONLY the owl with Stampin' Blends.  I fussy cut the image out and attached it over the Owl on the label with liquid glue.
I colored the images with Stampin' Blends:
Light Soft Suede
Light and Dark Smokey Slate
Dark Basic Black
Light Mango Melody
I cut the Scallop circle and smaller circle out of Daffodil Delight Cardstock and Basic Black Cardstock, with the Layering Circle dies.
I cut the bat out of Basic Black Cardstock using the Halloween Magic dies.


I attached the Moon and bat with Liquid Glue and the Label with Dimensionals.  I closed the box with a Library Clip on top.


Supplies:
Light Soft Suede
Dark Basic Black
Light Mango Melody
Light and Dark Smokey Slate

I hope you enjoyed my project today.
See you next time!

Thursday, October 22, 2020

Spooky Pumpkin Box - Stampin' Up!


Shop Stampin' Up! here

Hi Friends!
My project today is a Spooky Pumpkin Box I made with Everything Essential stamp set, Halloween Magic dies, Peek a Hoot dies, Regals 6x6 Designer Series Paper and the Essential Tag Punch.


I started with a piece of Basic Black Cardstock sized  7 1/2  x  7".
I scored the 7 1/2" side at:
1,  3 1/2,  4 1/2  and  7"
I scored the 7" side at:
1,  5  and  6"
To cut and put this  box together please watch my Video Tutorial here.


I used the Regals  Designer Series Paper sized:
(2)  2 1/4  x  3 3/4"
(2)  3/4  x  3 3/4"
(2)  2 1/4  x  3/4"
I attached the paper to the box with Stampin' Seal.
I attached a velcro dots to the inside flap of the box and the top of the outside of the box.


I cut the border from Halloween Magic dies, cut it down to 2 1/4" in length and attached it to the front fold over piece with liquid glue.
I stamped the pumpkin image from Everything Essential stamp set on a piece of Highland Heather and a piece of Whisper White.
I punched out the Highland Heather pumpkin with the Essential Tag Punch Punch.
I colored the other pumpkin with Light and Dark Pumpkin Pie Stampin' Blends.


I cut the web from a Basic Black Cardstock with the Peek a Hoot dies.  I attached it to the box with liquid glue.
I attached the Highland Heather tag to the box with Dimensionals.
I added 3 Iridescent Pearls to the top of the tag.  I put Glittered Organdy ribbon under the lid and tied a bow on the top of the box.
For the final touch I added Wink of Stella to the Pumpkin.


Supplies:

I hope you enjoyed my project today.  See you next time!

Monday, October 19, 2020

Chocolate Turkey Box with Plaid Tidings - Stampin' Up!


Hi Friends!
My project today is a Box I made for the Chocolate Turkeys I give my children for Thanksgiving.  I used Plaid Tidings Designer Series Paper,  Arrange a Wreath stamp set, Wreath Builder dies and the Essential Tag Punch.  
The Turkey is 1 ounce and the box measures 2 1/2  x  4 1/4  x  1 3/4".


I started with a  9  x  6 1/4" piece of Blackberry Bliss Cardstock.
(In my sample I used Cajun Craze)
I scored the 9" side at:
1/2,  3,  4 3/4  and  7 1/4"
I scored the 6 1/4" side at:
1 3/4,  4 3/4  and  5 3/4"

To cut and put the box together you can watch my video tutorial here!


I cut the hole in the box with a Circle die from the Layering Circle dies.  I cut a piece of Blackberry Bliss Cardstock with a Scallop Circle die and then cut the middle out with the same size Circle die I used to make the hole in the box.
I attached the Scallop piece to the front of the box over the circle with liquid glue.


I attached a  2 x 2"  piece of Window Sheet to the inside of the box, covering the circle opening, with a glue dot in the 4 corners of the sheet.
I closed the top of the box with a gold Library Clip.
I punched 2 tags using the Essential Tag Punch.  One from of Blackberry Bliss Cardstock and one From a Gold Foil Sheet.
On the Blackberry Bliss tag I embossed the sentiment with Versamark Ink and Gold Stampin' Embossing Powder.


I attached the tags, the Gold Foil in back, with liquid glue.
I punched a hole in the top of the tag and looped Gold String (from Wonder of the Season Ribbon Combo Pack) through the tag.
I wound the Gold String around the back of the Library clip and tied a bow in the front.
For the Final Touch I added 3 Gilded Gems to the bottom left of the box.


Supplies:


I hope you enjoyed my project today!  Thank you for coming to my blog.
See you soon!

Friday, October 16, 2020

Halloween Party Drink, Pouch Tag - Halloween Magic dies Stampin' UP!


Hi Friends!
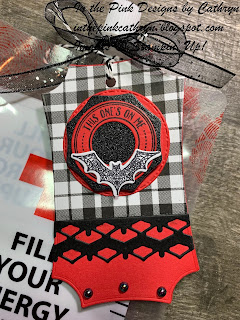
My project today is a tag that I made for some Halloween Drink Pouches.  I used Halloween Magic dies, Hallows Night Magic stamp set, Warm Hugs Stamp set, Warm Wraps dies and Plaid Tidings Designer Series Paper.


I cut to of the large label dies from Halloween Magic dies.  1 from Poppy Parade Cardstock and one from Plaid Tidings DSP.
I cut 1 3/8" off the bottom of the Plaid label.
I attached the top of the plaid label to the Red label with liquid glue.
I cut Black Cardstock with the Border label from the same set.
I attached a piece of the border on the Red Label below the Plaid with liquid glue.


I used the Warm Wraps dies to cut a circle out of Poppy Parade Cardstock and an 8 sided shape from Black Glitter Paper.
I stamped the "This one's on me" circle on Poppy Parade Cardstock with Tuxedo Black Ink and cut it out with the matching dies.
I stamped the small bat from Hallows Night Magic stamp set on Whisper White Cardstock with Tuxedo Black Ink and cut it out with the corresponding die from Halloween Magic dies.


I attached the bat to the sentiment circle, covering the "Merry Christmas", with liquid glue,
the circle to the Glitter Paper with liquid glue and the Glitter Paper to the Red Circle with Dimensionals.
I attached the entire piece to the top of the tag with Dimensionals.


I put glue on only the edges of the left over Plaid label and attached it to the back of the tag to make a little pocket.
You can use the little pocket for some Cash!


I purchased my Drink Pouches from the Halloween section at Walmart.  They are also available on Amazon.


Supplies:

I hope you enjoyed my project today.
See you next time!

Wednesday, October 14, 2020

Halloween Doorhanger with Ghoulish Goodies - 3D Stampin' Up

Shop Stampin' Up! here.

Hi Friends!
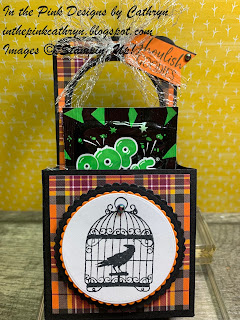
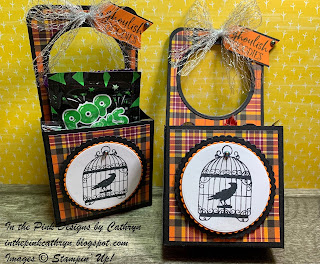
My project today is a door hanger for Halloween.  I used Ghoulish Goodies stamp set, Plaid Tidings Designer Series Paper, Layering Circle dies and Banner Pick a Punch.


I started with a piece of Basic Black Cardstock sized  9  x  7 1/4"
I scored the 9" side at:
1/2,  3 1/2,  4 3/4  and  7 3/4"
I scored the 7 1/4" at:
1 1/4"
then score ONLY up to the 3rd Scoreline at 4 1/4".
Turn your paper 180 degrees to the 7 1/4" other side and score ONLY to the 1st Scoreline @ 3".

To  cut and put the door hanger together you can watch my tutorial here.


I used Plaid Tidings DSP on this project sized:
(1)  5 3/4  x  2 3/4"
(1)  2 3/4  x  2 3/4"
(2)  1  x  2 3/4"
I attached the DSP Before I cut the circle in the top with the Layering Circle dies.
I used 2 of the Circle dies to make the border around the opening.


I cut a scallop circle from Basic Black Cardstock and a smaller one from Pumpkin Pie Cardstock.
I stamped the image from Ghoulish Goodies on a circle cut from Whisper White Cardstock with Tuxedo Black ink. (I used the same die for this that I used to cut the hole in the top.)


I attached the image to the Pumpkin Pie scallop circle with liquid glue,
then the Pumpkin Pie scallop to the Basic Black scallop with Dimensionals.
I mounted the entire piece on the front of the box with Dimensionals.


I tied I bow with Metallic Mesh Ribbon and attached it to the top of the box with 2 glue dots.
I stamped the sentiment on a  3/4"  piece of Pumpkin Pie Cardstock and attached it to a piece of  7/8"  of Basic Black Cardstock.
I used the Banner Pick a Punch on the right end and attached it to the top of the box with liquid glue.


Supplies:

I hope you enjoyed my project today.
See you next time!

Monday, October 12, 2020

Gilded Autumn Ghirardelli Box - Stampin' Up!
Shop Stampin' Up! Here

Hi Friends!
My project today is a Treat Box using Gilded Autumn Specialty Designer Series Paper, Gather Together stamp set and the Essential Tag Punch.  This box can fit many other goodies.  The base is  2  x  2  x  1 1/2".


I started with a piece of Gilded Autumn DSP sized  9 1/2  x  5".
I scored the 9 1/2" side at:
1/2,  2 1/4,  3 3/4,  5 3/4,  7 1/4  and  9".
I scored the 5" side at:
1 1/2  and  3 1/2".

To cut and put the box together you can watch my video tutorial here.


I punched a hole in the top of the box and put a piece of Mint Macaron Basketweave Ribbon through.  I tied it together at the top of the box with Metallic Copper Ribbon.

www
I used the Essential Tag Punch to cut 1 tag each of Mint Macaron Cardstock and Cajun Craze Cardstock.
I embossed the Cajun Craze tag with the Wrapped in Texture "Basketweave" Embossing Folder.


I stamped on the Mint Macaron Tag.  I stamped the Wheat Image from Gather Together stamp set in Mint Macaron.
I stamped the sentiment in Early Espresso.
I attached the Mint Macaron Tag on top of the Cajun Craze Tag with liquid glue.
I punched a hole in the top of the front tag, put the copper ribbon through the hole and tied a bow.
For the final touch I added 3 gold Metallic Pearls to the tag.


Supplies:

I hope you enjoyed my project today.
See you next time!